Walkthrough for Broken Sword 4: The Angel Of Death
============================================================
PART 1
NEW YORK
============================================================
~~~~~~~~~~~~~~~~~~~~~~~~~~~~~~~~~~~~~~
NEW YORK BAIL BONDS BUILDING
~~~~~~~~~~~~~~~~~~~~~~~~~~~~~~~~~~~~~~
YOUR OFFICE
After the intro, you find yourself trapped in your office, with your new client, Anna Marie.
After your last adventure, you’ve now settled down, and run a Bail Bonds agency in New York. Anna Marie was waiting for you in your office, and she asked for your help. She mentioned a manuscript. Then a couple of thugs appeared, and begin shooting the place up, leaving you and Anna Marie trapped in your office. You have to find a way out of here.
Look at the GOLF CLUB in the corner on the right, and pick up the GOLF CLUB. Walk left a few steps. Look at the hi fi on the floor against the wall. Look at the door in the back wall, and use your GOLF CLUB to break through the door.
FILING ROOM
Look at the filing cabinet to the left of the door. Push it over, to block the door and stop the gangsters getting in. Climb up onto the filing cabinet, then jump up through the hole in the ceiling. Anna Marie follows you.
FLOOR ABOVE YOUR OFFICE
Watch the cut scene, as Anna Marie tells you a bit more about her manuscript. The lift starts moving. The thugs are trying to find you, and you have to stop them. Anna Marie instinctively holds to lift door open, so the thugs can’t get here, but she can’t hold it open forever. You need to help her out. Use your GOLF CLUB with the space under the lift door, to prop it open.
Explore the room, and find the grille covering the extractor fan in the top right corner. Try to pull it off, but you can’t. From your Inventory, use ANNA MARIE’S ICON with the grille. She helps you to pull the grille off the wall. Look at the extractor fan to see that the wall around it is crumbling away. Pull the extractor fan out from the wall. Now move the extractor fan over to the lift. Click the right mouse button to grip \ release the extractor fan. Move the extractor fan into the gap underneath the lift door. Now the lift isn’t going anywhere. Retrieve your GOLF CLUB from the gap under the lift door.
Go back to the hole at the top right, and climb in there.
LEDGE OUTSIDE THE BUILDING
Click on the area on the right to hug the wall, then inch right along the narrow ledge, until you reach the fire escape ladder. Click the right mouse button to step away from the wall, then click on the ladder to climb up to the roof. Step up onto the roof.
ROOFS
On the roof, walk right a few steps, to the ladder in the middle of the roof. Climb up the ladder, onto the platform. Walk along the platform, and click on the right edge of the platform to release the chain. Look at the chain that’s now hanging below the platform, and try to grab the chain, but it’s out of reach. Use your GOLF CLUB with the chain below the platform, to grab it. Watch the cut scene, as you swing across to the roof of the next building.
You have to find a way to get Anna Marie onto this roof. Walk back a few steps, and look at both handles behind the pillar. They are used to rotate the loading joist. The handle on the left is broken, so just ignore it. Use the handle on the right to rotate the joist. Watch the cut scene as Anna Marie crosses over the joist, and joins you.
WAREHOUSE
Watch the cut scene, as you make your way into the warehouse. Walk left a few steps. Click on the area on the wall, above the planks, to jump up and grab onto the ledge. Shimmy left a bit. Grab the pipe above you, on your left - it will break loose. Shimmy left again, until you reach the next ledge. Click on the floor to drop down onto the floor.
Walk left, to a gap in the floor. Click on the floor on the left, to jump over the gap. Walk left, to the wall. Click on the wall to hug it. Now inch left, over the narrow ledge, until you reach the next part of the floor. Step away from the wall. Walk through the hole in the wall.
There is an opened door here - walk up, through the door.
From this angle, outside the building, you can see that the door is tied open. Take the STRING that’s keeping the door open, then enter the building again.
Close the door, and slide the door bolt across, to keep it locked. Right click on the door, and select the Gear Icon. You kick the door down, causing it to fall over, and create a bridge for Anna Marie.
If you’re outside the building, go back inside. Climb down the stairs, all the way down to the Ground Floor. Try to open the door on the right, but something is blocking it from the other side. Looks like you’ll need to find another way out of here. Climb up 1 level, to the 1st Floor. Head out through the doorway.
Walk left, over the floorboards, to the end of the room. Look at the rusted pipe on the floor, on the left side of the room. Look at the nearby breaker switch, on the wall on the left.
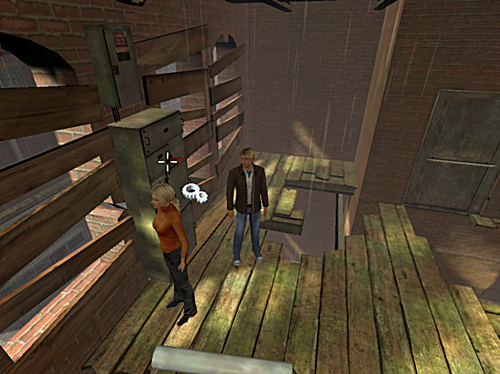
Try to use the breaker switch, but it keeps flipping back to the ‘ON’ position. Work your way back along the broken floorboards, past the door you came from, then head right, and go down the slope. You’ll see a wooden beam in front of you.

Click on the plank in front of you, or click on the floor beneath you. You’ll lower yourself down, so you are hanging on the edge of the floor. Drop down to the floor below. Walk right a few steps, then walk over the planks, until you see the live electric cables. Click on the cables, to hear the story about Granny Stobbart. Better keep away from them!
Head left, and make your way back to where Anna Marie is waiting. Click on the overhanging floorboards, and pull yourself up onto the floor.
Head left, and work your way back across the floorboards, back to the rusty pipe and the breaker switch. Use ANNA MARIE’S ICON from your Inventory, with the breaker switch (this won’t work, unless you’ve seen the live cables below). She holds down the breaker switch for you.
Head right, and work your way across the room, back to the live cables. Now that Anna Marie is holding down the breaker switch, the cables are no longer live. Continue past the cables, and right over the floorboards, until you see a large crate sitting in front of a door. Click on the crate to move it. You automatically open the door, allowing Anna Marie to re-join you.
Walk right, to the security shutters. Try to lift the security shutters, but you’re not strong enough. Use ANNA MARIE’S ICON from your Inventory - she’ll try to lift the security shutters, but she can’t do it either. Use the handle to the right of the security shutters, to wind them up. It works. However, if you let go of the handle, the security shutters just fall back down again. Okay, use ANNA MARIE’S ICON with the handle to the right of the security shutters, so she winds the shutters open. Now click on the security shutters to hold them open, while Anna Marie climbs through.
Watch the cut scene, as you and Anna Marie escape to her hotel.
~~~~~~~~~~~~~~~~~~~~~~~~~~~~~~~~~~~~~~
HOTEL ALFONSO
~~~~~~~~~~~~~~~~~~~~~~~~~~~~~~~~~~~~~~
LOBBY
Well, you may have escaped the goons at your Bail Bonds office… but you’re not out of the woods yet. As you enter the Lobby, Anna Marie recognises another of the goons. To top is off, she’s lost her handbag, which contained the key to her hotel room - Room 23. So you have to find a way into her room, while she hides in the alley outside.
Try to use the phone booths in the back wall - oops, they’re for paying customers only. Talk to Alfonso, behind the Reception Desk, and work through all the conversation topics. Alfonso gives you a NEW YORK HOTEL FLYER. Look at NEW YORK HOTEL FLYER in your Inventory, to get the hotel’s phone number. Look at the LIGHTER behind the glass partition. Talk to Alfonso again, and ask about the lighter, to learn that that‘s all he has left to remind him of his father. Walk left a few steps, Look at the grandfather clock, and try to use the grandfather clock. Alfonso warns you not to touch it. Try to use the water cooler machine on the left, but it’s out of order. Walk left a few more steps, and look at the security door. Try to open the door - it’s locked, and you need a security key card to get through it. Walk right, to the Lounge Area.
LOUNGE AREA
There’s a man, Thelwell Minster, reading a book in this area. Talk to him, and work through all the conversation topics. You learn that he’s here to buy some paintings of geese. Examine his book, to learn that there is a KEY CARD tucked in between the pages of the book. Try to take the KEY CARD, but you only end up upsetting the man. Look at the cigarette dispenser on the right, and try to use it, to learn that it’s out of order. Look at the drinks vending machine on the right, and try to use it, to learn that it’s out of order. Open the door on the right, and head through, into the bathroom.
BATHROOM
Use your PDA from your Inventory, and select the following options.
- Phone
- Alfonso’s Hotel.
When Alfonso answers, work through the conversation topics. You trick Alfonso into telling Thelwell that there’s a phone call for him. When Thelwell goes to take his (non existent) call, leave the bathroom.
LOUNGE AREA
Thelwell has left his book on the table, while he goes to take his call. Quickly, pick up the book to get the HOTEL KEY CARD. You don’t have much time before Thelwell returns. Now go left, back to the Lobby.
LOBBY
Walk left to the security door. Look at the electronic card reader next to the security door. Use HOTEL KEY CARD with the electronic card reader to unlock the security door, then walk through the door to the stairwell.
STAIRWELL
Climb up the stairs to the 1st Floor.
1ST FLOOR
You get a phone call from Anna Maria. She’s trapped on the fire escape, and it’s only a matter of time before the goons find her. She asks you to get into her room, and open the bathroom window for her. Look at the yellow ‘Fumigation Warning’ sign that’s on the stairs leading up. Look at the pile of dead bugs on the stairs, and pick up a DEATH WATCH BEETLE. Yuck!
Go left, into the corridor with all the hotel rooms. You hear banging coming from the cleaner’s cupboard (1st door on the left), but a goon warns you to just ignore it. Try to open the cleaner’s cupboard, but again, you are warned away from there.
Walk up along the corridor. Look at the flower vase on the table on the right, to see that the flowers are completely dry. Try to enter the last room on the right - Anna Maria’s room, but the goon guarding the room stops you. Look at the sprinklers on the ceiling - they could sprinkle out a lot of water! Walk up to the window at the end of the corridor.
Look at the window - it looks out over the front of the building. Open the window. The goon isn’t happy about it, but you open it anyway. Walk down the corridor, and go back to the stairwell.
Climb down the stairs to the Ground Floor.
Use HOTEL KEY CARD with the electronic card reader next to the door. Head through the door, back into the Lobby.
LOBBY
Go to the Reception Desk, talk to Alfonso, and work through all the conversation topics. Walk left to the Grandfather clock. Use the DEATH WATCH BEETLE with the Grandfather clock. Talk to Alfonso again and tell him about the beetle. Alfonso rushes over to inspect his beloved Grandfather clock. While he is away, quickly open the glass hatch on the right, and take the LIGHTER from the Reception desk. Now walk left to the security door.
Use HOTEL KEY CARD with the electronic card reader to unlock the security door, then walk through the door to the stairwell.
STAIRWELL
Climb up the stairs to the 1st Floor.
1ST FLOOR
Go into the corridor on the left, with all the hotel rooms.
Walk up to the window. Wait until the goon is doing his Elvis-dance, then open the window again. Now walk down to the dry plant on the table. The goon goes to close the window. Seize this opportunity. While he has his back to you, use the LIGHTER with the dry plant to start a fire, thus activating the sprinkler system. The goon runs for cover. Open the last door on the right, and enter Room 23.
ROOM 23 - ANNA MARIA’S ROOM
The room has been ransacked! Look at the safe next to the window, to realise that it’s empty. They’ve taken Anna Maria’s manuscript. Walk down a few steps, and pick up PEN FROM HOTEL ROOM from the floor. Make your way into the bathroom on the left.
Look at the extractor fan in the panel at the end of the bathroom. Look at the control switch in the panel, and use the control switch to turn off the extractor fan. Tie STRING to the extractor fan, then use the control switch again to turn the extractor fan back on. Watch the cut scene with Anna Maria. Talk to Anna Maria and work through the conversation topics. There’s nothing else you can do here, so leave the room.
1ST FLOOR
Walk down a few steps, and look at the cleaner’s cupboard again - the 1st door on the left. But the goon, who’s watching from the lift, tells you to stay away from the door. Look at the numeric keypad next to the door. Pity you don’t know the code for this. Use the NEW YORK HOTEL FLYER with the cleaner’s cupboard door. Use PEN FROM HOTEL ROOM with the cleaner’s cupboard door. You hear shuffling from behind the door, then the NEW YORK HOTEL FLYER and the PEN FROM HOTEL ROOM both appear on the floor again. Pick both items up. There’s a number scribbled on the NEW YORK HOTEL FLYER - 5837X. Use the numeric keypad next to the cleaner’s cupboard door. You open the door, and find the missing Receptionist, who’s not very happy about being locked up in the cupboard. Who can blame her? You automatically return to your office.
~~~~~~~~~~~~~~~~~~~~~~~~~~~~~~~~~~~~~~
NEW YORK BAIL BONDS BUILDING
~~~~~~~~~~~~~~~~~~~~~~~~~~~~~~~~~~~~~~
RECEPTION AREA
Watch the cut scene with poor Virgil. Your building has been ransacked! Talk to Virgil - he’s fuming that his music player has been smashed, so he’s lost all his music. Head up, into your office.
YOUR OFFICE
Walk up a few steps, and look at the ITALIAN CIGARETTES on the top edge of your desk. Strange. Nobody in your office smokes. Take the ITALIAN CIGARETTES. Walk down, and leave your office.
RECEPTION AREA
Click on the door on the right, opposite Virgil, to leave the building.
MAP
Go back to Hotel Alfonso.
~~~~~~~~~~~~~~~~~~~~~~~~~~~~~~~~~~~~~~
HOTEL ALFONSO
~~~~~~~~~~~~~~~~~~~~~~~~~~~~~~~~~~~~~~
LOBBY
You’re greeted by the Receptionist you saved, and a policeman. Talk to the Receptionist, Juanita, and work through all the conversation topics. Talk to the policeman and work through all the conversation topics. Show the ITALIAN CIGARETTES to the policeman. Talk to the policeman again and work through the conversation topics. Talk to Alfonso and work through all the conversation topics. Head right, and leave the hotel.
MAP
Go to Mama Martino’s Meat Packing.
~~~~~~~~~~~~~~~~~~~~~~~~~~~~~~~~~~~~~~
MAMA MARTINO’S MEAT PACKING
~~~~~~~~~~~~~~~~~~~~~~~~~~~~~~~~~~~~~~
GROUNDS
Enter the small Salami Shop at the back.
SALAMI SHOP
Look at Chico Garella behind the counter. Look at the bloody apron hanging up on the wall behind the counter. Talk to Chico and work through all the conversation topics. You realise that he’s desperate for a cigarette, so give him the ITALIAN CIGARETTES you found in your office. When prompted, choose the SALAMI as trade. Now leave the shop.
GROUNDS
Stand next to the wall, below the wooden pallets, so you can still see Chico through the window. Wait for a few moments. When you see Chico leave through the blue door at the back of the shop (he’s going out for a smoke), quickly enter the Salami Shop again.
SALAMI SHOP
Quickly take the bloody apron from behind the counter, then leave the shop.
GROUNDS
You automatically wear the apron. This lets you blend in, so you can explore the premises freely. Walk down to the bottom of the grounds, then head up the ramp on the left. Try to open the metal shutter for the loading bay, but it’s locked. Continue along the ramp, until you see the guard. Talk to the guard and work through the conversation topics. Walk down, and enter the refrigerated truck.
In the truck, look at the pile of ice in the corner. It’s beginning to melt. Take some ICE FROM FREEZER TRUCK, then leave the truck again.
Walk up, into the Factory.
FACTORY
Have a look around the factory if you like. Notice the pigs hanging from the line above. When you’re ready, head up through the door in the back wall.
CONVEYOR BELT AREA
Make your way to the top-right corner of the room, opposite the conveyor belt. Look at the FIRE PROOF BLANKET that’s hanging on the wall, and take the FIRE PROOF BLANKET. Now walk left a few steps, and up through the door.
DUMPSTER AREA
Ignore that blue door for the moment. Walk left a few steps, and look at the bone crunching machine. A bunch of safety keys are hanging from the key slot, so take MACHINE SAFETY KEYS from the machine. Walk up a few steps.
You hear music coming from somewhere. When you look up, you see that it‘s coming from an air vent high up in the wall. Look at the forklift truck on the left, and try to use it - it’s dead. Look at the green meat waste bin on the right. Push the green meat waste bin left a few times, until it’s on the forks of the forklift truck. Insert MACHINE SAFETY KEYS into the forklift truck, then use the forklift truck to raise the green meat waste bin up. Adjust your position, so you can see the green meat waste bin. Climb up it a few times, until you reach the air vent. Look at the air vent in the wall. Use the air vent, and watch the cut scene with the thugs. They have Anna Maria’s manuscript. Climb down again, so you are back on the ground.
Head up, and make your way past the bone crunching machine, through the door opposite, and back to the conveyor belt area.
CONVEYOR BELT AREA
Head down to the bottom left corner, and go through the door at the top of the stairs on the left.
FACTORY
Head to the bottom-left corner of the room. If you looked here before, the shutter with the green light above it was locked. Now, the shutter is open. Head up, through the shutter, into the Log Room.
LOG ROOM
Explore the room. Try to open the large metal door to the left of the pile of logs. OUCH!!! That door is HOT!!! Use your FIRE PROOF BLANKET with the door, to open it. Now head through the door, into the Smoking Room.
SMOKING ROOM
Look at the meat hanging from the ceiling. Touch the meat to realise it’s very greasy. Look at the collection of logs that are smouldering in the tray on the floor below the meat. Use the FIRE PROOF BLANKET with the smouldering log to pick it up, so you now have FIRE BLANKET HOLDING SMOULDERING WOOD. Now you just have to put that log to good use. Leave the room.
LOG ROOM
Walk down a few steps, and climb up the wooden stairs. Walk along the platform, and enter through shutter, back into the main factory area.
FACTORY
Head right, until you see the pigs hanging up. Walk through the door on the right, where the guard is standing.
GROUNDS
SAVE YOUR GAME HERE. Go into the refrigerated truck again. Pick up ICE FROM FREEZER TRUCK from the bottom corner. Now you’re gonna have to be quick here, before the ice melts, so use Left Ctrl to Run. Run out of the truck.
Run up through the door next to the guard.
FACTORY
Run up through the door in the back wall.
CONVEYOR BELT AREA
Climb down the stairs. Run right a few steps, and head through the door at the end.
DUMPSTER AREA
Ignore that blue door. Run forward, past the bone crunching machine, and onto the area with the forklift truck.
Run left to the forklift truck. Climb up it, and climb onto the green bin, until you reach the air vent. Push FIRE BLANKET HOLDING SMOULDERING WOOD through the air vent, into Fingers office. Only a small amount of smoking is going into the office, so you need to make more smoke. Use ICE FROM FREEZER TRUCK with the air vent. If your ice has melted, simply go back and get some more. Now watch the cut scene as Fingers and his gang of thugs leave the office. This is your chance to get the MANUSCRIPT.
You find yourself back at the door. Walk up, through the door, into the area with the conveyor belt.
CONVEYOR BELT AREA
Walk down a few steps. Climb up the stairs on the left, and go left, info the factory.
FACTORY
Walk down a few steps, and left a few steps, so you can see the Control Panel on the wall, next to the pigs hanging up.

Use the Control Panel to rotate the conveyor belt. Watch the cut scene as you see Tony… hanging from a meat hook. Eek! Poor Tony! Look at Tony, and search Tony, to find a MEAT PACKING COMPANY KEY CARD. Go back up through the door at the top right corner of the room.
CONVEYOR BELT AREA
Climb down the stairs. Walk forward, and go through the door at the end.
DUMPSTER AREA
Look at the blue door in the corner, and go through the blue door.
STORAGE ROOM
Look at the First Aid Kit on the wall. It’s good to see that the factory is so safety-conscious. Open the First Aid Kit. Wait a minute… this isn’t a First Aid Kit at all. It’s a Security Card Reader. Use the MEAT PACKING COMPANY KEY CARD with the Security Card Reader. Ah-Ha! A secret doorway! You automatically go through the secret doorway.
SECRET ROOM
It’s very dark here. Climb up the stairs to the top, then go through the door on the left, into the office.
OFFICE
This is the room you saw from the air vent outside. Look through the shaded window, and look through the opened window on the right 2 times, so you see the bone cruncher below. Walk over to the desk, and try to open the drawers on each side of the desk. Unfortunately, the drawers are locked. Open the drawer in the middle of the desk to find SOMETHING WRAPPED IN SILK HANKIE. Examine SOMETHING WRAPPED IN SILK HANKIE in your Inventory to discover PHOTOGRAPH OF FILM STAR LUCY CHU, and the SILK HANKIE. Look at the metal filing cabinet that’s against the wall - this is where Anna Maria’s MANUSCRIPT is kept. Try to open it. You’ve never seen so many locks! How are you going to open it? Right-click on the filing cabinet, and try to push the filing cabinet - it won’t budge, because the wheels are rusted up (you won‘t get this option, unless you‘ve seen the bone cruncher through the window). You’ll need to grease them. Leave the office.
SECRET ROOM
Climb down the stairs, all the way to the bottom. Go through the blue door on the right.
STORAGE ROOM
Head through the blue door on the right.
DUMPSTER AREA
Go through the door at the top.
CONVEYOR BELT AREA
Walk down a few steps. Climb up the stairs, and go through the door, into the factory.
FACTORY
Walk down a few steps, past the hanging pigs (and poor Tony), and make your way to the bottom left corner. Go through the door with the green light above it.
LOG ROOM
Head down to the bottom left corner, and enter the Smoking Room.
SMOKING ROOM
The greasy meat is still hanging from the sealing here. Use SILK HANKIE with the hanging meat, so it becomes a GREASE SOAKED SILK HANKIE. Leave the room.
LOG ROOM
Walk down to the wooden stairs. Climb up the wooden stairs, walk along the platform, and go through the door, into the factory.
FACTORY
Head right, and make your way past the hanging pigs, to the door at the top-right corner. Go through the door, into the conveyor belt area.
CONVEYOR BELT AREA
Walk up, and head through the door at the top.
DUMPSTER AREA
Go through the blue door on the left, into the Storage Room.
STORAGE ROOM
Walk up through the secret door, into the Secret Room.
SECRET ROOM
Climb up the stairs, all the way to the top. Go through the door on the left, into the Office.
OFFICE
Walk over to the metal filing cabinet, and use GREASE SOAKED SILK HANKIE with the filing cabinet, to grease the wheels. Now right-click on the filing cabinet, and push it across the floor. It falls through the window, into the bone crunching machine below. Now leave the Office.
SECRET ROOM
Climb down the stairs, all the way to the bottom. Go through the door, into the Storage Room.
STORAGE ROOM
Go through the blue door, into the Dumpster Area.
DUMPSTER AREA
Head left & up, past the bone crunching machine, and on to the area with the forklift truck.
Walk left to the forklift truck. Right-click on the forklift truck, and take the MACHINE SAFETY KEYS. Now walk right a few steps, and go back up to the bone crunching machine.
Look at the filing cabinet, sticking out of the bone crusher machine. Insert the MACHINE SAFETY KEYS into the bone crunching machine, then turn on the bone crunching machine, and watch as the filing cabinet is shredded. Pick up the MP3 PLAYER from the ground, and pick up ANNA MARIA’S MANUSCRIPT from the ground. You automatically return to your office.
~~~~~~~~~~~~~~~~~~~~~~~~~~~~~~~~~~~~~~
NEW YORK BAIL BONDS BUILDING
~~~~~~~~~~~~~~~~~~~~~~~~~~~~~~~~~~~~~~
RECEPTION AREA
Anna Maria is delighted that you found her manuscript. You study it together. Look at the following sections.
- Castle
- Hell
- Fleur de lys
- Latin header
- Latin Part 1
- Latin Part 2
- Latin Part 3
- Latin Part 4
- Coats Of Arms
- Holy Man
- Fortified City
- Idol
- Knight
- Angel
- Black symbols
Back away from the Manuscript.
You need help in deciphering all the information from the manuscript. If you could see Andre Lobineau’s historical database, it might help, but you’re locked out of his website. Your co-worker Virgil has some good hacking skills, and he might be able to hack into Andre‘s site, but he’s still mad at you, because of the MP3 incident. Talk to Anna Maria and work through all the conversation topics.
Walk left a few steps, to where Virgil is sitting on the settee. SAVE YOUR GAME HERE. Try to talk to Virgil, but he just ignores you. Give him the MP3 PLAYER you found. He finally forgives you, and admits that he has all his music backed up on CD at home. Talk to Virgil and work through all the conversation topics. He gives you a flash card, which you automatically install onto your PDA.
In your Inventory, use your PDA, and choose the following options.
- Connect
- Lobineau’s Private Server
- OK
- Yes
Virgil explains how to hack into a database, then gives you a demonstration. This is complicated! Note that the Diverters can be turned by clicking on them. This may affect the direction of the beam. Place the Diverters like so.

Andre’s database is downloaded to your PDA. Use your mouse to scroll down through the text. Click on the red words, to read more information about that subject, and the Scroll Back button on the PDA to get back to the last page you looked at. It’s easy to get lost in the database, but make sure you click on the following subjects.
- Latin
- Historical database
- Welcome Note (for amusement)
- Baphomet
- Knights Templar
- Philippe IV (then Continue)
- Clement V
- Knights Templar (again)
- Jacques De Molay (then Continue)
When you’re ready, click on the ‘X’ at the top right, to close the PDA. Walk right a few steps, and examine ANNA MARIA’S MANUSCRIPT on the desk, again.
Look at the following sections.
- Holy Man (Clement V) in the castle on the left
- Idol (Baphomet) in the castle on the right
- Fortified City on the right
You figure out that the Fortified City from the Manuscript, is actually Istanbul. So that’s your next destination. Back away from the Manuscript.
Click on the door on the right, to leave the building.
============================================================
PART 2
ISTANBUL
============================================================
~~~~~~~~~~~~~~~~~~~~~~~~~~~~~~~~~~~~~~
PASHA PALACE HOTEL
~~~~~~~~~~~~~~~~~~~~~~~~~~~~~~~~~~~~~~
HOTEL ROOM
Watch the cut scene, as the Waiter brings you Room Service. You automatically leave the room.
LOBBY
Talk to the Receptionist behind the counter on the right and work through all the conversation topics. Look at the computer at the end of the counter. Look at the photo on the counter, next to the computer. Look at the map on the wall, to the right of the Reception Counter. Talk to Anna Maria and work through all the conversation topics. Walk down a few steps, and head down the stairs, into the Dining Area.
DINING AREA
Look at the middle table on the right, and take the PASHA PALACE KNIFE. Talk to the Waiter and work through the conversation topics. Leave the Dining Area, and go back to the Lobby.
LOBBY
Look at the Map on the wall next to the Reception Desk again. You and Anna Maria discuss how to get into the Topkapi Palace (this won‘t happen, unless you‘ve spoken to the Waiter). Look at all the sections of the Palace:
- Harem
- Museum
- Lover’s Vestibule
- Fountain Courtyard
- Courtyard
- Entrance
Step away from the Map.
Walk down & right, and return to the Dining Area.
DINING AREA
Talk to the Waiter again and work through the conversation topics. Leave the Dining Area.
LOBBY
Talk to the Receptionist and work through the conversation topics. Walk right, climb up the stairs, and head through the door to leave the hotel.
MAP
Go to Topkapi Palace.
~~~~~~~~~~~~~~~~~~~~~~~~~~~~~~~~~~~~~~
TOPKAPI PALACE
~~~~~~~~~~~~~~~~~~~~~~~~~~~~~~~~~~~~~~
PALACE ENTRANCE
Talk to the Guard - you convince him that you’re a journalist called Eamon O’Mara. Sadly, the Guard still won’t let you in without any I.D. Without I.D., there’s nothing you can do here. Walk down to the Map.
MAP
Go back to the Pasha Palace Hotel.
~~~~~~~~~~~~~~~~~~~~~~~~~~~~~~~~~~~~~~
PASHA PALACE HOTEL
~~~~~~~~~~~~~~~~~~~~~~~~~~~~~~~~~~~~~~
LOBBY
Walk left to the Reception Desk. Talk to the Receptionist and ask about the following topic.
- Eamon O’Mara
She mentions an important LETTER that she had to sign for, for Eamon. Talk to Anna Maria and ask her about Eamon O’Mara. Look at the LETTER on the left side of the Reception Counter. Try to take the LETTER, but the Receptionist stops you. From your Inventory, use ANNA MARIA’S ICON with the LETTER on the left edge of the Reception Counter. She agrees to grab the LETTER for you, while you distract the Receptionist. Now talk to the Receptionist, and ask about the following topic.
- Golf
Watch the cut scene, as you display your golfing skills, and Anna Maria steals the LETTER from the counter. Now talk to Anna Maria and ask about Eamon O’Mara. She gives you the MAP AND ID CARD that was in the LETTER. In your Inventory, look at the MAP AND ID CARD. You separate them, so you have a MAP and EAMON’S ID CARD. Look at EAMON’S ID CARD in your Inventory, to see that Eamon’s photo is loosely attached to the card. You’ll need to do something about that. In your Inventory, use PASHA PALACE KNIFE with your BAIL BOND ID to get PHOTO OF GEORGE. Now in your Inventory, combine PHOTO OF GEORGE with EAMON’S ID CARD to create your very own ID FOR TOPKAPI, as well as EAMON‘S PHOTO. Walk right, climb up the stairs, and go through the door to leave the hotel.
MAP
Go to Topkapi Palace Hotel.
~~~~~~~~~~~~~~~~~~~~~~~~~~~~~~~~~~~~~~
TOPKAPI PALACE
~~~~~~~~~~~~~~~~~~~~~~~~~~~~~~~~~~~~~~
PALACE ENTRANCE
Talk to the Guard and work through the conversation topics. You fool him into believing that you really are Eamon O’Mara. Head up through the arch, and onto the gate.
Try to walk through the gate, but the Guard stops you. Don’t show your doctored ID FOR TOPKAPI to the Guard, because he’ll know you’re not really Eamon, and he’ll shoot you dead. Try to talk to the patrolling Guard, who will tell you to proceed to the gate. Now talk to Anna Maria, and ask about the patrolling guard (this option won’t appear, unless you have spoken with the patrolling Guard). When Anna Maria is busy with the patrolling Guard, walk left, through the arch, and along the path.
COURTYARD
Walk over to the scaffolding on the right. Look at the door in the wall, next to the scaffolding. Try to open the door, but it’s locked. There are 2 sections to the scaffolding - climb up onto the scaffolding on the right, and climb up to the top. Wait until the Guard is walking left, then take GUARD’S PHONE from on top of the wall, above the lantern. It’s hard to spot, but it’s there.

Look at the GUARD’S PHONE in your Inventory to learn the Guard’s mobile phone number - 555 654897. Now again, wait until the Guard is walking left, then replace the GUARD’S PHONE back on the wall. Climb down the scaffolding.
Walk over to the section of scaffolding on the left, and climb up the scaffolding to the top. Look at your PDA in your Inventory, and select the following options.
- Phone
- Guard
Wait until the Guard goes to answer his phone, then climb over the wall.
HAREM
Wait until the Guard has his back to you, and is walking away from you. Follow him up to the back wall, but make sure he doesn’t see you. When the Guard turns left, climb up into the arch in the back wall. Walk forward a few steps, to the other end of the arch. Watch the cut scene to see the Guard drinking from his cup. Look at the arched window on the right, and try to use the arch window on the right - the plaster in the wall is loose, and you can see rubble underneath. Use PASHA PALACE KNIFE with the window. Some loose plaster falls to the ground. The Guard hears the noise, and goes to check it out. While the Guard is busy, quickly follow the path up & right. Click on the cup on the window sill to drink the tea, then quickly run back to the 1st hallway. The Guard will see that he’s run out of tea, so he leaves to make some more. Walk up a few steps, then climb down the stairs into the Courtyard.
The guard dog is still here, guarding the place. Better not get too close to the dog. Climb back up the stairs.
Follow the paths round, until you reach this window.

Look at the clothes line that’s tied up on the wall, and click on the clothes line to untie it. In your Inventory, use PASHA PALACE KNIFE with the SALAMI to get SALAMI SLICE. Now tie the SALAMI SLICE to the clothes line to attract the dog’s attention. Follow the path up & right, and work your way round to the stairs. Climb down the stairs, into the Fountain Courtyard.
The dog is distracted by the salami on the clothes line, so he’s no longer guarding anything. Walk up through the arch, onto the balcony.
BALCONY
While standing on the balcony, click on the spot in front of you to see the fountain and the courtyard below. Head right, and climb down the stairs, into the entranceway.
MUSUEM ENTRANCEWAY
Look at the computer in the corner, and try to use it - it’s password locked. Look at the postcard stand on the counter. Look at the till on the counter. Look at the door to the museum, and try to open it - it’s locked. Look at the red triangle on the wall next to the museum door to learn about the alarm system. Look at the glass door to see the guards patrolling outside. Now, let’s get down to business. From your Inventory, select your PDA, and choose the following options.
- Connect
- Topkapi Security Management
This is another one of those puzzles where you have to deflect the beams of light. Place the diverters like so, remembering to rotate them as necessary.

Now you have access to the computer, select the following options.
- Service System
- Set system to Test Mode - Yes
- OK
The doors to the museum are now unlocked, and the lasers are now in Test Mode for 1 hour, which means that the lasers will flicker on and off. The problem is… you can’t see the lasers. Walk over to the door of the museum, open it, and enter into the museum.
MUSEUM
Before you do anything else, you need to find a way to see the lasers. Look at the box on the wall next to the door to realise that it’s a ventilation system. Open the ventilation box, then look inside - there’s a safety grille in front of the vent. Place the HOTEL FLYER WITH SCRIBBLED NUMBER inside the ventilation box, then use your LIGHTER to set it alight. The smoke reveals where the lasers are.
Walk forward a few steps, until you see 3 red lasers on the wall. Wait until they’re off, then walk forward a few more steps, to the next set of lasers. Wait until they’re off, then proceed forward. Repeat this until you reach the far end of the room.
Look at the door in the far wall - Anna Maria’s waiting on the other side. Talk to the door and work through the conversation topics with her. Look at the levers on the wall next to the door - they control the bars on the door, and you need to lower all the bars so that you can open the door. Pull lever #1, #2, and #4. The door opens, and Anna Maria enters the room. Talk to her and work through the conversation topics. Look at the door in the opposite wall, next to the statue. Look at the macabre heads on either side of the door, and try to turn it. Hmm, it seems like both macabre heads need to be turned at the same time. Talk to Anna Maria again, and she’ll help you open the door.
FOUNTAIN COURTYARD
Don’t walk forward along the path, because the guard will see you. Walk up \ left to the wall, then follow the wall along, making sure you stay behind the pillars. Walk up to the power switch on the wall.
Look at the power switch on the wall, and pull the power switch to turn the fountain pump off. The water in the fountain drains, and you automatically walk right a few steps. However, the guard just turns the pump back on again. When the guard sits back down again, walk back up to the power switch, still keeping behind the pillars. Use your PAPER CLIP with the power switch to short circuit the switch, then watch as the guard walks away. Quickly walk over to the drained fountain, and click in the fountain to jump in. Look at the statue in the centre - if you could move it, that could be your way down. Try to push the statue, but you need an extra pair of hands. Use ANNA MARIA’S ICON from your Inventory on the statue, and Anna Maria will help you push it. You uncover a hidden entrance. Climb down through the entrance, into the catacombs.
CATACOMBS
Walk up a few steps, to the top of the Walkway, noticing the valves on the wall. Look carefully at the wall to see a gauge. It’s not very obvious, so you need to look carefully.

It shows that there is no water flowing through these pipes. You need to get more water flowing through the pipes. If you start at the top, set the valves like so.
1. Valve open.

2. Valve closed.

3. Top valve - Water rushing in and downwards now.
Bottom valve - Water rushing down the left hand pipe.

4. I can hear the water rushing downwards now.

5. I can hear the water rushing down the left hand pipe.

Head back up to the top of the Walkway, and notice the water leaking through the pipe on the wall. Walk down a few steps, and look at the gauge on the wall to see that lots of water is flowing through the pipes now. Walk up again, close the top valve, then open it again. The water pressure forces a block to come shooting out from the wall. Climb through the newly-created hole in the wall.
TUNNEL BEHIND THE CATACOMBS
It’s very dark in here, but follow the path left a few steps, then up to the edge. Walk left along the edge a few steps, and climb down the wall.
CITADEL CHAMBER 1
Wow, you found the Citadel! Walk up to the door. Push the button next to the door - nothing happens. After some trial & error, I found that the cryptic clues in your MANUSCRIPT PAGE hold the key. Look at the MANUSCRIPT PAGE in your Inventory, and read the Latin Part 1 passage. Use ANNA MARIA’S ICON from your Inventory, on the button next to the door. Quickly walk down, and stand on the white drawing on the ground, that shows the knights who share a horse.

Anna Maria presses the button, and the door slides open. Walk up, through the door.
CITADEL TUNNEL
Follow the dark tunnel, into the next chamber.
CITADEL CHAMBER 2
Walk left a few steps, and look at the door - a knight holding a shield. Look at the MANUSCRIPT PAGE in your Inventory, and read the Latin Part 2 passage. Also, look at the Black Symbols at the bottom of the MANUSCRIPT PAGE. Use the door to see the Knights Templar Statue.

This is a riddle that you need to solve. You have to change the 4 star symbols at the bottom, to the correct symbols. Now click on the Roman Numerals at the bottom, like so.
- Click Roman Numeral I, 2 times, to show a moon
- Click Roman Numeral II, 1 time, to show a cross
- Click Roman Numeral III, 0 times, to show a star
- Click Roman Numeral IV, 2 times, to show a moon

Walk right, to the other side of the Chamber.
Look at the door - another knight with a shield. In other words, another riddle for you to solve. Use the door, to see the close-up.
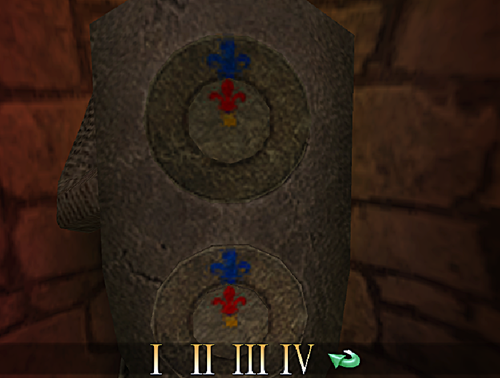
This time, you need to set the Fleur De Lys icons on the dials correctly. Again, the answers lie in your MANUSCRIPT PAGE. Click on the Roman Numerals at the bottom, like so.
- Click Roman Numeral I, 0 times
- Click Roman Numeral II, 2 times
- Click Roman Numeral III, 3 times
- Click Roman Numeral IV, 2 times

Solved! Walk right, to the next door. Look at the door - another knight, another riddle. Use the door to see the close-up.

As before, the answer to solving this, lies in the cryptic clues in your MANUSCRIPT PAGE. You have to turn each tumbler, to display the correct symbol. Click on the Roman Numerals at the bottom, like so.
- Click Roman Numeral I, 1 time
- Click Roman Numeral II, 4 times
- Click Roman Numeral III, 2 times
- Click Roman Numeral IV, 3 times

Excellent! Walk right, to the alcove.

Look at the alcove to see that it’s empty. Use ANNA MARIA’S ICON from your Inventory, with the alcove. After the cut scene, Anna Maria stands in the alcove, while you stand in another alcove. The final door slides open. Walk up through the door, into the Treasure Room.
CITADEL TREASURE ROOM
Watch the cut scene. You and Anna Maria become trapped in this room. Look at the CHERUB STATUE on the plinth, but don’t touch it, or you’ll die. Look at the red Map on the floor, and click on the following places.
- Paris
- Cyprus
- Constantinople
- Babel
- Alexandria
- Acre
- Rome
Using the MANUSCRIPT PAGE, as well as checking the Notes in your PDA, you can determine that you need to interact with the following places, in order.
- Acre
- London
- Paris
- Cyprus

It appears as though nothing has happened. But you’ve actually deactivated the trap, so take the CHERUB STATUE from the plinth. You automatically place it down on the ground. Now look at the plinth, and use the plinth. Move the plinth, like so.
- Left
- Left
- Left
- Down
- Left
- Down
- Left
- Down
It worked. The door opens, and you and Anna Maria make your escape. Watch the lengthy cut scene.
JAIL CELL 1
After a very eventful night, you wake up… and are immediately arrested. You have to escape from here.
Look at the hard, wooden seat. Look at the drain in the middle of the floor. Look at the damp wall on the right - the mortar‘s crumbling. Look at the rat hole in the wall on the left. Search the rat hole 2 times, to find a BRACKET. There is a small table on the left, at the front of the cell. Take MOULDY CHEESE from the table. Use BRACKET with the damp wall on the right, to scrape away the mortar. Now pull the stone block out of the wall.
Watch the cut scene with Father Nicolas and Sister Immaculata. They let slip that you are to be executed. Yikes! Father Nicolas gives you MECHANICAL MOUSE, SQUEAKY TOY, and BAG OF MARBLES. Before leaving, Sister Immaculata asks you to come up to the roof in 1 hour.
Look at the MECHANICAL MOUSE to get a MOUSE KEY. Open the BAG OF MARBLES to get MARBLE STRING, PIECE OF CLOTH, and some loose MARBLES. Use MARBLES with the drain in the floor, and watch how the roll under the cell door. Climb through the wall on the right, into the next cell.
JAIL CELL 2
Click on the cell door to get the guard’s attention. Oh dear! He slipped on the marbles. Climb through the wall on the left, back to Jail Cell 1.
JAIL CELL 1
Walk forward, to the cell door. Search the unconscious guard to find CELL KEY. Use the CELL KEY on the door to unlock it. Now you have to prevent the guard from raising the alarm, as you plan your escape. Use MARBLE STRING with the guard to tie him up. Use PIECE OF CLOTH with the guard to gag him. That’s taken care of the guard! Walk up a few steps, and look at the table on the left. Hmmm, you thought your things would be here. Climb up the stairs. Go through the door at the top of the stairs.
GUARD’S ROOM
Uh-oh… there’s a vicious guard dog here. Better not get too close! Look at the empty dog bowl on the ground. Look at the CAN OF BEEF on the table - you can’t pick it up while the dog is watching you. Show SQUEAKY TOY to the dog, and while he’s busy watching it bounce around the floor, quickly take CAN OF BEEF from the table. You automatically retrieve your SQUEAKY TOY. In your Inventory, use the MOUSE KEY to open the CAN OF BEEF, so you have OPEN CAN OF BEEF. Now put the OPEN CAN OF BEEF into the empty dog bowl on the ground. The dog won’t bother you anymore. Walk right, climb up the stairs, and go through the door.
STAIRS
You find yourself back in a familiar area. Climb up the stairs, to the balcony.
BALCONY
Follow the balcony round the corner, so you can see the vines growing on the wall.

If you could distract the guards below, then you could climb up the vines to get to the roof, where the nun wanted to meet with you. You need a plan! Go right, round the corner, and climb down the stairs.
Head up, through the arch, to find yourself back in the Museum Entranceway.
MUSUEM ENTRANCEWAY
Look at the computer in the corner - it’s been upgraded. Try to use it, but you can’t get past the extra firewall. Walk left, to the museum door. Look at the door, to see that it’s locked again. Use MECHANICAL MOUSE with the door. Quickly walk right, and up through the arch, to leave the area.
Start climbing up the stairs. It isn’t long before the MECHANICAL MOUSE sets off the alarm in the museum, causing all the guards to leave their posts to investigate. This is your chance. Climb up the stairs, and go round the corner, to the balcony.
BALCONY
There’s no guards in the Fountain Courtyard below, now. Climb up the vines you saw on the wall, up to the roof.
ROOF
Avoid that guard! Walk left a few steps, and look at the wall to see that it has a loose stone. Place your SQUEAKY TOY on the loose stone. It will start talking, and the guard will come to investigate. While the guard is distracted, head right, then up to the next section of the roof.
Explore the area, and find the nun in the top corner.

Approach the nun, and watch the cut scene. Wait a minute! That nun! She’s… she’s… NICO!!!
~~~~~~~~~~~~~~~~~~~~~~~~~~~~~~~~~~~~~~
PASHA PALACE HOTEL (PLAYING AS NICO)
~~~~~~~~~~~~~~~~~~~~~~~~~~~~~~~~~~~~~~
LOBBY
Both of you escape from Topkapi Palace, and return to the hotel. It’s so good to see each other again! Since George’s cover has been blown, you’re playing as Nico now. You suspect that Anna Maria has been playing George for a fool, but George won’t hear anything of it. You need to find a way up to George’s room.
Follow the red carpet down the stairs, and along to the Reception Desk. Look at the Receptionist, talk to her, and work through all the conversation topics. She confirms that Eamon O’Mara is staying here. You trick her into giving you the key for Eamon’s room - ROOM 505 KEY. Walk left, and climb up the stairs to the 5th Floor.
~~~~~~~~~~~~~~~~~~~~~~~~~~~~~~~~~~~~~~
PASHA PALACE HOTEL
~~~~~~~~~~~~~~~~~~~~~~~~~~~~~~~~~~~~~~
ROOM 505
You’re playing as George again. Goodness knows how you managed to get up here, without the Receptionist seeing you! You need to find a way down to the room that you and Anna Maria stayed in - Room 304. Talk to Nico and work through all the conversation topics. Explore the room if you like, but there’s nothing interesting here. Walk over to the windows, and open the window on the right. Climb up onto the window, then click outside the window, to climb onto the window ledge.
5TH FLOOR WINDOW LEDGE
You figure out where Room 304 is. Walk right, along the window ledge, so you can see the red canopy below you.

Lower yourself, so you’re hanging from the ledge. Now drop down to the balcony below.
4TH FLOOR BALCONY
Walk left a few steps - you hear a scream. Walk right, to the end of the balcony. Climb over the railing, onto the ledge. Lower yourself, so you are hanging from the ledge. Drop down to the window ledge below.
3RD FLOOR WINDOW LEDGE
Walk left a few steps, but stop when you see the silhouette in the window. The silhouette belongs to a policeman, who will raise the alarm if he sees you. Lower yourself, so you are hanging from the ledge. Shimmy left, to the end of the ledge, then climb back up onto the ledge again. You’re outside the window of Room 304. Open the window, then climb into the room.
ROOM 304
Walk forward a few steps, and pick up the ROSARY from the floor. Walk up, into the bathroom.
Search the bin to find a CREDIT CARD RECEIPT. Watch the cut scene. Wow, so ‘Father Nicholas’ is actually a policeman. He also suspects that Anna Maria is not quite as innocent as she appeared. He clears your name, so you’re no longer considered a terrorist. So you can come & go freely, now.
LOBBY
You automatically head back down to the Lobby. Look at the CREDIT CARD RECEIPT in your Inventory, to see that it‘s signed by Anna Maria. Maybe you should find out her address, so you can know what’s really going on with her. From your Inventory, look at your PDA, and choose the following options.
- Connect
- Credit R Us
Time for another of those puzzles where you have to deflect the beams of light. Place the diverters like so, remembering to rotate them as necessary.

Click on ‘OK’ 2 times to get Anna Maria’s address. She lives in Rome! That’s where you and Nico are heading next.
============================================================
PART 3
ROME
============================================================
~~~~~~~~~~~~~~~~~~~~~~~~~~~~~~~~~~~~~~
APARTMENT BLOCK
~~~~~~~~~~~~~~~~~~~~~~~~~~~~~~~~~~~~~~
STREET
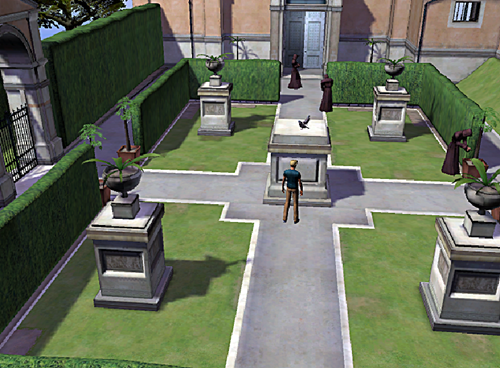
Look at the priest - Brother Mark - with pink gloves. Talk to him and work through all the conversation topics. Look at Brother Mark’s bright yellow car. He’s very protective of it. Try to use the car, but he warns you off. Look at Archie, who is the homeless man sitting on the steps. Talk to Archie and work through all the conversation topics. Look at the MOULDY BREAD lying on the steps next to Archie. Try to take the MOULDY BREAD, but Archie stops you.
Have fun with any of the intercoms for the different apartments if you like. When you’re ready, head to the building that Brother Mark is sweeping outside. Look at the sign next to the door to confirm that it’s Anna Maria’s apartment building. Look at the plans on either side of the door. Try to open the door, but it’s locked, and you don’t have the key.
Talk to Brother Mark again and work through all the conversation topics. Talk to Nico and work through all the conversation topics. Talk to Archie again and work through all the conversation topics. He tells you that there’s a KEY TO APARTMENT BLOCK under the plant next to Anna Maria’s door. You realise that he’s rather taken with Nico. Maybe you could use that to your advantage.
Walk up to Anna Maria’s door, and try to move the plant to the left of the door. Brother Mark stops you. You need to distract him somehow. Talk to Nico and ask her to distract Brother Mark. Archie is mesmerised. Use this opportunity - quickly walk down to Archie and take his MOULDY BREAD. Use the MOULDY BREAD on Brother Mark’s bright yellow car. Pigeons fly onto the car, which gets Brother Mark’s attention. While he is busy, move the plant next to Anna Maria’s door, and get the KEY TO APARTMENT BLOCK.
Talk to Nico and ask her to distract Archie. Now try to take Archie’s MOULDY BREAD - your plan doesn‘t work. Damn! Talk to Nico and ask her to distract Brother Mark. Try to move the plant next to Anna Maria’s door - this plan doesn’t work either. Now go through the door, into the apartment building.
STAIRS AND HALLWAY
Climb up the stairs, then turn left into the hallway.
Walk up a few steps, and look at the door for Apartment 8. Try to open the door, but it’s locked. Walk up to the end of the hallway. Open the balcony door, and head out onto the balcony. Nico doesn’t seem to be in a very good mood!
BALCONY
Climb onto the plants on the left, then jump up to the narrow ledge right above you.

Shimmy left, until you reach the broken section. There’s no way into Anna Maria’s flat from here. Shimmy right, until you reach the last balcony. Drop down, into the balcony. Try to open the balcony door - it’s locked. Jump up on the cable on the right, and shimmy along, until you reach the building across the road. Don’t fall!
Drop down, into the balcony. Walk right along the balcony, and notice the nun on the other side of the partition. SAVE YOUR GAME HERE. Try to open the balcony door. It’s locked. Wait for the nun to go inside (only after you’ve tried the balcony door), then quickly climb over the railing. Shimmy all the way right, until you reach the window. Now climb back over the railing, onto the balcony.
Jump up to the ledge above the window.

Shimmy right, past all the windows, and onto the balcony at the other side of the street.
Drop down into the balcony. Look at the door - it’s the kitchen door for Anna Maria’s apartment. Try to open it, but it’s locked. Look through the window to the right of the door, so you can see into her kitchen.
From this new view, look at the window again - it’s slightly ajar. Look at the bolt behind the door, locking it shut. Use your GOLF CLUB with the bolt on the door to unbolt it.
The view has switched back to the balcony. Simply open the door. You automatically enter, and let Nico in.
~~~~~~~~~~~~~~~~~~~~~~~~~~~~~~~~~~~~~~
ANNA MARIA’S APARTMENT
~~~~~~~~~~~~~~~~~~~~~~~~~~~~~~~~~~~~~~
LIVING ROOM
Explore the Living Room. Look at the computer on the table, and try to use it. It’s quite a basic computer, so there’s not much you can do with it. Look at the book lying on the table on the opposite side of the room. Look at the bookcase standing against the wall, and search the bookcase. Pick up PHOTO OF ANNA MARIA DRESSED AS A NUN from on top of the fireplace. Walk through the lower left door, into the kitchen.
KITCHEN
Take the AIR LINE STUB form the corner of the table. What was Anna Maria doing in Phoenix? Leave the kitchen.
LIVING ROOM
Walk through the upper left door, into the bedroom.
BEDROOM
Explore the bedroom. Pick up ITALIAN METRO TICKET from the bed. Look at the slippers on the floor next to the bed. Search the bin if you like, but it’s empty. Walk left, through the door, into the bathroom.
BATHROOM
Look at the bathroom scales on the floor. There’s nothing you can do here, so just leave the bathroom.
BEDROOM
Head up through the door in the top right, back to the living room.
LIVING ROOM
Talk to Nico and work through the conversation topics. Walk right a few steps, and leave the apartment.
~~~~~~~~~~~~~~~~~~~~~~~~~~~~~~~~~~~~~~
APARTMENT BLOCK (GEORGE)
~~~~~~~~~~~~~~~~~~~~~~~~~~~~~~~~~~~~~~
STAIRS AND HALLWAY
Watch the cut scene with Brother Mark - he has a package for Anna Maria, but he won’t give it to you. Head right along the hallway, and climb down the stairs.
STREET
You find yourself back outside again. Walk up to the top of the street, past the bollards, and onto the Map.
MAP
Go to The Vatican.
~~~~~~~~~~~~~~~~~~~~~~~~~~~~~~~~~~~~~~
THE VATICAN
~~~~~~~~~~~~~~~~~~~~~~~~~~~~~~~~~~~~~~
STREET
This is the place from the PHOTO OF ANNA MARIA DRESSED AS A NUN. Follow the road up & left, until you see the door to the convent on the right. Look at the door, and try to open the door to enter the convent - the guards stop you. Use the doorbell to the left of the door. Sister Serena answers - ask about the photo of Anna Maria as a nun.
Look at the window next to the door - it looks into a small office. Look at Sister Angelica, the nun sitting at the desk in the office. Talk to her and work through all the conversation topics. Look at the schedule on the desk. Try to take the schedule, but Sister Angelica scolds you. Step away from the office window.
Walk left a few steps, so you can see the guards. Look at the gold plaque on the wall of the Monastery - it reads ‘Monastery Of The Order Of St Michael’. Look at the large Monastery doors behind the guards, and try to open the doors. Hmm, I guess there’s no way in through the front door. There must be another way to get inside.
Go back to the office window, and ask Sister Angelica about the Holy Order Of St Michael. Apparently, it’s been around for 100s of years. Ring the bell next to the convent door, talk to Sister Serena and work through the conversation topics with her.
That’s all you can do here at the moment. Head down and walk right, to the Map.
MAP
Go back to Anna Maria’s apartment.
~~~~~~~~~~~~~~~~~~~~~~~~~~~~~~~~~~~~~~
ANNA MARIA’S APARTMENT
~~~~~~~~~~~~~~~~~~~~~~~~~~~~~~~~~~~~~~
LIVING ROOM
You need to find a way into that convent, if you want to find answers about Anna Maria. Maybe you could hack into their computer system. Use your PDA, and select the following options.
- Connect
- Vatican Server
Time for one of those puzzles again. Place the diverters like so.

Click on ‘OK’ to get the number for the wafer factory that Sister Serena mentioned. Now go through door on the right to leave the apartment.
~~~~~~~~~~~~~~~~~~~~~~~~~~~~~~~~~~~~~~
APARTMENT BLOCK
~~~~~~~~~~~~~~~~~~~~~~~~~~~~~~~~~~~~~~
STAIRS AND HALLWAY
Head right along the hallway, and climb down the stairs.
STREET
You’re out in the street again. Walk up to the top of the street, past the bollards, and onto the Map.
MAP
Go to The Vatican.
~~~~~~~~~~~~~~~~~~~~~~~~~~~~~~~~~~~~~~
THE VATICAN
~~~~~~~~~~~~~~~~~~~~~~~~~~~~~~~~~~~~~~
STREET
Head up to the office window, but make sure you’re not standing directly outside the office window. Now use your PDA, and selection the following options.
- Phone
- Wafer Factory
Sister Serena answers the call. Ask her about Sister Angelica. Sister Angelica is called away to answer your phone call, thus, leaving the office empty.
Quickly, look in the office window to see the office. Pick up the schedule from Sister Angelica’s desk. Hmm, the Health Inspector is due for a visit. You could use that information to your advantage. When Sister Angelica returns, talk to her and work through the conversation topics with her, and pretend that you are the Health Inspector. She’s rather startled, since she’s not expecting you until tomorrow. However, she does let you inside the wafer factory.
WAFER FACTORY
Watch the cut scene as Sister Serena gives you the grand tour. When the tour is over, talk to her and work through all the conversation topics. Look at the mixing vat, and try to use the mixing vat.

You seem to enjoy making things awkward for poor Sister Serena. Look at the ovens, and try to use the ovens.

Explore the factory as much as you like. Work your way up to the tables in the top right corner.
Look at the box of Communion wafers on the table, touch the box of Communion wafers, and have a chat with Sister Serena about it. Look at the top-most box in the corner to realise that it’s precariously balanced. Push the box onto the floor, then insist that Sister Serena clean it up. While she is busy, place your MOULDY BREAD into the box of Communion wafers. You’re being so nasty to poor Sister Serena! However, since she has to take care of things here, you’re left to explore the wafer factory on your own. Walk left a few steps, to the shelves.

Look at the box on the shelf, and try to open it. It’s firmly taped down. Use your PASHA PALACE KNIFE with the box to cut it open, then take the MINITURE BOTTLE OF RED WINE from the box. Now leave this area, and head over to the metal stairs.

Climb up the stairs, and follow the walkway along to the end. Look at the hatch on the side of the mixing vat nearest you (not the hatch on top).

Open the hatch - a fresh batch of dough is being mixed. Pour MINITURE BOTTLE OF RED WINE into the opened hatch. Head back along the walkway, climb down the metal stairs, and watch the cut scene. Now you’re being a jerk to Sister Serena AND Sister Angelica! Leave the area, and head up to the door to Sister Angelica’s office.

Look a the door, and try to open the door, but it’s locked. Head up, and follow the path round to the rear door. Open the rear door and head outside.
MONASTERY GARDEN
You need to get into the Monastery, which is the door at the far end of the garden. But you need to avoid the Monks, or they‘ll call for the guards. Walk up into the centre of the garden.
When the Monk nearest the door isn’t walking past the gap at the top, head over to the stone pillar at the top right. Remember, the Monk on the right mustn’t see you. Now throw some MOULDY BREAD into the shrub on top of the pillar at the top right. Quickly walk over to the pillar at the top left. The birds will flock to the pillar at the top right, so they can get the bread, attracting the attention of the monk at the gap at the top. Again, wait for the Monk nearest the door to walk past, then head up to the Monastery door, open it, and enter the Monastery.
MONASTERY - GROUND FLOOR FOYER
Walk forward a few steps, and look at the trapdoor in the floor. That thing is sealed shut! Walk left a few steps. Climb up the stairs and go through the arch to the 1st Floor Foyer.
MONASTERY - 1ST FLOOR FOYER & PASSAGE
Head up the passage, to the end. Open the door on the left, and enter an office.
CARDINAL’S OFFICE
Explore the office. Look at all 4 bookcases. Look at the painting on the wall, then examine it to get a close up. Look at all the different sections of the painting:
- Angel on the bottom left corner
- Angel on the bottom right corner
- Temple block
- Men debating
- Woman with baby
- Men carrying corpse
Step away from the painting. Now walk behind the desk, and open the top right drawer. Look carefully, to see a file with Anna Maria’s name written on it. It’s hard to spot, but it’s there.

Pick up the file. The Cardinal walk in, and catches you snooping. Watch the cut scene. You learn more about Anna Maria. Father Gregor gives you GREGOR’S BUSINESS CARD. After the cut scene, you automatically return to Anna Maria’s apartment.
~~~~~~~~~~~~~~~~~~~~~~~~~~~~~~~~~~~~~~
ANNA MARIA’S APARTMENT
~~~~~~~~~~~~~~~~~~~~~~~~~~~~~~~~~~~~~~
LIVING ROOM
There’s nothing you can do here at the moment. Leave the apartment through the door on the right.
~~~~~~~~~~~~~~~~~~~~~~~~~~~~~~~~~~~~~~
APARTMENT BLOCK
~~~~~~~~~~~~~~~~~~~~~~~~~~~~~~~~~~~~~~
STAIRS AND HALLWAY
Walk down the hallway, to Brother Mark’s apartment. Knock on his door. Talk to him and work through the conversation topics. Show him GREGOR’S BUSINESS CARD to trick him into believing that you are in fact Father Gregor. Talk to Brother Mark again, and ask about Anna Maria’s package. Since he now thinks you’re with the Vatican, he gives you PACKAGE ADDRESSED TO ANNA MARIA. Open the PACKAGE ADDRESSED TO ANNA MARIA in your Inventory, to find the UNMARKED DVD. I wonder what’s on it? Walk back up the hallway, and enter Anna Maria’s apartment.
~~~~~~~~~~~~~~~~~~~~~~~~~~~~~~~~~~~~~~
ANNA MARIA’S APARTMENT
~~~~~~~~~~~~~~~~~~~~~~~~~~~~~~~~~~~~~~
LIVING ROOM
Look at the computer on the table, and use the UNMARKED DVD with the computer. Watch the report about a new kind of gold, called monatomic gold, that’s been discovered in Phoenix. Nico decides to travel to Phoenix to find out more about it, while you remain in Rome to find more clues leading to Anna Maria’s whereabouts. When you’re ready, leave the apartment through the door on the right.
~~~~~~~~~~~~~~~~~~~~~~~~~~~~~~~~~~~~~~
APARTMENT BLOCK
~~~~~~~~~~~~~~~~~~~~~~~~~~~~~~~~~~~~~~
STAIRS AND HALLWAY
Walk down the hallway, to Brother Mark’s apartment. Look at PEN FROM HOTEL ROOM to see that it has a logo of a black cat on it. Knock on Brother Mark’s door again, and this time, show him PEN FROM HOTEL ROOM. Brother Mark tells you about the Black Cat Club. Talk to him, and ask him about the Black Cat Club 2 times, to learn it’s address. When you’re ready, head right along the hallway, and climb down the stairs.
STREET
Walk up to the top of the street, past the bollards, and onto the Map.
MAP
Go to the Black Cat Club.
~~~~~~~~~~~~~~~~~~~~~~~~~~~~~~~~~~~~~~
BLACK CAT MASSAGE PARLOUR CLUB
~~~~~~~~~~~~~~~~~~~~~~~~~~~~~~~~~~~~~~
STREET
Walk up a few steps, until you see the Doorman at the top of some stairs. Talk to the Doorman and work through the conversation topics with him. He won’t let you into the club, unless you are a member. But he won’t let you become a member. Oh… problems, problems! Head back up the street, and go to the Map.
MAP
Go to Anna Maria’s Apartment.
~~~~~~~~~~~~~~~~~~~~~~~~~~~~~~~~~~~~~~
ANNA MARIA’S APARTMENT
~~~~~~~~~~~~~~~~~~~~~~~~~~~~~~~~~~~~~~
LIVING ROOM
Leave the apartment through the door on the right.
~~~~~~~~~~~~~~~~~~~~~~~~~~~~~~~~~~~~~~
APARTMENT BLOCK
~~~~~~~~~~~~~~~~~~~~~~~~~~~~~~~~~~~~~~
STAIRS AND HALLWAY
Walk down the hallway, to Brother Mark’s apartment. Knock on his door. Talk to him, and ask him about the Black Cat Card a few times. He refuses to give you his Membership Card. There must be a way you could persuade him? Show him your PHOTOGRAPH OF FILM STAR LUCY CHU. He’s a huge fan of Lucy Chu, but he wants something a bit more personal. Walk up a few steps, and wait until Mark closes his front door. Now in your Inventory, use BLACK CAT PEN with PHOTOGRAPH OF FILM STAR LUCY CHU to sign it, so it becomes FORGED SIGNED PHOTO OF LUCY CHU. You can pretend it’s been autographed by Lucy herself.
Knock on Brother Mark’s door again, and give him FORGED SIGNED PHOTO OF LUCY CHU. He’s fooled by the signed photo, and gives you his BLACK CAT CARD. Head right along the hallway, and climb down the stairs.
STREET
Walk up to the top of the street, past the bollards, and onto the Map.
MAP
Go to the Black Cat Club.
~~~~~~~~~~~~~~~~~~~~~~~~~~~~~~~~~~~~~~
BLACK CAT MASSAGE PARLOUR CLUB
~~~~~~~~~~~~~~~~~~~~~~~~~~~~~~~~~~~~~~
STREET
Walk up a few steps, until you see the Doorman at the top of some stairs. Show BLACK CAT CARD to the Doorman. He finally allows you to enter, so climb down the stairs, into the club.
ENTRANCE ROOM
Walk forward a few steps, talk to the Receptionist. He tells you to change, before entering the Steam Room. Head up through the doorway on the left, into the Shower Room.
SHOWER ROOM
Look around the locker room area, and notice that Locker #17 (the only locker you can interact with) is empty. Head up into the shower area.
One of the showers is occupied. Walk up to the far end of this shower, and try to take the towel that’s hanging on the wall next to the shower, but the guest in the shower stops you. Leave the shower area, and go down to the locker room area.
Walk down to the far end of the locker room area. Look at the plastic plant in the corner, and move the plastic plant. You can now see the hot water valve in the wall, next to the lockers. Turn the hot water valve on. Ahh… hot water, at last! Return to the shower area.
It’s all steamy in here now. Walk up to the occupied shower, and walk round to the far side. Take the towel that’s hanging on the wall, next to the shower. Since it’s so steamy now, the guest doesn’t see you. You automatically wrap yourself in the towel, leaving all your other belongings in Locker #17.
Leave the Shower Room.
ENTRANCE ROOM
Walk down a few steps, and talk to the Receptionist in his reception cubicle 2 times. Work through all the conversation topics with him. When conversation is over, head up through the door next to him, into the hallway.
HALLWAY
Head up the corridor, and follow it round, until you see an opened door on the left. Enter through the door, into the Steam Room.
STEAM ROOM
Follow the corridor up & right, into the actual Steam Room itself.
Explore the room, and find your old pal Duane Henderson - the American tourist who thinks he’s in the CIA. Talk to him and work through the conversation topics. When you’re ready, head through the door on the right. Watch the cut scene with Mr Spallacci, as you are taken prisoner, and tied to a chair. As you are being interrogated, you hear Nico on the phone… then you hear gunshots!
PRISONER
After being beaten unconscious, you finally come round, still tied to the chair. Look at the power switch in the wall, and kick it with your feet to activate it. Watch the amusing cut scene. Afterwards, you end up holding a long hook.
Look at the metal box on the left, and talk to the metal box - there’s someone in there! Look at the harness hanging from the ceiling, on the right. Use the harness 2 times. Well, that doesn’t really do anything. Look at the bottle of baby oil on the table, and click on it to knock it over with your hook. It spills onto the floor, making the floor all slippery, so now you can slide on it. Kick the power switch in the wall again, and watch the cut scene as you free yourself from the chair.
Now, how do you get out of here? Look at the dark red curtain, and open the dark curtain, then watch the cut scene with Mr Spallacci. Did they really kill Nico? Look carefully at the left side of the window, to notice a small button.

Look at the button, and press the button. A door opens. Go through the door.
STEAM ROOM
You’re back in the corridor of the Steam Room. You hear a ‘Pssst’. Head right, into the Steam Room itself.
Climb down into the steam seating area in the centre of the room. You hear Duane talking to you from the drain! Talk to Duane in the drain, and work through the conversation topics. He has a key to the Laundry Room, and tells you that you can escape through there, but he can’t get his hand through the drain to give it to you. Damn! Climb up the stairs, and leave the Steam Room.
Leave the corridor through the door on the left.
HALLWAY
Follow the hallway up & left, and along to the end. Go through the opened doorway, into the Entrance Room.
ENTRANCE ROOM
Walk across to the other side of the room, and enter through the opened doorway, into the Shower Room.
SHOWER ROOM
Open Locker #17 (near the door) to get dressed, and get all your things back. Now remember Duane, and how he has the key to the Laundry Room? In your Inventory, combine ROSARY with PAPER CLIP to create ROSARY WITH CLIP. Leave the Shower Room.
ENTRANCE ROOM
Walk over to the door at the other side of the room, and enter the Hallway. Ignore the Receptionist’s request to change.
HALLWAY
Head up the corridor, and follow it round, until you see an opened door on the left. Enter through the door, into the Steam Room.
STEAM ROOM
Follow the corridor up & right, into the actual Steam Room itself.
As before, climb down into the steam seating area in the centre of the room. Duane’s still down in the drain. Use ROSARY WITH CLIP with the drain. Duane attaches his key, so it’s now ROSARY WITH KEY. In your Inventory, disassemble ROSARY WITH KEY, so you have 3 separate items - ROSARY, LAUNDRY ROOM KEY, PAPER CLIP. Fantastic! Climb up the stairs, and leave the Steam Room.
Leave the corridor through the door on the left.
HALLWAY
Follow the hallway up & left.
Look at the 1st door on the right, that‘s marked ‘Personnel Only‘, and use LAUNDRY ROOM KEY on this door to unlock it. Now open the door, and enter the Laundry Room.
LAUNDRY ROOM
Climb up the stairs, open the door at the top of the stairs, and head outside.
STREET
Walk forward, along the street, until the realisation of Nico’s death hits you. You need a drink! Watch the cut scene, as Brother Mark tells you that Gasmen have repaired the gas leak in Anna Maria’s apartment. Wait a minute… Anna Maria doesn’t have gas in her apartment!
~~~~~~~~~~~~~~~~~~~~~~~~~~~~~~~~~~~~~~
ANNA MARIA’S APARTMENT
~~~~~~~~~~~~~~~~~~~~~~~~~~~~~~~~~~~~~~
KITCHEN
Watch the cut scene as you and Brother Mark discover a bomb in the kitchen. SAVE YOUR GAME HERE. You have 10 minutes to diffuse the bomb! But you don’t know how to diffuse a bomb - maybe the Military would have that sort of information. In your Inventory, look at the PDA, and select the following options.
- Connect
- US Military Field Notes
It’s time for another one of those diverter puzzles. Note that this one is a lot more complicated than the previous ones, and that double-sided diverters have to be placed in 2 points, as shown below.

Place the diverters like so.

Bomb diffusion notes have been downloaded to your PDA. Quickly scroll down to the bottom of the notes, and click through the following text. Don’t bother to actually read them - you don’t have the time. Just scroll through them.
- US Military Bomb Defusal Field Notes
- Self Protection
- Back Arrow (bottom right of the PDA)
- Defusal
- Part 2
- Part 3
Okay, now you know how to diffuse a bomb, so let‘s get started. SAVE YOUR GAME HERE. You can’t touch the bomb with your bare hands. Talk to Brother Mark, and ask him for his RUBBER GLOVES. He gives them to you. Now interact with the bomb on the table, to get a close-up of it.

Now diffuse the bomb like so.
- Use PAPER CLIP with the blue wire at the bottom left.
- Select ‘Live Trigger Wire’ from the options at the bottom
- Use PASHA PALACE KNIFE on the blue wire at the top
YOU DID IT!!! You diffused the bomb! Congratulations! Now watch the cut scene with… WITH NICO! SHE’S ALIVE!!!
============================================================
PART 4
PHOENIX
(PLAYING AS NICO)
============================================================
~~~~~~~~~~~~~~~~~~~~~~~~~~~~~~~~~~~~~~
COMPOUND
~~~~~~~~~~~~~~~~~~~~~~~~~~~~~~~~~~~~~~
OUTSIDE THE COMPOUND
This is where we find out what Nico was up to, when she went to Phoenix.
Look at the gate in front of you - it’s locked with a sturdy padlock. The whole place seems to be deserted, though. Try to open the gate - it won’t budge. Search the jeep on the right to find a JACK HANDLE. Use the JACK HANDLE on the gate to force it open. Now walk through the gate, into the compound.
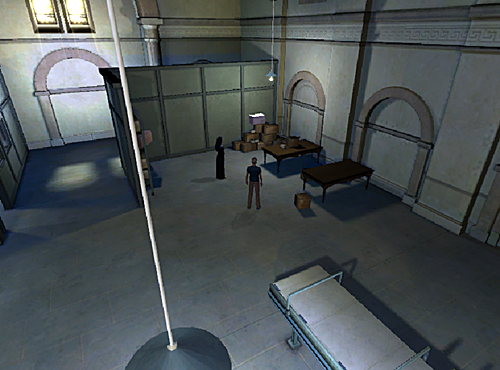
THE COMPOUND GROUNDS
Walk up the path for a few steps, until you see a gap in the wall on the right. Walk into this gap. Look at the dumpster against the wall, and try to move it, but it won’t budge. Okay, notice the 2 crates on the ground, next to the dump. Move both crates out of the way, so you have access to the brake on the side of the dumpster.

Release the brake, then push the dumpster to the left. Notice the gap in the guttering above the dumpster. It’s too high for you to climb. Move one of the crates, over to this part of the wall, and climb up onto the crate.

Climb up the wall, onto the level above, so you‘re on the 1st Floor. Walk right a few steps, to the metal platform in the wall.

Climb up onto the platform. Now jump up to the pipe above you, so you are hanging from the pipe. Shimmy left to the next platform, and climb up onto the platform. Jump left, over the gap, and onto the next platform. Climb up onto the next platform. Follow this platform left, and round the corner. Now at the end of this platform, there is a gap in the barbed wire on the wall on the right. Climb up the wall, through the gap in the barbed wire, and onto the roof.
ROOF
Explore the roof carefully.

Look at the red lever on the ladder on the building opposite. Look at the RUBBLE on the ground, and pick up some RUBBLE. Look at the satellite dish holder (minus the satellite) on the pole in the centre of the roof. Turn the satellite dish holder round, to the position in the screenshot. It looks like a catapult now. Use RUBBLE with the satellite dish holder - it really does act like a catapult, flinging the rubble across, and hitting the lever on the building opposite. Now the ladder for that building has been lowered. Walk right, climb down off the roof, and onto the metal platform.
Work your way right, back along the platforms, they way you came, and back down to the ground.
THE COMPOUND GROUNDS
Opposite the area with the dumpster and crates, you can now see a ladder on the left.

Climb up the ladder, onto the roof of the building.
ROOF
Look at the rusty pipe on the roof. Try to move the pipe, but there’s stuff in the way. Look at the wooden box next to the pipe, and push it down the hole - that hole is pretty deep. Now that the box is out of the way, push the rusty pipe, so that it acts as a bridge over the gap. Crawl through the rusty pipe, along to the other side of the gap.
Walk right a few steps, and look at the hole in the roof. But how deep is this hole? Pick up the rubble that’s lying on the ground next to the hole, and throw it down into the hole. Hmm, it’s not that deep. Climb down the hole, into the office.
OFFICE
Explore the office. Look at the long window, overlooking the loading bay. Look at the door in the corner, and try to open it - it’s locked. Look at the secretary’s wedding photo on the desk nearest the door. Look at the poster on the wall. Look at the gun display case. Look at the computer on the desk on the right - it’s password-protected. Time for some more hacking. Look at your PDA in your Inventory, and select the following options.
- Connect
- c.jenkins_office1
Place the diverters like so.

The readable files are downloaded to your PDA. Scroll down to the bottom of the PDA Notepad, and click on ‘Files’ to read the emails. Some of the emails mentions changing the codes, and reversing the dates. Hmm, that’s something to keep in mind. Look at the wedding photo on the desk nearest the door again, and notice the date - 12\08\91. If you reverse that date, it becomes 91\08\12. Go back to the door in the corner. Use the code lock next to the door, and select the following option.
- 91 08 12 (Wedding Date Reversed)
Now go through the door, into the Loading Bay.
LOADING BAY
Walk left along the Walkway, jump over the gap, and walk left a few more steps. In the next gap, climb down onto the scaffolding below. Shimmy left as far as you can, so you’re over the wooden crates. Now drop down, onto the wooden crates. Jump down, off the crates, onto the floor.
Look at the large crack in the floor on the left. Look at the hopper in the floor on the right. Look carefully at the edge of the hopper, to see a KEY CARD.

Pick up the KEY CARD. You fall down, through the hopper, into what appears to be a Lift Room.
LIFT ROOM
There’s nothing you can do in here. Walk right, and go through the door to leave the room.
CORRIDOR
Go through the door on the right, into the Kitchen.
KITCHEN
Someone’s been cooking fish here, recently. Walk right a few steps, and take the HOOK that’s hanging above the sink. Look at the cubby holes on the wall on the right. There’s something on top of the cubby holes, but it’s out of your reach. Move the dining table along, climb on top of it, then take PIECE OF GUM from on top of the cubby holes. Now walk left, and leave the Kitchen.
CORRIDOR
Walk down a few steps, so you see more of the corridor. Go through the open door on the right, into the Men’s Locker Room.
MEN’S LOCKER ROOM
Oh dear! Someone locks you in here! Explore the room. Look at the row of lockers on the right, and notice that one of the lockers has a bent door. Try to open it, but you can’t get a proper grip with your bare hands. Use the HOOK with the locker to pry it open, then take the can of ENGINE OIL from inside the locker. Now walk back over to the door, and look at the electronic lock next to the door. Let’s hack the lock. Use your PDA, and select the following options.
- Connect
- admin.pc_office7
Place the diverters as so.

All doors are now unlocked. Open the door, and head up into the corridor.
CORRIDOR
Open the door at the end of the corridor, and head up into the stairwell.
STAIRWELL
Climb down the stairs to the level below. Open the door, and go up into the corridor.
CORRIDOR
You automatically try to open the door on the left, only to find that it’s locked with an old fashioned lock, so you can’t hack it. Try to open the door on the right, but that’s locked as well. Walk down a few steps, and enter through the open door on the right. Someone closes the door behind you. Try top open the door, but it’s now locked. Watch the cut scene as you are cornered by Mr Spallacci’s goon. But don’t worry, Maynard comes to your rescue. Now we know that the gunshots George heard over the phone, weren’t Nico being shot. Maynard is the man who discovered Monatomic gold, and he’s rather… eccentric! He takes you to his Safe Room.
SAFE ROOM
It seems that Maynard hates Anna Maria as much as you do - he believes that she was making a fortune from his Monatomic gold. Look at the safe, and try to open the safe - you don’t know the code. Talk to Maynard and work through all the conversation topics. When conversation is over, climb up onto the desk on the right, then climb up through the hole in the ceiling.
CENTRIFUGE ROOM
Look at the rollers on the floor. Walk left a few steps, and look at the Centrifuge Chamber. Look at the Control Panel in the wall opposite the Chamber. It controls the pulley system hanging overhead. Try to use the Control Panel, to learn that the chain has rusted in place. Look at the chain hanging above the hole in the floor - it’s very rusty.

Use ENGINE OIL with the chain to grease it. Now use the Control Panel again, and select the following options.
- Right
- Down
The pulley is now in the Safe Room below. Climb down the hole in the floor, down into the Safe Room.
SAFE ROOM
The pulley is hanging above the safe. Use your HOOK with the pulley to attach it to the safe. Climb back up the hole in the ceiling, into the Centrifuge Room.
CENTRIFUGE ROOM
Go back over to the Control Panel on the left. Use the Control Panel, and select the following options.
- Up
- Left
The safe is now on the rollers. Walk right a few steps, too see that Maynard has climbed up through the hole, into this room, as well.
Walk right, and make your way to the other side of the room. Look at the large Control Panel, sitting on the platform, to learn that it controls the rollers. Use the Control Panel - the system is dead. Look carefully at the front of the Control Panel to see that the wires are loose. Use your PIECE OF GUM with the wires in the front of the Control Panel to re-attach the wires. Try to use the Control Panel again - it still doesn’t work. Walk left a few steps, and talk to Maynard. Ask him about the Control Panel. He goes over to fix the panel - all it takes is one swift kick!
Make your way back right, and head to the large Control Panel on the platform. The roller system works now… partially. You need to navigate the safe into the Centrifuge Chamber. Select the following options.
- Left
- Left
- Down
- Right
- Right
- Up
- Up
- Left
- Down
- Down
- Left
- Up
- Up
- Up
- Up
Walk over to the safe, and try to push it into the Centrifuge Chamber. You can’t shift it on your own. Talk to Maynard and ask about the safe. Now walk back over to the safe, and push it. Watch the cut scene. When you get the chance, push the button on the Control Panel. Watch another cut scene. Sadly, Maynard is trapped inside the chamber, and can’t get out in time. All you can do, is watch, as he is vaporised! R.I.P. Maynard!
Enter the Centrifuge Chamber.
Walk into the centre of the Chamber. Pick up the PLASTIC FOLDER and pick up MAYNARD’S KEYS from the floor. In your Inventory, look at the PLASTIC FOLDER to find a BANK STATEMENT. Read the BANK STATEMENT in your Inventory to learn that the factory has received a large about of money. Hmm, interesting! Watch another cut scene. Now you have to get out of here, before the thugs find you. Leave the Chamber.
Walk left a few steps, and look at the blast door. Try to open it, but it’s locked. Use MAYNARD’S KEYS with the blast door to unlock it. Now go through the door.
STAIRWELL
You find yourself back in the Stairwell. Climb up the stairs, to the level above. Open the door, then watch the short cut scene, as the Boss orders Vito to stay by the Lift door. But notice that Vito uses the doorstop at the bottom of the door to keep the door open.
Look at the light switch in the wall, and flip the light switch, so that it’s dark. Use ENGINE OIL with the doorstop to make it all slippery. Now unhook the doorstop, so the door closes again. Quickly hide in the shadows on the left. Vito comes out to investigate why it’s suddenly got dark. He slips on the oil and bangs his head, knocking himself unconscious. Turn the lights back on again. Head up through the door, into the corridor.
CORRIDOR
Quickly head down the corridor, and go through the 2nd door on the right, into the Lift Room.
LIFT ROOM
Close the door, and use MAYNARD’S KEYS with the door to lock it. That should buy you some time. Now walk right a few steps, and simply use the Lift to get up to the Loading Bay.
LOADING BAY
Head left along the Walkway, and go through the door. Watch the cut scenes, as you make your escape, and return to Rome.
============================================================
PART 5
ROME
============================================================
~~~~~~~~~~~~~~~~~~~~~~~~~~~~~~~~~~~~~~
ANNA MARIA’S APARTMENT
~~~~~~~~~~~~~~~~~~~~~~~~~~~~~~~~~~~~~~
LIVING ROOM
After Nico told you what happened to her in Phoenix, the evidence against Anna Maria is overwhelming! But something inside you still doesn’t want to believe that Anna Maria is evil. You & Nico decide to go back to the Monastery - you’re determined to prove that she’s innocent.
~~~~~~~~~~~~~~~~~~~~~~~~~~~~~~~~~~~~~~
THE VATICAN
~~~~~~~~~~~~~~~~~~~~~~~~~~~~~~~~~~~~~~
STREETS
Talk to Nico and work through all the conversation topics. Talk to Archie on the bench and work through all the conversation topics. Look at the HALF EMPTY BOTTLE OF METHS on the pavement next to Archie. Try to take the HALF EMPTY BOTTLE OF METHS, but Archie objects.
Head up to the Monastery. Try as you might, the guards won’t let you in. You’ll need to find a way to distract them. Walk left a few steps, until you see the bin in the pavement - it‘s to the left of the guards. Look at the bin, and search the bin to find a HALF EMPTY BOTTLE OF CHAMPAGNE. Take the HALF EMPTY BOTTLE OF CHAMPAGNE. Head right, and go back to where Archie is sitting on the bench.
Talk to Archie, and ask him about the BOTTLE OF METHS 2 times. You offer him a trade. When prompted, choose the following option.
- Half Empty Bottle Of Champagne
He’s happy with that trade, so pick up the HALF EMPTY BOTTLE OF METHS from the pavement next to Archie.
Head up to the Monastery again, then walk left to the bin. Pour HALF EMPTY BOTTLE OF METHS into the bin, then use your LIGHTER with the bin to set it on fire. The guards rush over to try and put out the fire. This is your chance! Head right to the door next to the office window, then go through the door, into the wafer factory.
WAFER FACTORY
Walk forward a few steps, and enter the door that was previously locked.

Watch the cut scene with Sister Angelica. Nico is distracting her outside, allowing you to explore the room, uninterrupted. Walk left a few steps, and look at the conveyor belt full of wafers. You automatically eat a couple. Look at the Control Panel showing the wafer machine’s settings. Use the Control Panel - you can’t make hear nor tales from it, and smoke starts pouring from the machine. Look at the mixing vats in the corner, and look at the monotomic gold lying on the ground, between the mixers. What is gold doing near a wafer making machine? Watch the cut scene, as Sister Angelica returns. Work through the conversation topics with her. Watch the cut scene with the Cardinal. Look at the conveyor belt again. Leave the room.

Follow the path right, and go out into the Courtyard.
COURTYARD
Walk forward a few steps, and climb up the stairs. The Cardinal has left the gate open, so simply walk through the gate, into the garden.
MONASTERY GARDEN
Watch the cut scene. Go up the pathway on the left, making sure to avoid the Monks. Enter through the door at the far end of the garden.
MONASTERY - GROUND FLOOR FOYER
Watch the cut scene with Nico. She managed to get in here before you. Walk left, climb up the stairs, and go through the arch to the 1st Floor Foyer.
MONASTERY - 1ST FLOOR FOYER & PASSAGE
Head up the passage a few steps. Look through the window of the 1st door on the left, and enter through this door, into Devlin’s office.
DEVLIN’S OFFICE
Watch the long cut scene. The priests shoot the Cardinal, kidnap Nico, and knock you unconscious. Eventually, Brother Mark wakes you up. Thankfully, the Cardinal survives. He tells you about the Ark, and about the priests evil plan to bring forth the Angel Of Death. You HAVE to stop them! He gives you a MANUSCRIPT BOOK… then dies from his injuries. In your Inventory, look at the MANUSCRIPT BOOK, and read the information on the following subjects.
- Templar
- Turk (and Latin Text next to it)
- Assassin
- Mamluk
- Hospitaler
- The Ark (and Latin Text next to it)
- Jesus (top right)
Talk to Brother Mark and work through the conversation topics. Leave the office.
MONASTERY - 1ST FLOOR FOYER & PASSAGE
Head up the passage, to the end. Go through the door on the left, into the Cardinal’s Office.
CARDINAL’S OFFICE
Look again at the painting on the wall behind the Cardinal’s desk - the Ark Of Ashdod. Examine the painting again to see a close-up. Look again at the following sections in the painting.
- Angel on the bottom left corner (notice the hourglasses)
- Angel on the bottom right corner (notice the hourglasses)
- Temple block
- Men debating
- Woman with baby
- Men carrying corpse
When you’re ready, leave the office through the door on the right.
MONASTERY - 1ST FLOOR FOYER & PASSAGE
Head down the passage, back to the foyer.
Go through the arch on the right, and down the stairs, back to the Ground Floor Foyer.
MONASTERY - GROUND FLOOR FOYER
Look at the trapdoor in the floor, and try to open it - it’s locked. From your Inventory, use BROTHER MARK’S ICON with the trapdoor. He holds the trapdoor slightly ajar, giving you more room to work with the crack. Use your GOLF CLUB with the trapdoor - you finally manage to pry it open. Climb down the stairs in the trapdoor, into the Basement.
BASEMENT
There are 2 giant angels statues down here. Look at the heads of both statues, and move the heads of both statues, to learn that the heads just click back into place. Notice the 4 hourglasses below the angels - 2 for each statue. Look at the hourglasses to realise that you can turn them. But which way should you turn them? The clue was in the painting you saw in the Cardinal’s office. Turn the hourglasses like so.
- Left Angel Statue
- Left hourglass: Left 2 times
- Right hourglass: Left 2 times
- Climb up onto the statue, and pull the head
- Right Angel Statue
- Left hourglass: Left 1 time
- Right hourglass: Left time
- Climb up onto the statue, and pull the head
A stone slab on the ground between the angel statues, slides open. However, it shuts again quickly, so you don’t have enough time to get through it. From your Inventory, use BROTHER MARK’S ICON with the head of the giant angel statue on the right. Brother Mark is rather upset, because it means he won’t be able to come with you, but he reluctantly agrees to your request.
Thanks to Brother Mark, the stone slab stays open. Climb down the stone slab, into the Catacombs below.
~~~~~~~~~~~~~~~~~~~~~~~~~~~~~~~~~~~~~~
CATACOMBS
~~~~~~~~~~~~~~~~~~~~~~~~~~~~~~~~~~~~~~
CORRIDOR
Walk forward a few steps, and look at the junction box on the wall.

The plastic cover of the junction box is screwed tightly to the wall. Unscrew the plastic cover with your PASHA PALACE KNIFE. The junction box is now open. Now you can’t handle the live wires inside with your bare hands, so use the pink RUBBER GLOVES with the opened junction box. You pull the wires loose. Now walk round the corner, to the door.
Try to open the door, but it’s locked. How are you going to get through the door? Look at the LIGHT BULB in the socket to the left of the door. Touch the LIGHT BULB - it’s really hot. Use your FIRE PROOF BLANKET with the LIGHT BULB to pick it up. Place the C-4 EXPLOSIVES in the socket you took the LIGHT BULB from, then walk back down to the junction box.
Use your pink RUBBER GLOVES with the opened junction box, to re-connect the live wires. BOOM!!! The door explodes! Head up, through the door, into the Chamber.
CHAMBER
Watch the long cut scene. The monks catch you, and are about to shoot you, when Brother Mark comes to your rescue. Brother Mark is shot in the arm. Anna Maria pulls you to safety, away from all the gunfire. Wait… ANNA MARIA??? She tells you that she’s been kept a prisoner here, ever since you were with her in Istanbul. She also tells you that Nico is going to be used as a human interface in order to summon the Angel Of Death. She had believed that the Ark was a peaceful cause. Now, she knows otherwise. So she wants to help you save Nico, and stop the Ark ceremony.
Read the ‘Five’ verse on the pillar next to you. Now you may get trapped here, between Anna Maria, and the pillar. This bug is inconvenient, but just keep clicking on various spots in the ground, until you’re free. It may help, if you run (Ctrl) at the same time. Walk over to the right pillar, and read the ‘Seven’ verse. Search the chamber, and read all 14 verses on various walls and pillars. It doesn’t matter if you don’t find them all - it just gives you some background to the story. Find Brother Mark, who’s sitting on the floor, somewhere in this Chamber. Talk to Brother Mark and work through the conversation topics. Talk to Spallacci and work through the conversation topics.
Head up towards the archway at the top left, and go through the archway. Watch the cut scene with Archie. Good old Archie. Look at the diagrams and rollers in the wall on the right. Look at the MANUSCRIPT BOOK in your Inventory, and look at the 3 images of Jesus at the top right.
Use the diagrams and rollers to get a close-up. You have to turn the crucifixes in the centre row, to match the 3 diagrams of Jesus in the MANUSCRIPT BOOK. Turn the crucifixes like so.
- Move #1, 1 time
- Move #2, 5 times
- Move #3, 1 time

A door opens. Go through the door, into the corridor.
SMALL CORRIDOR
Follow the corridor along, and enter the Floor Tile Room.
FLOOR TILE ROOM
The aim here, is to cross the floor safely. You need to avoid the pillars falling on you, and crushing you, from above. Open your MANUSCRIPT BOOK, and read the Latin Text, to see a guide on how to get across the floor. Cross over the tiles, like so.

Go up through the door, into the small corridor.
SMALL CORRIDOR
Follow the corridor along, and enter the Floor Trap Room.
FLOOR TRAP ROOM
Walk across the narrow bridge. OH NO! You fell through a trap in the floor, and now you are being crushed! Anna Maria finds some levers in the wall, and she has to pull them in the correct order to release you. Again, open your MANUSCRIPT BOOK, and read the Latin Text, to see a guide. Pull the levers like so.
- Dagger (Assassin)
- Crescent Moon (Turk)
- Lion (Mamluk)
- Cross (Templar)
That’s it! The floor rises, releasing the trap, and bringing you back into the room. You need to push on. Go up through the arch, into the next room.
TEMPLAR KNIGHT STATUE ROOM
Look at the Templar Knight statue on the left. Open your MANUSCRIPT BOOK, and read The Fourth paragraph of the Latin Text: The master shall show the way through the warmth of his heart. Place the MAP in the Templar Knight’s hand, then use your LIGHTER with the MAP to set it on alight. The door opens. Go through the door, into the small corridor.
SMALL CORRIDOR
Walk straight up the corridor, into the Ark Room.
ARK ROOM
Watch the cut scene. It seems that the ceremony has already begun. A frustrated Anna Maria kicks the empty stand in the middle of the room, triggering a booby trap, and releasing poisonous gas into the room. Oh dear! Look at the base of the stand, to see a slot, and the words ‘Memento Mori’. Insert the ROSARY into the slot in the stand. A door on the right opens, and the room clears. Head up through the door, continue up the small corridor, and enter the Chapel.
CHAPEL
Watch the cut scene. The ceremony has indeed started, as Nico is being used as a sacrifice. She will become the Angel Of Death, if you don’t do something to stop this madness. She pleads with you to free her. Look at the 2 cherubs on the altar, and use your GOLF CLUB to smash one of the cherubs on the altar. Watch the cut scene. Anna Maria proves that she really is on your side now. Use your GOLF CLUB to smash the other cherub on the altar. Now watch the final bitter-sweet cut scene. You free Nico, but Anna Maria steps into the line of fire to save your life… and she dies! She was on your side all along! *sniff*
The End!
Contributed by
Freaky Hobbit


