Walkthrough for Crowns and Pawns: Kingdom of Deceit
Walkthrough for Crowns and Pawns: Kingdom of Deceit
Full Game & Prologue
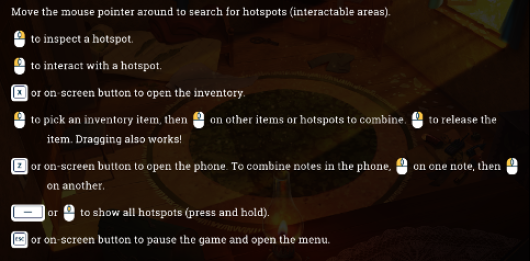
Controls
PROLOGUE
Part 1 – Milda's room
Computer screen
You play as Milda and at first we see a computer screen with the character creation tab open. To progress, Milda first needs to “Create a character”.
After she's done with her avatar and clicks “create”, the player receives a character creation email and a few seconds later, a computer voice call from Dana.
Get inheritance letter
During the conversation with Dana a doorbell rings. Milda quickly says goodbye and stands up. The player can now control Milda in her apartment. The doorbell continues to ring until Milda opens the door. Once Milda opens the door, a postman gives Milda a letter and leaves. Milda learns that her grandfather has died and she is the only heir to his house in Lithuania.
Leave
At any point after Milda is done talking with Dana and has picked up the letter from the mailman, she can leave to the Cloud Gate (the Bean), if the right conditions have been met:
- Milda has to get dressed (because she is in her pajamas). To do say the players needs to open the wardrobe.
- Phone must be picked up from the table.
Part 2 – The Bean
Talk to Dana
Milda meets Dana near the Cloud Gate (the Bean). Dana is stressed as she is about to meet with a possible investor for her artwork.
Dana and Milda discuss the inheritance letter and Dana tries to convince Milda to go to Lithuania and get the house that her grandfather left her. Milda complains about the money for the trip and Dana offers to give some money if they manage to convince a businessman Alfred to support her exhibition.
As Milda and Dana finish their chat, one of the lightest painting is blown off by the wind. Dana asks Milda to make sure everything's in order.
A0 PUZZLE 1: Secure the painting
Milda has to put up the blown off painting. Milda can pick up the painting but it won’t stay up. Milda needs to talk to Dana about it, who rambles about Alfred and mentions she has chewing gum. Milda can ask Dana to give her the chewing gum.
Now Milda needs to pick the painting up, and secure it with chewing gum. Regular chewing gum won’t stick so Milda has to chew it first. Then the player needs to use the chewed gum on the painting, thus the painting is secure. After that, Alfred comes in and starts talking to Dana.
Talking to Alfred
Dana introduces Milda to Alfred and the three of them begin to have a conversation about business. Milda’s final goal is to get Alfred to fund Dana’s exhibitions. Milda has to make sure that Alfred is satisfied and all conditions are met.
The first two things Alfred complains about and two puzzles that can be solved simultaneously:
- Alfred is thirsty, needs a refreshing drink
- Alfred is annoyed by the musician playing, wants him to stop
A0 PUZZLE 2: Getting lemonade
Milda needs to buy some refreshing lemonade. She can do that by talking to the lemonade girl. If Milda wants to buy the lemonade, she needs coins, because the lemonade girl doesn’t take cards. She can asks Dana for coins, once she needs them (after attempting to buy lemonade at least once). Once the player has acquired the coins, s/he needs to use them on the lemonade girl to buy lemonade. After buying the lemonade, Milda has to give it to Alfred.
A0 PUZZLE 3: Silence the loud musician
Alfred complains that he can't focus while the music is playing. Milda can ask the trumpeter to stop playing but he refuses. In order to silence the trumpeter the player must pour lemon juice on the trumpet (which can be acquired in A0 PUZZLE 3.1). Milda learns that the lemonade that the girl scout sells is made from very sour lemons that “make your mouth shrink”. After Milda gets the lemon juice, she has to pour it on the trumpet. Timed puzzle. Milda has to put coins into the trumpeter’s case. He walks to pick them up, and Milda has to pour the juice in the trumpet while musician is distracted. After she successfully does that, the trumpeter stops playing.
A0 PUZZLE 3.1: Get lemon juice
Milda asks to buy the lemon juice from the girl scout but she refuses to sell so Milda has to convince her that she likes sour lemon juice. To do that, Milda has to chew the gum, that numbs her mouth. Timed puzzle. After chewing the gum, Milda’s mouth becomes numb, which fades off over time. Milda has to drink the lemon juice as a challenge during that time to successfully prove to the girl scout that she likes sour taste. After that Milda can buy the sour lemon juice from the girl with coins.
Talking to Alfred. Part 2
When the trumpeter stops playing and Alfred has gotten a drink, he agrees to continue talking to Dana and Milda. Alfred says that Dana needs:
- promotional material (fliers)
- a mascot for her exhibition.
A0 PUZZLE 4: Print Dana's fliers
Milda needs to print the fliers that Dana sent her.
To print the fliers Milda has to go home, open her computer, open the mail tab – click on Dana's letter – click to print one of the attachments. After the fliers are printed, the player can pick them up from the printer.
Milda has to bring Alfred the right kind of flier. She can guess that from the clothes he’s wearing. He’s wearing pink, so the pink flier is the right one.
A0 PUZZLE 5: Get dressed as in Dana's artwork
Milda has to get dressed the same as in Dana's artwork. To see that in game, the player needs to either examine the flier from the inventory (it is also visible in the email).
When speaking to Alfred, Milda is hinted by Alfred that he's disappointed in Milda's change of style if Milda doesn't wear what she was wearing in the artwork as a model for Dana. Milda may return home to change as needed. The correct clothes are these (the hairstyle doesn’t matter):

End of Part 2
Once all the conditions are met, Alfred agrees to fund Dana. He leaves and Dana suggests she and Milda celebrate and prepare for Milda’s trip to Lithuania. Milda can freely walk around the Bean for now, or she can go straight home for the next part.
Part 3 – Milda’s room, preparing for trip
Talking to Dana
Milda talks to Dana about the trip, what needs to be prepared. To proceed Milda needs to do the following:
- Get plane tickets (automatically done after the conversation with Dana).
- Pack her stuff (note puzzle).
- Contact Joris (SMS).
- Gather her profession related items (this can be done any time during the chapter).
- Call mother (phone call).
A0 PUZZLE 6: Packing
Milda needs to pack the items for the trip. The puzzle is on Milda’s phone, in the “Notes” section. Milda needs to pack 5 things and make sure she gets all the essentials. Some items have very similar qualities, so only one of those should be taken.
POSSIBLE SOLUTION (as there are more than one): (1) one pair of shoes, (2) shorts OR jeans, (3) earphones OR headphones, (4) documents, (5) toiletries.
Contacting Joris
Milda has to text Joris to arrange coming to Lithuania. To proceed the player needs to open the phone menu and go to the messages section.
Talking to mother
Milda needs to call her mother, to tell her that grandfather has died and that she’s going to Lithuania. To proceed the player needs to open the phone menu and go to the calls section. The choices during the call determines Milda’s relationship with her mother for the rest of the game.
End of PROLOGUE
Once Milda does all of this, she can talk to Dana and they agree that Milda is ready for the trip. Ending cutscene starts which transitions to Act 1.
ACT 1
Part 1 – Arriving at grandfather’s house
Milda arrives from Chicago to her grandfather’s house. Strangely, she finds the door unlocked. Once she goes inside the house, it is dark and the light switch doesn’t work. Milda needs to go back outside and get electricity back on.
A1 PUZZLE 1: Fusebox puzzle
Milda needs to use the keys from the grandfather’s house, that she has in her inventory, to unlock the fusebox. Then she can enter a close up – mini game. The player needs to solve the fusebox puzzle to get the light back on.
Solution: ↑←↓←↑↓
Milda then goes inside and turns on the light using the lightswitch. The whole kitchen is trashed and Milda hears footsteps and a window crashing in the other room. If she tries to investigate it, the door to the other room is blocked. Milda needs to go back outside, where she notices a broken window. Milda climbs through the window to grandpa’s bedroom.
When Milda enters the room, there’s a walkie talkie on the ground, through which someone keeps talking. When Milda picks it up and answers, the person on the other side seems to know Milda and tells her to give him some kind of documents. Milda doesn’t know what he’s talking about but she still refuses to give anything to him. She realizes though that whatever it is, must be important, so she keeps looking around.
Scattered around the house, there are 5 blank pages:
- (essential) in the mailbox (along with grandfather’s library card)
- on the table in the kitchen
- on the top of a cabinet in the kitchen
- (essential) under the door between kitchen and bedroom
- (essential) under the bed in the bedroom
In one of the drawers in the bedroom Milda also finds a bottle of Invisible ink, which suggests that perhaps the pages aren’t blank after all. The ink is made from strong alcohol and lemon juice and to be visible, needs to be heated.
A1 PUZZLE 2: Lighting up the oil lamp
There’s an oil lamp in the bedroom that Milda needs to light up. She needs to pick up a bottle of kerosene from the cupboard in the kitchen and a lighter from the oven. Using the kerosene and the lighter Milda lights up the lamp.
A1 PUZZLE 3: Figuring out grandfather’s letter (CLOSE UP)
Using the blank pages on the lamp opens up a mini game, where the player needs to find the right pages, on which there’s text and putting them all together reveals a letter from Milda’s grandfather. In the letter there’s a poem and a note from grandfather, telling Milda to check the hollow in the tree in the garden.
A1 PUZZLE 4: Getting gardening shears
In order to get to the tree, Milda needs to cut the Sosnowski’s hogweed. For that she needs gardening shears. There’s broken gardening shears and a nut in the toolbox in the bedroom.
A1 PUZZLE 4.1: Finding the bolt
To find the bolt, Milda needs to pick up the metal detector from the bedroom and power it with batteries that are found in the cupboard in the kitchen. Then she needs to use the powered metal detector on the garden to mark a spot and then use the shovel on the new marked spot, to dig out a bolt.
But this bolt doesn’t fit the nut that Milda has.
A1 PUZZLE 4.2: Finding the right nut
The right nut is in the crack in the floor in the kitchen. Milda needs to pick up the magnets from the sink in the kitchen (there are two magnets that Milda automatically picks up, they both have close ups when examined, which is used for another puzzle), and a string from a drawer in the bedroom. She needs to use the magnet that is also a bottle opener (the St. John’s one) to attach the string to it and then use the magnet on the string on the crack, to fish out the right sized nut.
Using the bolt and the right nut Milda can fix the gardening shears and then use them to cut the Sosnowski’s hogweed. Then she reaches in to the tree hollow and picks up documents and a wooden box from it.
A1 PUZZLE 5: Solving the wooden box
Go to inventory and open wooden box by inspecting it. The wooden box puzzle is made out of 5 movable pictures, that need to be put into the right order. The order can be found in grandfather’s letter – the most bolded words are the answers.
SOLUTION: Horseman → Crown → Tomb → Sing → King
In the wooden box, Milda finds some kind of a note in a foreign (old polish) language.
As soon as she inspects the note, Milda gets a phone call, from the same mysterious person that was talking through the walkie-talkie. He says that his patience is running out and he is coming to deal with Milda in person. Milda decides she needs to get out of there.
Milda goes to Joris’ house (click on the car outside).
Part 2 – Joris place Night (Joris street → Joris flat)
Milda comes to Joris’ place at night. Joris is standing in the balcony in the street and shouts out to Milda to come up.
Once Milda comes into the flat, they start talking about her trip and then Milda tells Joris about what happened at her grandfather’s house. To progress, Milda needs to discuss all her findings with Joris:
- The old polish note (from the wooden box)
- The KGB documents
- Grandpa’s letter
A1 PUZZLE 6: Old polish text translation (see Mini Game section for more info)
Milda gives Joris the old polish text which Joris loosely translates, however there is much space for interpretation, so Milda has to help Joris make sense of the message. The message is presented with Joris' translation and optional words that might fit the message. Milda needs to make the message clear by choosing the correct words.
Translated text
As the order instructed, the three keys to the crown are safely hidden thanks to the Grand Architect. The great fire provided him with the opportunity to chose different gods, as demonstrated in this manuscript.
A1 PUZZLE 7: Making Grandpa’s letter transparent
Milda needs to make grandpa’s letter easily readable without a light source. Joris suggests to use something to make the pages see-through. Milda needs to find oil in Joris’ place – which is in a cabinet in the kitchen. Milda needs to combine oil with the blank pages and she gets grandpa’s letter that she can read whenever right from her inventory.
Talking to Joris
Milda talks to Joris about each of her findings at her grandfather’s house:
- From Grandpa’s letter Milda learns about Vytautas the Great
- From the KGB letters Milda learns that it was actually her father, Linas Kovas, who was involved with the KGB. She also learns about a KGB project KOSCHEI, but the information is very vague. Milda gets a note in her phone „Dad was involved in project Koschei.“
- After learning about father’s involvement with KGB, Milda decides to call her mother to ask more about it. Her mother is reluctant to talk about it and even gets upset of the topic of Milda’s gradfather and father. She blurts out something about them being all about “pagans” and all that but when Milda asks more, mother refuses to continue this conversation. Milda gets intrigued, why did mother mention “pagans”. Milda gets a note „Dad researched pagan temples.“
- The old polish text raises more questions, than answers.
After all that, Milda notes that tomorrow she should investigate:
- The old polish text (she and Joris decide to post about it in a history forums, looking for help).
- KGB (need to find father).
- Pagans (from mom/need to find father).
Milda adds a note: „Dad and grandpa were looking for the crown of Vytautas.”.
They agree to go to sleep and continue their research in the morning. Right before sleep, Milda starts texting with Dana about what happened so far. The texting drifts off to a black screen and a new day begins.
ACT 2
Part 1 – VU library visit
Joris’ flat, morning
Joris wakes Milda and tells her that a history professor from Vilnius University reached out to them, suggesting help. Joris arranged for Milda to meet him in the Vilnius University library so Milda has to get up and get ready to go out. Before leaving, Joris asks if Milda wants a bagel for breakfast, which is an optional choice.
Joris leaves ahead and Milda stays at Joris’ place in her pajamas. This is for the player to be introduced to wardrobe in this chapter. Milda says that she should change before going out The player needs to go to the luggage which is Milda’s wardrobe in the next few acts.
Joris’ street, day
Milda goes out and finds Joris outside the building. Here Joris gives her a bagel, or not, depending on the player’s choice before, and also mentions that the bagels here are great because the shop is run by the Jewish community. Then Joris says he’ll show her the way to Vilnius university
VU outside → VU library
Milda and Joris arrives at VU outside, where Joris introduces the place to Milda. He says the professor will be waiting inside the library and he leaves Milda here, saying they can later meet up at his place. Joris leaves and Milda can go inside.
At the library she meets with Karolis, the history professor. He suggests they look at the translated old Polish note so he could explain parts of it. (Milda can’t leave the VU outside until she talks to Karolis and shows him the translation.)
When the old polish note is dragged on Karolis, the player can click on some words/sentences and Karolis explains that specific thing. To proceed, the player needs to click on all the important words to get notes about them. The clickable parts of the text are: “keys”, “Architect”, “fire”, “gods”, “manuscript”.
Besides finishing the conversaton with Karolis, Milda is free to continue her research by herself. What she can do at the library is:
- Learn more about the KGB and project KOSCHEI.
- Learn more about pagan temples.
- Get more information from her Grandfather’s library card.
- Get a list of Glaubitz’s churches and start the church puzzle (only after talking to Karolis).
A2 PUZZLE 3: Getting information about KGB (CLOSE UP)
Milda needs to ask the librarian for information about the KGB. The librarian will give Milda a book about KGB which is presented to the player as a close up with text, some of which is clickable and gives Milda notes.
The possible notes to get:
- „Project Koschei was dedicated to finding artifacts with special powers.“
- „I should ask the librarian about GRRCL.“
Getting the number of the GRRCL
One of the notes Milda finds on the book about KGB is a source, where more information on the topic could be found. It is GRRCL and Milda asks the librarian what it stands for. The librarian explains that it’s the Genocide and Resistance Research Center of Lithuania. The librarian provides Milda with GRRCL phone number so that she could look for more information there.
Calling the GRRCL
Milda calls the research center where she asks for more information about her father. The call itself is required to proceed the story (after doing this call AND visiting the Holy Spirit street location at least 2 times, Milda will get a mysterious text message).
A2 PUZZLE 4: Getting information about pagans
Milda needs to ask librarian for information about pagans. The librarian will give Milda a book about pagan temples which is presented to the player as close up with text, some of which is clickable and gives Milda notes. Milda adds this note: „Pagan temple sites: Šventaragis' valley, Sapiega palace territory, entrance to Antakalnis district.”
A2 PUZZLE 5: Getting information from Grandfather’s library card
Milda needs to learn about the books her grandfather has taken from the library. But the librarian refuses to tell her, because of the privacy policy. Milda needs to find a way to get access to the database herself. The librarian tells Milda that she can use the library laptop to access her account (or her grandfather’s) but she needs to know the password. The librarian also tells her, that she (the librarian) could access the account, which is a hint that the player needs to figure out the librarian’s username and password.
All professions need to figure out two things: the librarian’s username and password.
Getting the username
To get the username, Milda needs to do these steps:
- Look at grandfather’s id from inventory and when in close up, click on grandfather’s username, to get a note with it: „Grandfather's account id is kovas.rokas“.
- Inspect librarian’s id on the table to get her name and surname as a note: „Librarian's name is Eva Bardaitė.“
- Combine the two notes to get the librarian’s username: „Librarian's account id is bardaite.eva“.
Getting the password
Version 1: Programmer
Milda needs to ask the librarian for Necronomicon – a book that is really far in the library that it takes a long time for the librarian to get and come back. This is a timed puzzle. While the librarian is away, Milda needs to use her USB stick on the librarian’s computer to plant a keylogger. Once the librarian comes back and types her password – Milda gets a note with the librarian’s password: „Librarian's password is Fortuna123“.
Version 2: Photographer
Milda needs to ask the librarian for Necronomicon – a book that is really far in the library that it takes a long time for the librarian to get and come back. This is a timed puzzle. While the librarian is away, Milda needs to turn the mirror on the librarians table so that it would reflect the computer screen. Then, after the librarian comes back, Milda needs to use her camera on the mirror to take a photo while the librarian is typing and that way she gets a note with the librarian’s password: „Librarian's password is Fortuna123“.
Version 3: Psychologist
After talking to the librarian once, Milda needs to use her psychology related book to make an observation. She notices the librarian seems irritated, tired, in pain perhaps. She realizes, it’s probably cramps. Milda has to talk to the librarian about it, this is a dialogue puzzle – choosing the right options moves the dialogue forward and eventually Milda talks the librarian into taking some pills that Milda has. After the taking the pills, the librarian is feeling friendlier towards Milda and suggests help. Milda asks if she could access grandfather’s account, but the librarian says she can’t do that. She suggests though that Milda try to access it herself, try guessing grandfather’s password. Librarian suggest the password could be a pet’s name with 123 at the end. Milda gets a note with this suggestion: „Librarian suggested to guess grandpa's password – might be a pet's name with 123”. Then, when Milda learns (or has learned by this point) the name of the librarian’s cat, she also gets a note with it: „Librarian's cat's name is Fortuna”. The player needs to combine the two notes – the cat’s name and the librarian’s suggestion – and gets a note „Librarian's password might be Fortuna123“.
Using laptop
From the moment Milda starts the grandfather’s books puzzle by using it on the librarian, she can sit down at the laptop and try to access the system. At first, Milda needs to input an account name. Her options are:
- (if have note with grandfather’s account name) kovas.rokas
- (if have note with librarian’s account name) bardaite.eva
- leave
Once clicked on an account name, Milda needs to input a password.
If she is accessing grandfather’s account she gets three random passwords, none of them work.
If she’s accessing librarian’s account name, she gets these options:
- password123
- 12345
- ILoveBooks
- (if she has figured out the librarian’s password) Fortuna123 - correct
- leave
Once Milda access the librarian’s account, she learns about grandfather’s book history and gets a note: „Grandfather hasn't returned one book – Don Quixote by Miguel de Cervantes.”.
Getting grandfather’s book – manuscript
After getting the information from VU library, that grandfather hasn’t returned the book Don Quixote by Miguel de Cervantes, Milda should go back to her grandfather’s house and search through the books there. The first search doesn’t yield results, just a random book. The second search, yields results. Milda finds the book and when she opens it, she notices that it’s actually a manuscript of the architect J.C. Glaubitz. Also in the book Milda finds Chancellor List.
A2 PUZZLE 6: Note puzzle, finding the three churches
After Milda has talked to Karolis about the note, Milda needs to ask the librarian for a book with a list of churches that Glaubitz worked on. Once Milda gets the book, the player needs to click on it and Milda makes a list of 11 churches (as notes) that Glaubitz worked on. Now she needs to narrow them down to three. This is a note combining puzzle. The player has to open up notes on the phone and narrow down the list of churches to three, based on the year they were built/reconstructed, the city they’re in and the religion they represent. Most of the the clues for the conditions can be found in the old polish text.
The final list should consist of these:
- St. Catherine’s church.
- The Orthodox church of Holy Spirit.
- The Jewish Great Synagogue of Vilnius.
A2 PUZZLE 6.1: Narrowing down the catholic churches
Since there’s not enough information to narrow down catholic churches, a few of them fit the facts from the Old Polish translation note. To proceed and finish the church note puzzle, the player needs the manuscript from Grandpa’s house. Once Milda finds the manuscript and opens the page with the catholic church (it’s the one with the 8 statues of saints), she needs to compare the statues in the manuscript with the magnets she has from her grandfather’s house. The magnets are very similar, both depicting a bishop with a staff. The main difference is the staff’s top. The staffs in the manuscript match the staff on the St. Catherine’s magnet. The player needs to use the St. Catherine’s magnet on the bishop shown in the manuscript and thus Milda decides, that must be the church. From this point onward, the player may combine St. Catherine’s church note to get the final answer.
Meeting Joris
After Milda finds out all the three churches, she says she should discuss them with Joris. She can either call him, which will result in him telling her to come over. Or she can go straight to his home.
Part 2 – Joris place
Next steps
As Milda and Joris confirm the three churches list, they discuss each one.
- Talking about the Holy Spirit church, opens a new area on map.
- Talking about St. Catherine’s church also opens a new area on map.
- Joris mentions that the Jewish Synagogue has been destroyed. Milda says she’ll look for more information on it. IF the player has picked up the promotional flier which is on the table next to the bagels shop, Milda will mention here that she heard about some lecture about Jewish heritage, which could lead to more clues.
This all opens 3 paths the player can move forward with – finding a key in each of the three churches.
→ Pursuing Holy Spirit Church path
→ Pursuing Jewish Synagogue path
→ Pursuing St. Catherine’s church path (this is a dead end for now. Milda can go to the St. Catherine’s church and attempt to enter it, but is stopped by the cleaning lady and construction workers, as there is construction work being done inside.)
Part 4 – Holy Spirit Church
Milda visits the Holy Spirit Church. The priest however tells her that he is concerned with other matters at the moment and Milda learns that the Eucharistic wine has been stolen from the church. The priest says he’s too busy to discuss anything else as he is most concerned with the Eucharistic wine being stolen.
Finding the wine
In order to proceed, Milda needs to find the stolen wine. Milda needs to visit the St. Catherine Church location and notice a homeless man there. A wine bottle is seen on his bag. If Milda inspects the bottle in the bag, she can ask the man about it and learn that he in fact stole the Eucharistic wine to „wash his sins away“. Milda also learns, that the man thinks that holy wine is made by mixing red wine and holy water.
A2 PUZZLE 7: Making holy wine – street style
Milda needs to find a replacement wine for the man to get the Eucharistic wine back. First Milda needs to pick up a half full red wine bottle from Joris place (might already be in the inventory) and mix it with holy water, by using it on the holy water font in the Holy Spirit Church. Though, if Milda tries to give it to the homeless man, he’ll complain that it seems weak, as if it’s diluted. To make it stronger, Milda needs to mix in the Invisible Ink in it (since it’s made from strong alcohol). The final product then needs to be given to the homeless man. Once given, the guy says Milda can just take the Eucharistic wine from his bag.
Quick puzzle solution: mix (1) half full red wine bottle, (2) invisible ink, (3) holy water (from the holy water font in the Holy Spirit Church).
Giving back the wine
Milda can then bring the Eucharistic wine to the priest, which he will be really thankful for. Milda can then again ask him if he knows anything about keys hidden here, but the priest is not sure what she’s talking about.
Asking the priest again for information, based on reading the manuscript
The information on how to proceed is in the Glaubitz manuscript now. The player needs to drag the Glaubitz manuscript on the specific iconostasis, that is shown in the manuscript, OR inspect the iconostasis in the Glaubitz manuscript while being in the church OR drag the Glaubitz manuscript on the priest. Any of these options open a new conversation option: „Did anyone try to look behind the iconostasis?“. When asked like this, the priest mentions that indeed something was found there, but not a key, but a seal stamp of a chancellor with the symbol “W” on it. Milda also learns that it was given to the VU archives for safekeeping. Thus opening a new path.
Part 5 – VU archives
Getting access
In order to get into the VU archives, Milda needs to get an access card. If Milda asks the librarian about the archives, she says that it’s only accessible for employees. The player could have noticed earlier that the librarian’s cat was sitting on the table on the access card but now both the card and the cat are gone from the table.
A2 PUZZLE 8: Cat Chase
When the player goes back out to the VU courtyard, the librarian’s cat can be seen near the flower pots. If Milda approaches the cat directly, it runs away to another flower pot. To solve this puzzle Milda needs to: learn that the cat’s name is Fortuna because she likes tuna (this can be learned while talking to the librarian[optional]) → get a tuna bagel from the bagel shop at Joris’ street → attach the tuna bagel to the magnet on the string → attach the magnet with tuna bagel to the drain pipe on the side of VU library building → chase the cat around until it stops at the bagel. At this point the cat will come to get the bagel and will be busy long enough for Milda to take the id card.
Going into VU achives
When Milda enters the VU archives, there’s an item on the table to pick up – glue. Then there are 3 hotspots of interest – the 3D printer, the computer terminal and the window where archive boxes are accessed through.
A2 PUZZLE 9: Archives computer terminal (see Mini Games section for more information)
Milda needs to choose the correct options in the terminal, to find the seal. She can learn the century of the seal stamp by looking at the chancellor list and finding the right symbol there. That way she learns it’s a stamp of Albertas Goštautas. The priest in the church also mentioned, that the stamp was from a political figure, giving her the answer to the right theme. Milda only needs to guess the material, which is metal.
SOLUTION: Choose “XVI”, “politics”, “metal”.
Once the correct choices are made, Milda presses OK and the robot hand brings the box AND locks the exit, so Milda can't leave until she returns the box.
A2 PUZZLE 11: Making a copy of the seal
Milda has to make a copy of a seal using the 3D printer inside the archives. In order to copy a seal, Milda needs to put the seal into the printer, then put metal block materials that she finds on top of the printer to match the right weight of the seal for printing into the printer’s materials drawer. However the material amount never matches accurately so Milda needs to add the nut that she found at grandpa's place. The nut is equal to a small metal cube. Once it is done, the printing begins. The copy comes out and Milda picks up the first seal copy. Now Milda has two options – to return the real seal or the copy to the box (moral choice). Milda needs to put either of those seals into the box, then press the return button in the terminal and the computer hand will take it, opening the gate to the exit as well. Practically there is no difference which seal will Milda decide to keep except for some comments.
SOLUTION: 1 big metal cube, 1 medium metal cube, 2 small metal cubes, nut.
Part 6 – Jewish Synagogue questline
Finding more information about Synagogue
After researching the churches and inquiring more about the Synagogue, Milda learns that it was destroyed during the second world war.
There are many hints during the game, both said by Joris and can be reached in the conversation with the bagel shop lady, that the bagel shop is run by the Jewish society. These hints should point the player to search for more information around the bagel shop.
Talking to the bagel shop lady
During the day, on the table next to the bagel shop, Milda can find a promotional flier that advertises an exhibition of new archaeological findings at the synagogue site. But the exhibitions is not in a few days. It also says that for more information, you can ask at the bagel shop. If Milda drags the promotional flier on the bagel shop lady, she can ask more about the exhibition (this can be done at any point during A2). If Milda already knows about Synagogue (after church puzzle), she can ask about it at the bagel shop lady. Milda shows a lot of interest in the Synagogue and asks to meet with the lecturer, Tamara.
Meeting with Tamara
Milda meets with Tamara next to the bagel shop. Tamara has a picture from the digging site that was recently worked on for Milda to see, that shows some of the most notable found objects.
A2 PUZZLE 12: Synagogue archaeological findings picture
The player is presented with a picture of an archaeological site with some items scattered around. The player can click on the items to get more information from Tamara about them. One of the items is mislabeled as “candlestick”.
If the archives puzzle is complete and Milda already has one seal, once the player examines the “candlestick”, Milda comments – „wait… this looks familiar.“ The player needs to drag the seal from inventory on the candlestick hotspot so that Milda would realize, the “candlestick” is actually a seal.
Getting grandfather’s phone number
After Milda asks Tamara more about the “candlestick”, Tamara mentions it was just sold to a candlestick collector. Tamara suggests to share the number of the collector, since Milda is so interested in it. If Milda tries to call it, the “collector” denies that this is the right number.
If Milda has already talked to the travel agent about the hockey game, here Milda gets a text from the travel agent saying the fan bus has arrived.
Part 7 – Getting to Belarus questline
A text from an unknown number
At a specific point in game (after the second entry to Holy Spirit outside and after talking to the GRRCL) during A2, Milda gets a text from an unknown number, telling her to come to the Moniuszko Square, near St. Catherine’s church.
Shady meeting
Once Milda comes to the location next to the St. Catherine Church after getting the message, there’s nothing new there yet. Milda needs to ask around, specifically the Homeless man, if he’s the one that texted her. That conversation lead nowhere, but after it, a voice starts speaking from behind the statue. The mysterious person tells Milda he knew her father and gives her a note with a phone number on it, saying the person’s name is Vlad and he might be able to help her more. Without explaining anything further, the mysterious person disappears.
Call with Vlad
Milda calls the number she received and indeed reaches a person named Vlad. She mentions her father in the call and Vlad says he was expecting her. He tells her to come to Minsk, Belarus and they’ll talk then. Now Milda needs a way to get there.
Travel agency
Milda visits the Travel Agency near the Holy Spirit Church. She asks the travel agent there, if she could travel to Minsk. The agent says she needs to fill in the visa papers and in 3 to 5 business days, Milda will be able to travel. Milda takes the papers and walks to a table to fill them.
Travel agency table (CLOSE UP)
Milda is presented with a bunch of papers, that she can start filling in. At any given time, Milda can just turn each page, until they’re all turned away and the player notices a flier on the table. It’s an advertisement for a hockey game between Lithuania and Belarus, that’s happening today. It also says, that if you’re going to the game only, you don’t need a visa. Milda needs to pick up the flier. (filling the application is optional).
Getting to a hockey game
The player needs to drag the flier about the hockey game on the travel agent. That starts a conversation about going to the hockey game. The travel agent can sell Milda the ticket, but the bus is for fan club members only. Milda asks if there’s any way she could go even though she’s not a fan and the agent says, she needs to convince the bus driver to let her go. Milda asks, when will the bus get here. The conversation with the travel agent has two outcomes:
→ If Milda hasn’t gotten the candlestick collector number from Tamara yet, the travel agent says she’ll send Milda a text, when the bus gets here.
→ If everything else in A2 is done, the travel agent will say that the bus is right outside.
Convincing the bus driver
As Milda goes to talk to the bus driver, he refuses to let her in because she is not a fan. He finally agrees on one condition – Milda needs to at least look like a fan. For that he suggest she finds a T-shirt that makes her look like one.
A2 PUZZLE 13: Finding/making a fan T-shirt
In order to look like a fan, Milda needs a T-shirt that makes her look like a fan (similar to the t-shirt the driver has). To do so, Milda needs these items: Grandpa’s old green sweatshirt (found in Grandpa’s bedroom), flag with coat of arms (found in VU library), glue (found in VU archives) and shears (from A1). Milda needs to cut (use shears on the shirt) the shirt’s sleeves to make it a T-shirt (the sleeves are kept as a separate item), then cut out the coat of arms from the flag and glue it on the T-shirt. After creating the T-shirt, Milda automatically puts it on.
Going to Belarus
After Milda comes back to the bus driver while wearing the fan T-shirt, he finally agrees to let her in. Before getting on, Milda calls Vlad to tell him she’ll be coming to the hockey game and he tells her to meet him in the VIP room.
ACT 3
Part 1 – Bus ride to Belarus (Bus to Belarus day)
Milda is riding the bus to Belarus next to a sleeping fan. If she tries to wake him, no use – he’s fast asleep. Milda can pick up a Lithuanian flag nearby, that’s dropped on the drums. After taking it, honking horn is revealed. Milda can take the honk horns. Then she can either use the Honk Horn on the fan or just click on the honk in the inventory and honk once to wake the fan up. During the dialogue with the fan, Milda learns that some hockey player lineups that are better against others, and also learns how to honk the horn, the different sounds it makes and how much influence it has on the masses. As the dialogue ends, the bus ride ends and a cutscene shows Milda arriving to Minsk.
Part 2 – Meeting Vlad (Hockey arena → VIP lounge)
As Milda arrives to the hockey game, she needs to go to the VIP lounge to meet Vlad. He greets her and tells her to take the painting and leave the money for it. But Milda has no idea what painting that is. After a bit of conversation, Milda learns that Vlad was contacted by her father a few weeks ago and said that a family member will pick up the painting. When Milda asks for the number, Vlad refuses to give it to her. Their further conversation is interrupted as the Lithuanian team scores a point and Vlad goes to make a phone call.
ACT 3 PUZZLE 1: Making the bet
Milda is free to look around the room while Vlad is on a phone call. Milda needs to inspect the painting, take the sheet off of it, and she notices it’s a painting of Vytautas the Great. After the painting inspection, Vlad’s phone call ends and Milda can continue the conversation. Milda has to make a bet, dialogue puzzle. Milda needs to agree that if the Belarus wins, Milda can get the painting and her dad’s number, and if she loses, she will give Vlad her grandfather’s house. Vlad agrees to it.
ACT 3 PUZZLE 2: Winning the hockey game for Belarus
The player has to influence the game in various ways to help Belarus win. The puzzle proceeds forward as the game state meets the right conditions. The game consists of 3 periods and an overtime. The period changes when the right conditions are met. When Milda arrives, it’s the 1st period. While she talks to Vlad for the first time, Lithuania scores and now it’s 1:0. As soon as the bet is made, the period changes.
Honk Horn patterns:
Attack: 1, 2, 2, 1, 1
Defend: 3, 3, 1, 1, 3, 3, 2, 1
=2nd period=
1. Milda needs to play the attacking tune while in the Hockey arena.
Belarus scores. The score now is 1:1.
=3rd period=
1. Milda needs to put up a flag on the glass to disturb the players. To do so, Milda needs to pick up the Belarus flag from the VIP room and glue it with the Lithuanian flag she has from the bus. Then put up the two sided flag on the protective glass in the arena. (this can be done in the 2nd period as well, it is a required task in this period only though).
2. Milda needs to play the defensive tune while in the Hockey arena.
The score stays 1:1.
=Overtime=
1. Milda needs to ask Vlad to change the line up to win against the ones Lithuania just switched out. The player can see which pairs and which lines are out in the screen in the VIP lounge. The players needs to see which pair is Lithuania using right now and choose the correct Belarus line up to go against it. This information is given by the fan, back in the arena. He explains to Milda which lines go against which pairs.
The line ups that should be used:

2. Milda needs to play the attacking tune while in the Hockey arena.
Belarus scores. The score is 1:2.
Taking the win
As Belarus wins, there’s a fade to black and Milda appears in the VIP lounge. Milda talks to Vlad. Milda gets dad’s phone number, which, she realizes, is the same number she got from Tamara – the person’s who bought the “candlestick”.
Calling dad
Milda needs to call the number again and this time she mentions her name and calls out for dad. The person recognizes her and without explaining anything further, tells her to meet him tomorrow in Italy, Siena.
Part 3 – Going home
Milda rides the bus back to Lithuania. It’s evening outside, the fan next to her is sad about Lithuania losing and Milda is sitting next to him. Here player gets a new text message from Dana. Player needs to go to phone, messages and have a messages exchange with Dana. The scene changes.
Part 4 – Planning next steps (Joris flat night)
Milda comes back to Joris’ place with the painting and tells him she got her dad’s number from Vlad in Belarus. She tells him that she needs a plane ticket to Italy to meet him. Joris finds a ticket that leaves in a few hours.
Milda and Joris also discuss the painting that she brought back from Belarus. They decide to bring in Dana for the discussion as she could be more of help as an artist. They give her a quick call and ask her to take a deeper look at the painting while Milda goes off to Siena.
ACT 4
Part 1 – Getting to the meeting with dad (grandfather) (Siena Square → Siena Alley)
As Milda arrives to Siena she walks from the Square, to the Alley. There a stand with balloons is seen as well as a goat standing around. The goat is blocking Milda’s way to the Balcony.
A4 PUZZLE 1: Milda needs to use the apple from her grandfather’s house on the goat. When Milda tries to give the goat the apple, the goat bites Milda’s hand and the apple falls further to the right. The goat follows the apple and eats it, that way unblocking Milda’s way to the Balcony.
Part 2 – Meeting dad (grandfather) (Siena Balcony)
Milda climbs up to the Balcony, where she expects to meet her dad but instead finds her grandfather Rokas. He answers a lot of her questions about her father, project Koschei, pagan temples, being in Italy and all the clues he left. He also tells her that there’s a key to the St Catherine’s church attached to his house keys that Milda has in her inventory. They take a look at the chancellor list, grandfather explains, that he believes the crown was passed down from one chancellor to another (not every chancellor might have used it though). But their meeting is interrupted as Karolis walks in, revealing that he’s the bad guy and demanding they give him the seals. Milda needs to figure out a way to escape while Karolis is threatening to shoot her and bickers with Rokas.
A4 PUZZLE 2: On the table in the balcony, there’s a bowl of apples. Milda can pick up apples from it (one apple at a time can be in inventory). There’s also the option to look down to the Ground Level, back to the Alley.
Looking to the Alley there are a few hotspots of interest for this puzzle: a balloon full of helium, ready to be sold, a gas tank with helium (He) and a gas tank with hydrogen (H). The gas tank with helium is connected to the pump that fills the balloons.
Milda can use one of the apples on one of the hotspots. Once used, she drops the fruit and the goat walks to it and starts chewing it, chewing something next to the hotspot as well. If the fruit is used on the balloon, the goat chews off the string that’s holding the balloon and the balloon flies up in the air. As soon as the balloon seller sees that, he shoos the goat away, inflates and ties up a new balloon. If Milda drops an apple next to the helium (He) gas tank, the goat chews off the tube that connects the tank to the balloon pump. Being out of options, the balloon seller connects the hydrogen (H) tank to the pump and pumps a new balloon, this time – with hydrogen. If Milda drops an apple on the hydrogen tank (H), the goat might try to chew the tube off as well, but it is much stronger so she cannot do that.
Once the hydrogen tank is connected to the pump, Milda needs to throw an apple next to the balloon, so the goat would chew off the string and the balloon would fly away. Then the balloon seller will fill up a new balloon, this time, with hydrogen. After that Milda needs to throw another apple next to the balloon and the goat chews off the string on the hydrogen filled balloon and it flies away. Timed puzzle.
Milda needs to come back to the balcony right after the goat chews off the balloon string, so she can see the balloon fly by here. The goal is to use the lighter on a balloon filled with hydrogen while it is flying by in the balcony, which causes an explosion which distracts Karolis for enough time for Milda and Rokas to run away.
Short walkthrough: Look down to the Ground Level → drop an apple on the helium gas tank (the goat chews off the tube) → drop an apple on the balloon to get a new balloon with hydrogen → drop another apple on the balloon to make the hydrogen balloon flow up → go back up to the balcony → use lighter on the hydrogen filled balloon flying by to make it explode.
Part 2 – Running away
Cutscene: After the explosion, Milda and Rokas run away pushing Karolis away. Milda and Rokas run to the Square and Rokas tells Milda to hack a scooter.
A4 PUZZLE 3: Scooter lock (CLOSE UP)
Inspect blue (3rd from the left) scooter. Milda needs to unlock a scooter by getting 3 locks correctly. It’s more of a guessing mini-game – the player needs to find the three positions of the pins that light up the lights of the engine.
After the player does some moves in the puzzle, a short cinematic is shown – the big thug runs in and stops for a second to catch his breath, grandpa takes out the seal he has, shouts “can’t catch an old man?”, shows the seal to the thug and then runs away. The thug chases after him. After the short cinematic, the player is dropped back into the close up and can finish the puzzle.
The correct positions (put pins to these positions and trigger ignition):

After unlocking all the locks, Milda drives off.
A4 PUZZLE 4: Scooter chase (mini game)
Milda enters the scene alone, goes up to the front row. Rokas enters a bit later in the third lane and catches up with her to the front row. He shouts to Milda that the thug is right behind them and he wants Milda to have the seal and tells her to come get it. But the Thug is already behind them. The thug enters in the middle lane and when he gets closer to the front row (almost between Rokas and Milda), he hits Milda (who was moving towards Rokas). Her scooter wiggles and becomes a bit broken, she moves behind them as her accelerator doesn’t work anymore.
Puzzle Part 1:
Thug and Rokas are moving up and down constantly between the front row and the middle row, but never get down to Milda’s level (i. e. back row). Milda can only move right and left as her accelerator doesn’t work. She can try accelerating, but it doesn't work, only some oil is spilled instead. The solution is – Milda needs to be in the middle lane when the thug is in his down position, right in front of Milda, and then Milda needs to use the honk horn on the thug to distract him (timed puzzle). As she does so, the Thug gets scared and distracted, he starts wiggling his scooter, towards Rokas. Rokas doesn't want to crash, so he slows down, and the thug slows down too. Both of them move to the back row. At the same time, since Milda avoids the collision with the thug, she turns right to the first lane and because the other two slowed down, Milda moves to the front row. Once all three of them have stabilized their positions, Rokas and Thug start moving forward again, back to their last stage positions, while Milda slowly starts falling behind, as she can’t accelerate and keep up with them.
Puzzle Part 2:
This is another timed puzzle – Milda has limited time before she falls behind them again. During this short period of time, Milda needs to change the lane to the left, to appear in front of the thug and then press accelerate, which causes oil to leak from her scooter. The thug drives into the oil, starts wiggling and falls greatly behind (goes to the back row), while Rokas catches up with Milda. As they reach their final positions – a cinematic plays.
After Milda finally takes the seal from her grandfather, he heroically crashes into thug and Milda escapes.
Part 3 – Getting home
Milda travels back to Lithuania, once she lands in Vilnius, she gets a text message from Dana. After chatting, Milda is back at Joris place.
ACT 5
Part 1 – Catching up with Joris and painting puzzle (Joris flat night)
After Milda comes back from Siena, she briefly tells Joris what happened there and then they call Dana to figure out, what’s the deal with the painting.
A5 PUZZLE 1: Fake painting (CLOSE UP)
After calling Dana, she tells us that she believes the painting is an overpaint. Dana suggests Milda finds something acidic and some strong alcohol and a rag and then carefully wipe the painting with it, to reveal layers beneath. The player needs to combine Invisible ink, as it is made from lemon juice and strong alcohol, with the sleeves that were cut off grandfather’s shirt and then use the wet sleeves to wipe parts of the painting.
Some parts of the painting are real, and some are fake. Depending on Dana’s comments, Joris’ comments and player’s knowledge, the player must use the wet sleeves on specific hotspots that seem to be fake.
Dana mentions that the date on the painting doesn’t make sense (“there hardly were any paintings of this kind during the time. Neither from style, nor from quality.”). Since the date is mentioned in the text under the painting, Milda wipes off the whole text, getting a new message. ("I will be the last to carry this blessing and curse. Let the temple of the Old Gods guard this dangerous crown.")
From the new text, Milda and Joris decide that perhaps the one that’s shown here was the person that had the crown last. Now they need to figure out who it is, since suspicions rise that it might not be Vytautas after all.
There are total of 3 fake spots on the painting: the text, the face, the seal. It is necessary to scrub all the 3 fake hotspots to get all the info needed to proceed in the game.
The player has to compare the painting with the Chancellor List to figure that it’s actually Leonas Sapiega in the picture. The player needs to use the Chancellor list on the painting, to put it next to the painting. Then the player needs to click on the right face on the Chancellor list – Leonas Sapiega – after cleaning off the face and the seal on the painting.
Milda adds a note to her phone, that Leonas Sapiega was the last one to hold the cursed crown and hid it in an old pagan temple. Now from the information gathered so far, the player needs to figure out where could the crown be hidden. For that, Milda needs to combine the newly gotten note about Leonas Sapiega with a note saying, that there was a pagan temple at Sapiega’s park.
After combining those notes and coming to the conclusion, that the crown is in Sapiega’s park, Milda talks to Joris and they get ready to go to St Catherine’s church to get the last seal.
Part 2 - Getting the last seal (St. Catherine church outside night)
Getting inside
Milda and Joris arrive at St. Catherine’s church and try to get inside but the cleaning lady doesn’t let them in. Milda has a key from the side door but no matter which door she tries to use, the old lady is still in her way. Milda and Joris try to find a way to distract her.
A5 PUZZLE 2: Creating a diversion plan (dialogue puzzle)
Milda talks to Joris and they come up with a plan to distract the cleaning lady. The player has to choose the right dialogue options to create a plan, that would distract the old lady long enough for Milda to sneak in. If the wrong choices are chosen, the plan fails, and they have to try again.
Solution: Joris needs to go to the main door and ask for directions.
Once the correct choices were made and Joris succesfuly distract the lady, Milda needs to use her grandfather’s keys on the side door of the church and she can finally go inside.
A5 PUZZLE 3: Rotating the statues
Once Milda gets inside the St. Catherine’s church, she needs to get inside the secret catacombs. Where the door is and the solution to this puzzle is depicted in Glaubitz’s manuscript. The player has to figure this out and then rotate the statues’ heads to match the Glaubitz’s manuscript description. All the other statues have to look to the one, that is showing with its hand to the secret door.
Solution: Statue 1 and 2 (from the left of the screen; only counting statues with hotspots) – look to the right of the screen, Statues 4, 5, 6, 7, 8 – look to the left of the screen.
A5 PUZZLE 4: Finding the seal (Catacombs)
Milda enters the catacombs and now she has to figure out, where the seal might be hidden. She has to use Glaubitz’s manuscript for clues. She needs to use kerosene on the empty bowls on the statues and then light up the bowls using lighter. She needs to create a cross from shadows and solve the riddle as mentioned in the Glaubitz’s manuscript. She has to light up the two torches that form the cross with shadows and use a shovel to dig the seal out.
Solution: Light up the 2nd and 4th statue only (from the left of the screen).
Getting out of St. Catherine’s church
As soon as Milda comes back up from the catacombs, she is confronted by Karolis and his thugs. Karolis order his thug to take her seals (one seal is still with Joris). Karolis then tells the thug to shoot Milda. Milda needs to kick the thug that’s holding her in the croach and then she jumps back into the catacombs. The thug goes after but the shutting door traps his leg at the entrance to the catacombs, making him block the path and forcing Milda to find another way out.
A5 PUZZLE 5: Finding another way out
Milda needs to use the shovel on the 5th statue (the rightmost one; which is hinted to be wobbly) to make it fall on the grates. Crashing the floor and making Milda fall into the fresh made hole.
Back to safety (for now)
She exits through the manhole in front of St. Catherine's church, right behind Joris who is still talking with the cleaning lady. Milda calls Joris over, he gives her the one seal he still had and they both rush to Sapiega’s park.
FINALE
Milda and Joris come to Sapiega’s park where they find a thug who is holding a seal. Joris punches the thug to distract him and makes him drop the seal. The thug runs after Joris leaving the area and leaving Milda with the seal. Milda needs to pick up the dropped seal.
FINALE PUZZLE 1: Finding the entrance
Milda needs to find the entrance to the church. She notices there are a few dig spots on the ground. The player can use the metal detector, to determine, which spot it is or just use the shovel to dig out the correct spot. Once found the spot is found, Milda uncovers a seal socket, where she needs to use the seal she just got from the thug to get inside. Once she uses the seal on the socket, a secret entrance opens, leading underground.
FINALE PUZZLE 2: Underground maze
Back in Italy, Milda learnt that the marked words in the poem, in the grandfather’s letter, actually lead to the pagan crown (which is added as a note on Milda’s phone). She needs to follow the same 5 words to get to the crown. Milda can examine the carvings to determine which passage mean which word.
Correct path is: Horseman → Crown → Tomb → Sing → King
Solution:
- 4th door (horses)
- 2nd door (serpents with crown)
- 5th door (tomb, death)
- 3rd door (sing, dancing ladies)
- 1st door (king, Perkūnas, Lithuanian pagan god of thunder)
After passing through the last door, we can see a sealed a sealed passage over the 6th passage, with a seal socket in the middle. Milda needs to use the one seal she still has, the copy or real one from the archives, and the door opens.
The Crown Room
Milda enters the Crown Room and finds Karolis next to the seal spot on the other side. He puts the seal in the socket and that reveals the crown in the middle of the room.
Ending cutscene
The crown room starts crumbling. Karolis jumps on Milda, who is reaching for the crown and they both roll next to the edge of the platform. Karolis falls over but holds on to Milda, while having the crown in his other hand. He tells her to pull him up, but Milda can’t hold on and Karolis falls into the abyss, while the crown gets stuck on a branch. Milda considers reaching for the crown and almost falls herself, when Joris appears behinds her and saves her. They run out of the crumbling chamber.
Epilogue
Back outside the Sapiega church, Milda and Joris recap what just happened, and finally they decide to go home for some rest. The crown is likely lost for good.
THE END


")
