


Colossal Cave
Colossal Cave – Reimagined by Roberta Williams
Goal/Objective for completion
In order to beat this game, you need to interact with all 15 treasures in the game using either the EYE or HAND cursor, and then blow open the wall of the Repository to reach the office. The secondary objective is to earn as many points as possible, up to 350.
The 15 treasures in the game, and their locations, are as follows:
Gold Nugget (Hall of Mist, S room with mining dwarf)
Diamonds (West Hall of Mist, on table by polishing dwarf)
Coins (Hall of the Mountain King, West room, on altar)
Precious Jewelry (Hall of the Mountain King, South room behind snake)
Bars of Silver (Hall of Mountain King, North corridor to “Y2”)
Ming Vase (Orient Room)
Emerald (Plover room in Orient region)
Platinum Pyramid (Dark room next to Plover room, Orient region)
Trident (Magnificent Caverns N of Giant’s Room, on the NE shore)
Pearl (Inside the “clam” in the Shell Room of Bedquilt)
Rug (Under the Dragon in Secret Canyon)
Golden Eggs (Giant’s Room, in chicken coop)
Rare Spices (Troll Region, NE side of the bridge, NE path in fork, then E)
Golden Chain (Troll Region, NE side of bridge, SE path in fork)
Pirate’s Chest (Pirate’s Room in MazeAlike, if Pirate has hidden it yet)
350-point walkthrough
There are several different routes for reaching 350 points, so we are presenting one such route here.
(A quick note that the score values might not line up with what you see, depending on the timing of the Pirate appearance. He shows up randomly, and depending on when you decide to reclaim your treasure and steal his treasure, the score values will be different. Seeing the Chest (his treasure) awards 2 points, and depositing it in WellHouse awards 12 points. If you took a detour to steal his treasure and recover yours, and are otherwise caught up with the route, your score will be 14 points higher than reported here until the “Cave closing, Repository, End” section.)
Any time you run into a dwarf, click on it with the Axe, and do not forget to recollect the Axe afterwards. This is the reason why we are carrying the Axe for the entire game and sacrificing a valuable inventory slot.
Beginning → Hall of Mountain King
In this “segment”, the goal is to collect a full inventory worth of treasure and then deposit it in WellHouse once I reach “Y2” for the first time.
Start Game → Reject instructions → Enter building, collect Keys and Lantern, light lantern Inventory: Keys, Lit Lantern
Score: 32 points
Head S to Grate → Use keys on grate → open grate → enter CobbleCrawl
Collect Wicker Cage (W → NW → S → W) → Head roughly W to Debris Room → Collect Black
Rod → Examine XYZZY rock
Inventory: Keys, Lit Lantern, Wicker Cage, Black RodHead W to Bird Room → Drop Black Rod → Use Wicker Cage on bird → Collect Black Rod → W to Hall of mists
Inventory: Keys, Lit Lantern, Bird in Cage, Black Rod
Head down the stairs → Go S up the hill to Gold Nugget room → Collect Gold Nugget → Head N
down the hill and trigger Axe Dwarf cutscene → Collect Axe
Inventory: Keys, Lit Lantern, Bird in Cage, Black Rod, Axe, Gold Nugget Score: 59 points (+25 for dwarf cutscene, +2 for seeing Gold)Head W to fissure → Use Black Rod on fissure to create crystal bridge → Drop Black Rod → Cross bridge → Collect Diamonds (We’re dropping Black Rod because it no longer serves a purpose and inventory space is very limited)
Inventory: Keys, Lit Lantern, Bird in Cage, Axe, Gold Nugget, Diamonds
Score: 61 (+2 for seeing Diamonds)
Cross the crystal bridge east → Head N down the stairs into Hall of Mountain King → Use “Bird in Cage” on the snake on S end of Hall of Mountain King → Collect Precious Jewelry from S chamber of HoMK → Collect Coins from altar in W chamber of HoMK
Inventory: Keys, Lit Lantern, Axe, Gold, Diamonds, Jewelry, Coins
Score: 65 (+4 for seeing Jewelry, Coins)
Head through N passage from HoMK → DO NOT INTERACT WITH THE SILVER → Continuously
enter Y2 room until learning PLUGH → Use PLUGH to return to WellHouse
In WellHouse building, drop/deposit Gold, Diamonds, Jewelry, Coins → Drop Keys → Collect
Bottle → PLUGH back to Y2 room
Inventory: Lit lantern, Axe, Bottle (with water) Score: 105 (+40 for depositing treasure)
First beanstalk watering: Orient loop
We need to water the beanstalk twice in order to access the Giant Region. I use this to break up my trips to deposit treasure in WellHouse, since we can only carry so much at one time. This also works quite well because the WellHouse building is a source of water, so we don’t need to make any extra detours. For this first watering trip, I head through Orient to grab those treasures and prepare for collecting the Pyramid in the future.
In this route, I don’t collect the bars of silver until the very end. The reason for this is that there is a timer that is initiated once you see the 15th treasure. If the pirate steals your treasure and you recover it and steal his Chest, you could end up seeing the 15th treasure in a very inconvenient spot, and may not have time to return it to WellHouse.
From Y2 room, head S and down the ladder to Bedquilt region (don’t collect Silver) → W and down ladder to Complex Junction → W to Bedquilt → W to TwoPit Regions (Swiss Cheese room)
Head W to TwoPit room → Click on plant in W pit using the Bottle of Water → E to Swiss Cheese
room → NW exit to Orient (this has a random success chance, so keep trying until it works) Inventory: Lit lantern, Axe, Bottle (empty)
In Orient room, head N to Misty Cavern → Take W exit to Alcove → Drop entire inventory on the ground by the tight gap → Walk into the crack to pass into Plover Room → Collect Emerald on S end of room → Continuously walk between Plover room and Dark room (N) until you learn the Plover magic word → Exit through tight crack → Recollect inventory (Lit Lantern, Axe, Bottle (empty))
Inventory: Emerald, Lit lantern, Axe, Bottle (empty)
Score: 107 (+2 for seeing Emerald)
From Alcove, head back to Orient Room → Collect Ming Vase → Exit SE to Swiss Cheese room →
Head E to Soft Room → Collect Velvet Pillow → Head back to Swiss Cheese room → Exit NE to Bedquilt
Inventory: Emerald, Lit lantern, Axe, Bottle (empty), Vase, Pillow
Score: 109 (+2 for seeing Vase)
Head E to Complex Junction, climb ladder → Head E in Dirty, Broken Passage and climb ladder to
HoM → Ignore Bars of Silver → Head N to Y2 → Use PLUGH
Inventory: Emerald, Lit lantern, Axe, Bottle (empty), Vase, PillowIn WellHouse building, drop/deposit Pillow (you MUST do this before Vase), Vase, Emerald → Fill Bottle with water (click on water source with empty bottle) → Collect Keys, Tasty Food → PLUGH
Inventory: Lit lantern, Axe, Bottle (with water), Keys, Food Score: 137 (+28 for depositing treasure)
IF PIRATE STOLE TREASURE
The pirate can begin showing up after 5 minutes have elapsed since you encountered the axe-throwing dwarf in Hall of Mists. This means he can steal your treasure at any point during these trips! Since our inventory management is quite tight, it can be rather inconvenient and you might need to make two trips through his maze.
After your treasure is stolen, the pirate hides his own treasure (the Chest) in MazeAlike. Once we collect that, the pirate will never again bother us. There are two approaches at this point:
Make a detour to collect his Chest and your treasure as soon as he steals from you, so you don’t run into him in more inconvenient times (like after acquiring the Trident or Golden Eggs). If you do this, you should definitely save the bars of silver for your 15th treasure (which I outline in this guide). Saving the silver for your 15th treasure, you guarantee that you’ll be able to deposit them in time, because Y2 is immediately N of them.
Wait to collect his Chest as the 15th treasure. The reason we might opt for this is that a timer begins once we have seen our 15th treasure, and after it expires we are no longer able to return to WellHouse to deposit treasure. If we don’t deposit every treasure, we cannot get 350 points. The Chest is very, very close to the Debris Room, which lets us XYZZY back to WellHouse, so it is an extremely forgiving option. The downside of this route is that the pirate may rob you two or three times, or interrupt some of the more important sequences.
No matter when you decide to recover your treasure and steal his, you can follow this path:
Starting from Hall of Mists, head W across the crystal bridge we made earlier → Head W past diamond polishing station, climb stairs on S wall, enter MazeAlike → Navigate to pirate’s room (E → S → S → S → N → E → Brink of Pit → E → NW) → Collect Chest and any other treasure he stole
Inventory: ???, Chest
Score: ??? (+2 for seeing Chest)
From Pirate’s room: S → N → Brink of Pit → Click on the slope to climb down to Bird Room →
Head E until Debris Room → Use XYZZY to return to WellHouse
Deposit Chest → PLUGH → Either do another lap to recover remaining stolen treasure or resume where your left off
Score: ??? (+12 for depositing Chest, +14 total for Chest)
Second beanstalk watering: Giant/Troll loop
Our second trip to water the beanstalk will proceed up the beanstalk into Giant Region, loop through Troll region, and then do some cleanup in Bedquilt and Plover Room. To prepare for this, we need to take the Keys and Food (both the bear), and fill the bottle with water after depositing treasure and before heading back into the cave.
We will be using every inventory space here, and it is extremely inconvenient to encounter the pirate in this segment. You can either grab a treasure from WellHouse (e.g. diamonds) and run around the Hall of Mists until he steals your stuff, or just plow ahead and hope for the best. I choose the latter.
From Y2 room, head S and down the stairs → Head W and down the stairs to Bedquilt → Head W to TwoPit region (Swiss Cheese room)
Head W to TwoPit room → Go to W pit and click on the beanstalk with the bottle of water → Go to E pit and click on the puddle of oil with the empty bottle to fill it with oil → Go back to beanstalk and climb it to enter Giant Region
Inventory: Bottle (oil), Lit lantern, Axe, Keys, Food
Proceed to Giant’s Room → Collect Golden Eggs, read FEE FIE FOE FOO on wall → Head N to iron door, click on iron door with bottle of oil, click on door with HAND cursor → Drop empty bottle on floor (no more puzzles to solve with it) → Head N into Magnificent Cavern
Inventory: Lit lantern, Axe, Keys, Food, Eggs
Score: 139 (+2 for seeing Golden Eggs)
Cross bridge N → Walk along the shore to the west, collect Trident → Head back E, climb the hill, exit W to Troll Region
Inventory: Lit lantern, Axe, Keys, Food, Eggs, Trident Score: 141 (+2 for seeing Trident)
Walk E and down very steep slope to enter Large, Low Room → SW to Bridge Room → Approach bridge, click on Troll with Golden Eggs → Proceed NE across bridge and into tunnel → Go left at fork (NE) and then right (E), collect Rare Spices → Go back to fork in tunnel (W, S) then SE to bear room.
Inventory: Lit lantern, Axe, Keys, Food, Trident, Spices
Score: 143 (+2 for seeing Rare Spices)
In bear room, click on the bear with the Tasty Food → Use Keys on the chain → Collect Golden Chain. Drop Keys (Nothing left to unlock!) → Walk back to the bridge, making sure that the bear is following → Step onto bridge, trigger the Troll cutscene, and wait for bear to scare the troll away → Use HAND cursor on bear to dismiss him, otherwise he will destroy the bridge and kill us → Cross bridge
Inventory: Lit lantern, Axe, Trident, Spices, Chain
Score: 145 (+2 for seeing Chain)
On SW side of bridge, head E through the tunnel to Large, Low Room → Go SE to Orient → Go SE to Swiss Cheese room → Head NE to Bedquilt → Go E to Complex Junction → N to Shell Room → Click on the “clam” with the Trident, chase pearl down and E and collect Pearl → Return to Shell Room → S and climb ladder → E and climb ladder to HoM
Inventory: Lit lantern, Axe, Trident, Spices, Chain, Pearl
Score: 147 (+2 for seeing Pearl)
Head N to Y2, use Plover → Head N to Dark Room, collect Platinum Pyramid → Go back to
Plover Room and use Plover again to return to Y2 → PLUGH
Inventory: Lit lantern, Axe, Trident, Spices, Chain, Pearl, Pyramid Score: 149 (+2 for seeing Pyramid)In WellHouse building, drop/deposit Trident, Spices, Chain, Pearl, Pyramid → PLUGH
nventory: Lit lantern, Axe
Score: 219 (+70 for depositing treasure)
Final treasure cleanup
The other non-Chest treasures that we haven’t seen yet are the Rug and the Silver. If you haven’t encountered the Pirate yet, you are guaranteed to bump into him shortly after you acquire see your final treasure. We’ll start by collecting the Rug, loop back to Giant’s Room to recollect the Golden Eggs that we gave to the Troll (using FEE FIE FOE FOO returns them to Giant’s Room), pick up the Silver, steal from the Pirate, and then deposit those treasures!
As I said before, after we have seen all 15 treasures, a “timer” starts. After 15 moves (defined later in the document, but basically any room change or HAND/EYE interaction), the cave closes and prevents us from going back to WellHouse (either via magic words OR the grate in CobbleCrawl). If we haven’t deposited our treasure by then, we cannot score 350 points. Unless you’re very comfortable with the map layout and your own ability to navigate efficiently, I recommend either saving the Chest for last or the Bars of Silver. The Chest is very close to the Debris Room, and allows you to XYZZY back to the WellHouse, and the Silver is one room away from Y2 where you can PLUGH back to WellHouse.
From Y2, head S to Hall of Mountain King → SW to Secret Canyon → Head W, following the bridge to the dragon room → Click on the dragon twice with the HAND cursor to slay him → Collect the Rug
Inventory: Lit lantern, Axe, Rug
Score: 221 (+2 for seeing Rug)
Proceed N until you reach a room with a wooden bridge → Use the HAND cursor on the rope to
the left (W) → Head SW from Slab Room into TwoPit region
In TwoPit room, climb beanstalk → Head to Giant’s Room, use FEE FIE FOE FOO → Collect
Golden Eggs → Head back to TwoPit room Inventory: Lit lantern, Axe, Rug, Golden Eggs
In TwoPit room, Head E to Swiss Cheese and NE to Bedquilt → Head E to Complex Junction, climb ladder → Head E and climb ladder to HoM → Collect Bars of Silver
Inventory: Lit lantern, Axe, Rug, Golden Eggs, Silver
Score: 223 (+2 for seeing Silver)
If Pirate still hasn’t shown up yet, head N to Y2, PLUGH to WellHouse to deposit those treasures (Score should be 261), and then PLUGH back to HoM. You should instantly get a Pirate encounter here, and can follow the steps in the “IF PIRATE STOLE TREASURE” section.
If Pirate had shown up previously and we collected his chest, head N to Y2 and use PLUGH, and deposit the Rug, Golden Eggs, and Silver (score should be 275).
If Pirate had shown up previously and we saved his Chest for last, follow the instructions in the “IF PIRATE STOLE TREASURE” section to navigate the maze, take his Chest, head to Debris Room, and use XYZZY to go back to WellHouse.
In WellHouse building, drop/deposit Rug, Golden Eggs, Silver, Chest (if you haven’t already) → PLUGH
Inventory: Lit lantern, Axe
Score: 275 (+38 for depositing Rug, Eggs, and Silver, +12 for depositing Chest, +2 for seeing Chest)
Cave closing, Repository, End!
At this point all 15 treasures have been seen and deposited, and the cave is closing. All we have left to do is the collect the Magazine and drop it in Witt’s End, then wait for several moves to elapse so we’re sent to Repository (standing in place won’t advance this, you need to change rooms or interact with things), then blow open the wall.
After we get the message for “the cave is closing soon, please exit through the main office”, all the remaining living dwarves go away. It is safest to stand around in Y2 and click the eye cursor until that message so there is no chance of being instantly killed from just walking around.
From Y2, head S and down the stairs → Head W and down the stairs to Complex Junction → Head E to Antechamber and watch the Dwarf cutscene → Collect Magazine → Head E to Witt’s End → Drop Magazine
Inventory: Lit lantern, Axe
Score: 276 (+1 for dropping Magazine in Witt’s End)
At this point, you can either walk around or wait and click the eye cursor until you’re taken to Repository. If you don’t want to wait, you can manipulate the variables a bit (details in the Cave Closing section of this document).
Inventory: None (wiped on entering Repository)
Score: 311 (+25 for cave closing, +10 for entering Repository)
In Repository, head to the S end and collect the Black Rod → Click on it in inventory, choose “Examine” to reveal that it is Dynamite → Head back to N end of the room with the dwarves (if you are not on the N end of the room for the next step, you will die) → Click on Dynamite in inventory and choose “Throw” → Head through the hole in the wall and touch the door in the main office to finish the game!
Inventory: None
Score: 350 (+35 for blasting the wall, +4 points for not quitting the game)
Colossal Cave puzzle solutions
This is just a list of the interactions and puzzles that aren’t as simple as “collect the thing that is on the ground”. Hopefully this will be an easier resource to reference than online guides. I’ll make one list for the puzzles, and another for just the items in case you are wondering what, for example, the trident is used for.
Puzzles by area
This is a list of all of the potential snags that I can think of. They are roughly sorted in order, but since this is a very open game after you get past the Hall of the Mountain King, that won’t be true for very long.
Opening the grate
The WellHouse grate is unlocked with the keys in WellHouse building.
Navigating the darkness safely
If you walk in a dark room, you are very likely to die. The lantern (in the WellHouse building) can be turned on by clicking on it in the inventory and choosing to turn it on. While carrying a lit lantern, you will not die in dark rooms.
Catching the bird
The bird will be scared if you are currently carrying the Black Rod from Debris Room in CobbleCrawl. If you are not carrying the Block Rod, clicking on the bird using the Wicker Cage (from the start of CobbleCrawl) will capture it. You are able to recollect the Black Rod after the bird is captured.
Crossing the Hall of Mist fissure
Clicking on the fissure with the Black Rod from CobbleCrawl’s Debris Room will cause a crystal bridge to appear. Clicking on the bridge with the Black Rod will cause it to vanish. The crystal bridge will also vanish when the cave is closing.
Getting past the snake in Hall of Mtn King
The snake in the Hall of the Mountain King must be scared away by clicking on it with the caged bird or dropping the caged bird on the ground in front of it.
Note: The SW exit of Hall of the Mountain King (to Secret Canyon) is only blocked by the snake sometimes. There is a chance that the snake will allow you to pass. If you do this and then allow the dragon in Secret Canyon to incinerate the bird, the game cannot be completed.
Getting past the dragon in Secret Canyon
When the dragon is standing in front of you, use the HAND cursor on it. The narrator will remind you that only a fool would attempt to kill a dragon with your bare hands. Use the HAND cursor again to punch the dragon asleep (nothing dies in this game, he’s fine!). This allows us to take his Rug.
Carrying the Gold Nugget up the stairs
You can’t (through intended means, anyways). In order to bring the Gold Nugget back to WellHouse, you have to use PLUGH in Y2.
Depositing treasures in WellHouse building
While standing in the WellHouse building, drop the treasure from inventory and it will automatically teleport to its home in the room. When depositing the Ming Vase, be sure to drop the Velvet Pillow first or it will break.
Using the magic words (XYZZY, PLUGH, Plover, FEE FIE FOE FOO)
This game has four magic words, and each has a special purpose. They are used from the inventory in our game, but only work if you’re in the proper room:
XYZZY – Acquiring by using the EYE cursor on the XYZZY rock in Debris Room of CobbleCrawl. Causes the player to teleport between Debris Room and WellHouse building if used in either of those rooms.
PLUGH – The player has a random chance of hearing this every time we enter the “Y2” room in Hall of the Mountain King. This teleports the player between Y2 and WellHouse building if used in either room.
Plover – The player has a 50% chance of hearing this each time we enter the Plover Room in Orient. The teleports the player between the Plover Room and Y2 if used in either room. Note: The emerald is left behind if we are carrying it when we use Plover.
FEE FIE FOE FOO – Elaborated on a little further down the doc, but we acquire this by using the EYE cursor on the FEE FIE FOE FOO writing on the wall of Giant’s Room. It causes the Golden Eggs to reappear in the nest in Giant’s Room.
Climbing the beanstalk in TwoPit
The tiny muttering plant in the W pit of the TwoPit room requires being watered exactly twice. The bottle in the WellHouse building starts filled with water, and can be refilled by clicking on a water source with the empty bottle. The most convenient water sources are in WellHouse again (while depositing treasures), or at the Small Pit in the E side of the Dirty, Broken Passage of Bedquilt region.
When the plant is watered twice, using the HAND cursor on it will climb. If you water it a third time, it will shrivel and die, and the game cannot be completed.
Opening the iron door in Giant’s Room
Clicking on the iron door with a bottle full of oil will loosen it up enough to be opened with the HAND cursor. The bottom of the E pit in TwoPit room has oil that you can collect with an empty bottle.
Opening the “clam”
The “clam” in the Shell Room of Bedquilt is opened by clicking on it with the Trident (found in Magnificent Cavern beyond the iron door N of Giant’s Room).
FEE FIE FOE FOO
The FEE FIE FOE FOO magic word written on the wall of Giant’s Room causes the Golden Eggs to teleport back to their nest in Giant’s Room. They will return here if you’ve deposited them in WellHouse, thrown them down a pit, had them stolen by Pirate, or gave them to the Troll, etc.
Getting past the Troll
The Troll in Troll Region demands treasure to cross the bridge. He will accept any treasure at all, but in order to get the maximum score, you should give him the Golden Eggs. We can recall the Golden Eggs back to the Giant’s Room, so they are never lost forever.
For the return trip across the bridge, you can scare the Troll away by escorting the Bear back to him. Note: if you opt to scare the Troll away with the Bear, be sure to use the HAND cursor on the bear afterwards to shoo him away. If you don’t, the bear will follow you across the bridge, crumble it, and watch you die.
Freeing the Bear
In order to release the bear, you first need to calm him down by giving the Tasty Food to him. Once it is calm, you can unlock the Golden Chain using the Keys (both of these are in WellHouse building). When the Bear is free, it will attempt to follow you and can scare the Troll off of the bridge. As above, if the Bear scares the troll away, be sure to dismiss him with the HAND cursor so he doesn’t destroy the bridge.
Fighting dwarves
Dwarf mechanics are mentioned in greater depth earlier in this document. In short, if you encounter a Dwarf, you can attempt to kill them (2/3 chance of success) by clicking on one with the Axe. You should always carry the Axe with you while you play.
Recovering items stolen by the Pirate
If the Pirate shows up and steals your treasure, you can recover them by going to his room in MazeAlike.
Navigating MazeAlike
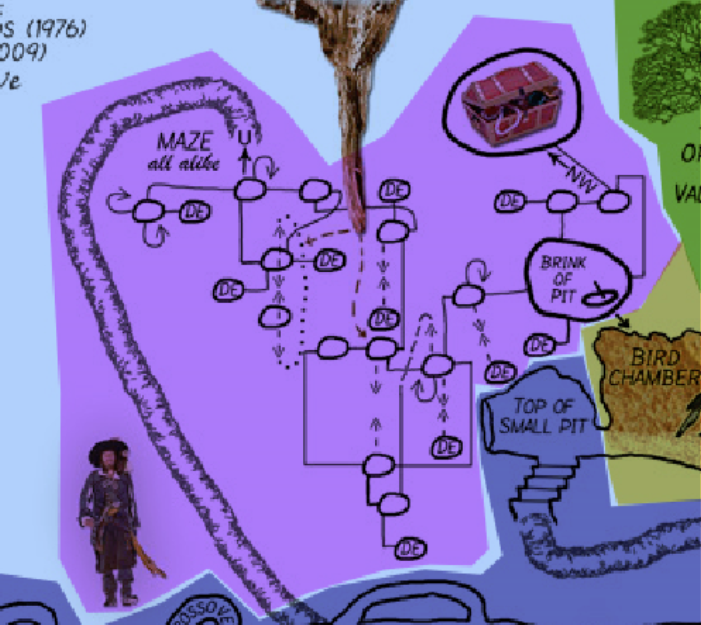
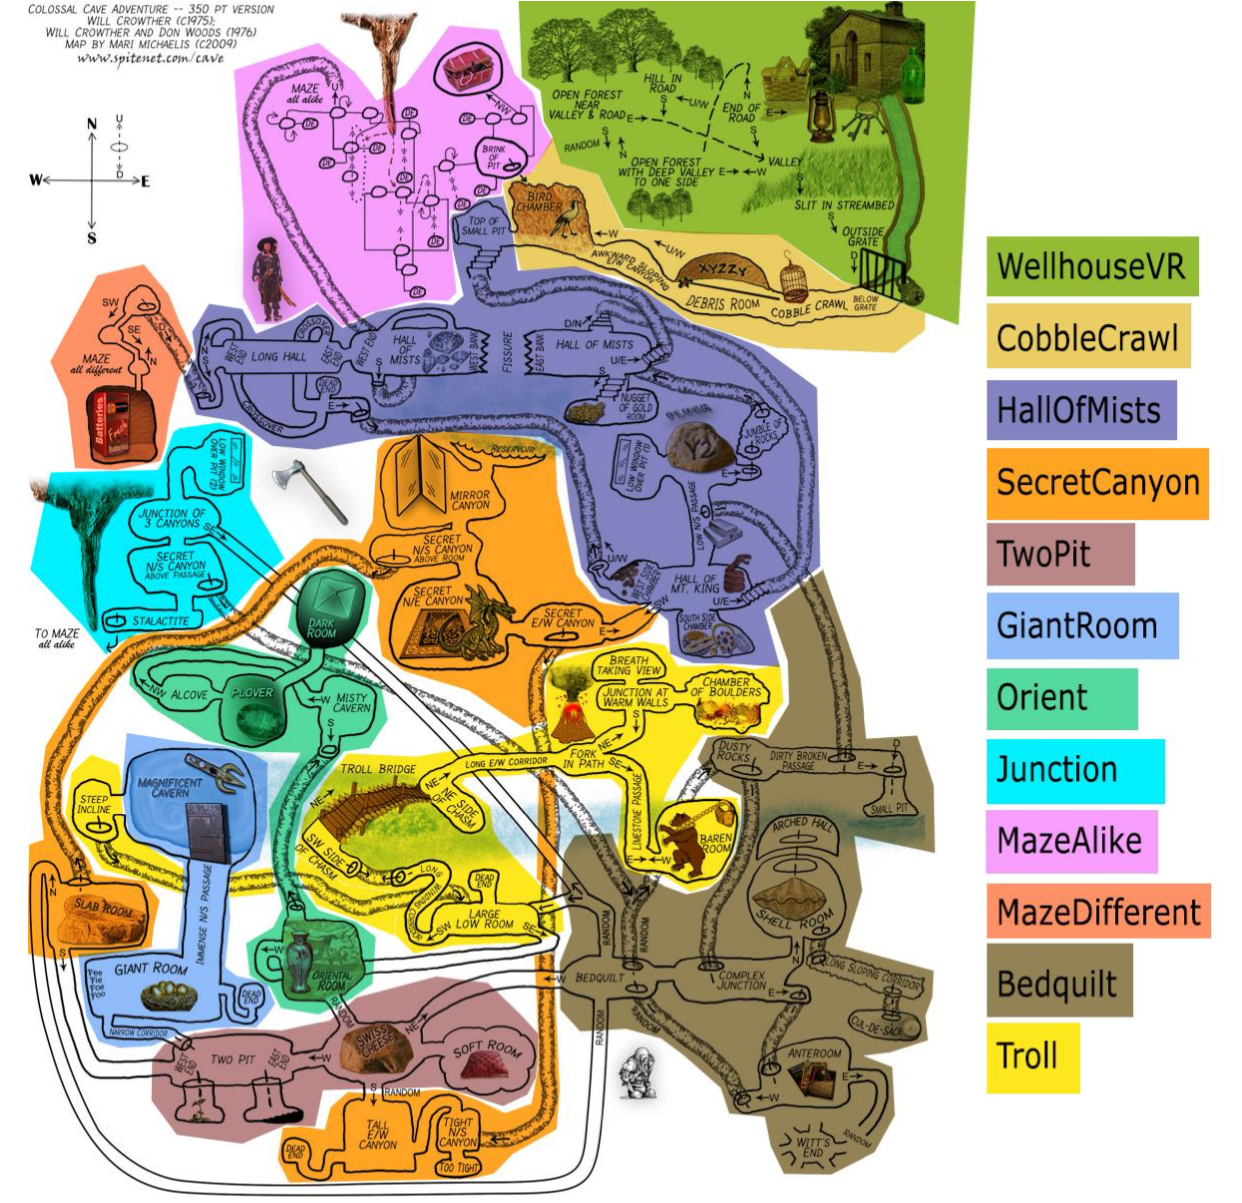
The only point of interest in MazeAlike is the Pirate’s Room, marked with a chest on the map. We can exit MazeAlike either by climbing the ladder from the entrance room, or by climbing down the slope in Brink of Pit. This map is taken from the master map that we use for region/room names, and is a very good visual reference for MazeAlike. If you don’t want to figure out your own path, this is the one I prefer to take:
Enter MazeAlike → E → S → S → S → N → E → Brink of Pit
Brink of Pit → E → NW → Pirate’s Room
Pirate’s Room → SE → N → Brink of Pit → Down → Bird Room (CobbleCrawl)
Navigating MazeDifferent
We are never required to go to MazeDifferent, and the only real point of interest in the Vending Machine room (to acquire Batteries or see if the Pirate’s Message is written on the floor). There is a spreadsheet for this in one of the Teams directories, or you can reference this one, made by Valentin:
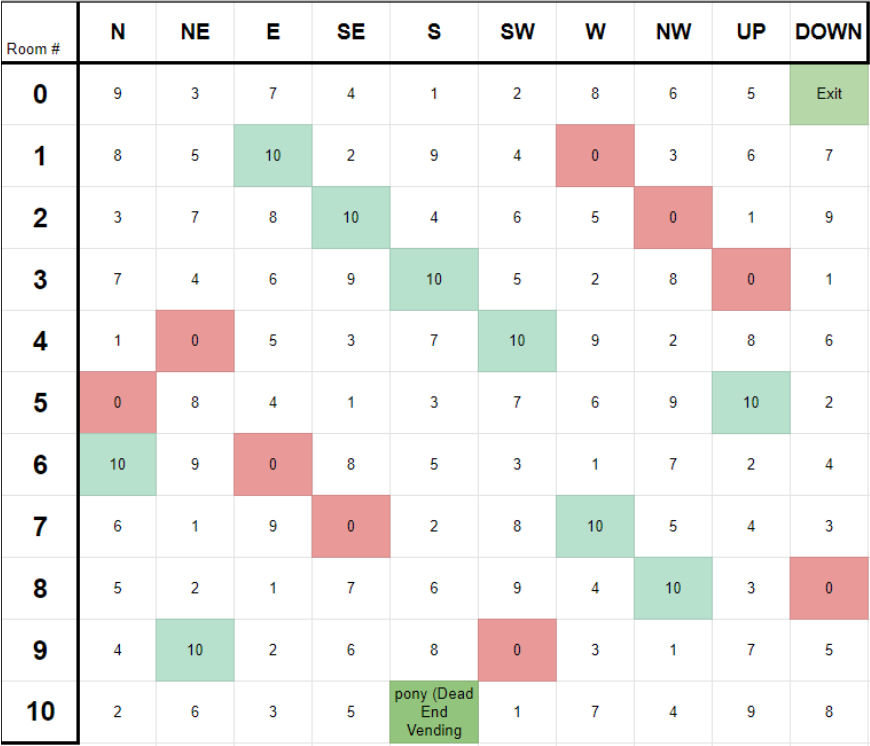
Room 0 is the entrance (climb down the ladder in this room to exit), and “pony” is the Vending Machine room. The quickest path between these two is:
Diff0 → SW (Diff2) → SE (Diff10) → S (pony)
Pony → N (Diff10) → NW (Diff4) → NE (Diff0) → Down (Exit to Hall of Mists)
Using the vending machine
The Vending Machine is never required to complete the game, and in fact costs us points to operate. If you click on the Vending Machine with the Coins (from W end of Hall of Mountain King), it will drop Batteries. Batteries refill your lamp power to 2500 moves when you lamp power is below 30 moves.
Squeezing through tight gap in Orient: Alcove→Plover
In order to squeeze through the tight gap in the Orient region between Alcove and Plover, we need to have no items in our inventory (including the lamp). Just drop them on the floor and walk through. This is the only room beyond CobbleCrawl that is safe to navigate without a lit lantern.
There is a 50% chance of hearing the Plover magic word (sound?) every time we enter this room, and that magic word is required for completing the game. If you don’t hear it, just keep walking between this room and the emerald altar until you do.
Entering the Dark Room of Orient (next to Plover)
To enter the Dark Room, we need to use the Plover magic word while in the Y2 room. This lets us bring a lantern into the Plover Room, which is required to enter the Dark Room and collect the Platinum Pyramid.
Prevent the Vase from breaking
To drop the Vase without breaking it, you must either currently be in the Soft Room, or you must drop the Velvet Pillow (also found in Soft Room of TwoPit region) on the ground first. To safely deposit the Vase in WellHouse, you must drop the pillow first.
Escaping Witt’s End
Every exit in Witt’s End except for West has a 5% chance of returning you to the Antechamber of Bedquilt. Just pick a direction that feels lucky (and isn’t West) and keep trying until you exit.
“Exiting the cave via Main Office”
After collecting all 15 treasures, the narrator tells us that the cave is closing, and to exit the cave via the Main Office. There is nothing that we can actively do to work towards the end of the game at this point. After enough time elapses (detailed in the cave closing section above), we will automatically be brought to the Repository.
Exiting the Repository
To finish the game from Repository, head to the S end of the room and collect the Black Rod. Click on it in the inventory and choose “Examine”. This will reveal that this Black Rod is actually Dynamite. Head back to the N of the room (the side with the sleeping dwarves, not the side with the snake pit), select the Dynamite in the inventory, and choose the THROW option. This will blow open the wall to the Main Office. As of my writing this, there is no automatic sequence for ending the game, so you can freely walk through the office to the door on the far end and complete the game!
Items in Colossal Cave
In case you find it easier to find what you’re looking for by looking for particular items instead of puzzles, below is a list of items, their locations, and their noteworthy interactions.
Keys
Found: WellHouse building (floor)
Opens the locked grate in WellHouse and unlocks the Golden Chain tethering the Bear (Troll Region)
Lantern
Found: WellHouse building (shelf)
Lights up the maps and prevents the player from spontaneous death in dark rooms.
Bottle
Found: Wellhouse building (shelf)
Can be filled with either water or oil. Water is used to water the beanstalk in the W pit of TwoPit room, and oil is used to lubricate the iron door in the N hallway of Giant’s Room.
Water sources: WellHouse building, Small Pit (Dirty, Broken Passage of Bedquilt), Reservoir in Secret Canyon (not sure if implemented)
Oil source: Bottom of E pit in TwoPit room
Tasty Food
Found: Wellhouse building (shelf)
Used to feed the bear so it becomes calm enough for us to unlock its chain. It can also be used on dwarves to make them angrier and more accurate (don’t), or eaten (renders the game impossible to complete). Save the food for the bear.
Black Rod
Found: Debris Room (CobbleCrawl) and Repository
The Black Rod creates a crystal bridge to span the Hall of Mists fissure if we click on the fissure while holding the rod. The Black Rod also scares away the bird in CobbleCrawl if we have it in our inventory. In Repository, the Black Rod is actually Dynamite. We can reveal this by clicking on it in inventory, and then choosing to “Examine” it. From there, we can do a number of things to die, or we can Throw it at the wall on the N end of Repository to finish the game.
Wicker Cage
Found: CobbleCrawl (from entrance, W→NW→S→W)
Clicking on the bird with the Wicker Cage, while the Black Rod is not in our inventory, will capture the bird.
A bird in a cage
Found: CobbleCrawl (Bird Room/Splendid Chamber)
In order to complete the game, we must use the bird on the snake in the Hall of the Mountain King (either clicking on the snake with the bird-in-cage cursor, or by dropping it in front of the snake). We can also release the bird on the dragon, but it will instantly kill the bird. We need to scare the snake to acquire the Precious Jewelry (required for completion), so killing the bird is bad.
Axe
Found: Hall of Mists
The Axe is used to kill combat dwarves when they show up. If we don’t kill combat dwarves, they will continue to follow us until one of us is dead. It is recommended to always carry the axe.
Velvet Pillow
Found: Soft Room (TwoPit region, E of Swiss Cheese room)
Dropping the Velvet Pillow on the ground allows us to drop the Ming Vase without it shattering into pieces. This is required for depositing the Vase safely in WellHouse, but is not required for completing the game.
Batteries
Found: MazeDifferent (Vending Machine room, S of Diff10, see map above)
We acquire the Batteries by spending our Coins in the Vending Machine in MazeDifferent. The Batteries restore our lamp to a power of 2500 moves if the power is below 30 moves while we have the Batteries in inventory. There is currently no way to manually replace the Batteries (as of my writing this).
Magazine
Found: Antechamber (E of Bedquilt, by the dwarf)
The magazine is a confusing item whose only purpose is to award us a single point if we drop it in Witt’s End.
Dynamite
Found: Repository (S end, using “Examine” on the Black Rod in the inventory)
The Dynamite is required for completing the game, by throwing it at the wall on the N end of the room. If we drop it on the ground or throw it at the S end of the room, we are killed and game over.
Rock
Found: Repository (on ground next to mirror, N end)
The rock serves no beneficial purpose. We can throw it at the mirror in Repository to break it and get killed by dwarves. Otherwise, we should leave it.
Gold Nugget
Found: Hall of Mist, S room with mining dwarf
Treasure. 10 points for depositing in WellHouse. Cannot carry this up the stairs in “Top of Small Pit” room in Hall of Mists, so we need to return via PLUGH in Y2.
Diamonds
Found: West Hall of Mist, on table by polishing dwarf Treasure. 10 points for depositing in WellHouse.
Coins
Found: Hall of the Mountain King, West room, on altar
Treasure. 10 points for depositing in WellHouse. Can spend in the Vending Machine of MazeDifferent to acquire Batteries, but causes us to permanently lose access to those 10 points.
Precious Jewelry
Found: Hall of the Mountain King, South room behind snake
Treasure. 10 points for depositing in WellHouse. Permanently inaccessible if we lose or kill the bird.
Bars of Silver
Found: Hall of Mountain King, North corridor to “Y2” Treasure. 10 points for depositing in WellHouse.
Ming Vase
Found: Orient Room
Treasure. 14 points for depositing in WellHouse. The Vase will break when dropped in any room besides the Soft Room, unless the Velvet Pillow has been dropped in that room first.
Emerald
Found: Plover room in Orient region
Treasure. 14 points for depositing in WellHouse. Will not teleport with us when we use Plover, so we must leave the Plover room via the tight crack again instead of using Plover.
Platinum Pyramid
Found: Dark room next to Plover room, Orient region
Treasure. 14 points for depositing in WellHouse. To enter the Dark Room, we need to be holding a lit lantern, which requires entering Plover room from Y2 via the “Plover” magic word.
Trident
Found: Magnificent Caverns N of Giant’s Room, on the NE shore
Treasure. 14 points for depositing in WellHouse. The Trident is used to open the “clam” in the Shell Room of Bedquilt.
Pearl
Found: Inside the “clam” in the Shell Room of Bedquilt
Treasure. 14 points for depositing in WellHouse. The Trident is required to open the clam shell.
Rug
Found: Under the Dragon in Secret Canyon
Treasure. 14 points for depositing in WellHouse. In order to collect the Rug, we need to kill the Dragon by using the HAND cursor on it twice.
Golden Eggs
Found: Giant’s Room, in chicken coop
Treasure. 14 points for depositing in WellHouse. The Golden Eggs will be teleported back to the chicken coop of Giant’s Room if we use FEE FIE FOE FOO, regardless of where they were before (even if they were thrown off a cliff, given to the troll, deposited in WellHouse, etc)
Rare Spices
Found: Troll Region, NE side of the bridge, NE path in fork, then E Treasure. 14 points for depositing in WellHouse.
Golden Chain
Found: Troll Region, NE side of bridge, SE path in fork
Treasure. 14 points for depositing in WellHouse. Acquired by unlocking the bear’s chain after feeding the Tasty Food to the bear.
Pirate’s Chest
Found: Pirate’s Room in MazeAlike, if Pirate has hidden it yet
Treasure. 12 points for depositing in WellHouse. This item only exists after the Pirate has either stolen items from us, or shown up to tell us he is going to hide his Chest (which only happens if we have seen all of the other 14 treasures and are not carrying any of them). After we use the EYE or HAND cursor on this Chest, we will never encounter the Pirate again. Otherwise, this behaves like any other treasure.


A near-equal balance of good and bad that can make a game either fall disappointingly short of its evident potential or be mildly entertaining despite its many failings.
Despite a lovingly crafted 3D reimagining, Colossal Cave recreates the original too closely to appeal to much more than game history buffs and nostalgia seekers – or very patient players who don’t mind repetitive, arduous gameplay.


Top Adventure Games
More