


Legend Of Kyrandia Book 1: Part 2/2
LEGEND OF KYRANDIA: BOOK 1
FABLES AND FIENDS
WALKTHROUGH – PART 2
*******************************************
~~~~~~~~~~~~~~~~~~~~~~~~~~~~~~~~~~~~~~
ZANTHIA’S DOMAIN
~~~~~~~~~~~~~~~~~~~~~~~~~~~~~~~~~~~~~~
ZANTHIA’S LABORATORY
Zanthia found you in the forest, and brought you here, to her lab. She agrees to help you if she can, but she doesn’t have much magic left. She also tells you that you are a prince! Wow, never expected that! She wants you to get some MAGIC WATER from the fountain for her. Drop all your items here. Pick up FROST SCROLL. Take the EMPTY FLASK she offers you. Now walk left to leave her laboratory.
ZANTHIA’S DWELLING
Don’t mess around with the swamp monster – he’ll swallow you whole! Walk left 2 screens to A Ruined Fountain.
A RUINED FOUNTAIN
Malcolm is waiting for you here. He taunts you for a while, then he breaks the fountain by stealing one of the magical orbs that surround it. How are you going to get MAGIC WATER for Zanthia now? The only way to repair the fountain, is to replace that orb. But Malcolm isn’t going to make things easy for you! Walk down 2 screens to A Rocky Wall.
A ROCKY WALL
Walk left 3 screens, to A Rocky Wall.
A ROCKY WALL
Walk up 2 screens to A Flaming Tree.
A FLAMING TREE
Wow, that tree is on fire. It’s not a problem though – simply use your FROST SCROLL to douse the flames. Pick up CRYSTAL BALL that was concealed in the flames. Walk down 2 screens, to A Rocky Wall.
A ROCKY WALL
Walk right 3 screens, to A Rocky Wall.
A ROCKY WALL
Walk up 2 screens to A Ruined Fountain.
A RUINED FOUNTAIN
Replace CRYSTAL BALL into it’s place on the fountain. That magic works – the fountain is restored! Fill your EMPTY FLASK in the fountain to get some MAGIC WATER. Drink the flask of MAGIC WATER to activate your blue Dispel Stone. Fill your EMPTY FLASK in the fountain again, to get some more MAGIC WATER. Pick up flask of MAGIC WATER. Head right, and continue right, until you are back in Zanthia’s Laboratory.
ZANTHIA’S LABORATORY
Give MAGIC WATER to Zanthia. She tells the story of Malcolm killing your parents, then she asks you to get some BLUEBERRIES. Take the EMPTY FLASK she offers you. Also, take the other EMPTY FLASK from the floor. Leave her lab.
ZANTHIA’S DWELLING
Walk left 2 screens to The Enchanted Fountain.
THE ENCHANTED FOUNTAIN
Go down 2 screens to A Rocky Wall.
A ROCKY WALL
Walk left 3 screens to A Rocky Wall. Walk up one screen to A Rocky Outcropping.
A ROCKY OUTCROPPING
Walk left 3 screens to A Rocky Wall.
A ROCKY WALL
Walk up to A Cascading Waterfall.
A CASCADING WATERFALL
Take 3 BLUEBERRIES from the bush. Walk down to A Rocky Wall.
A ROCKY WALL
Walk right 3 screens to A Rocky Outcropping.
A ROCKY OUTCROPPING
Walk down to A Rocky Wall.
A ROCKY WALL
Head right, and continue right, to A Rocky Wall.
A ROCKY WALL
Walk up to A Natural Clearing.
A NATUAL CLEARING.
Walk up 2 screens to The Enchanted Fountain.
THE ENCHANTED FOUNTAIN
Head right, and continue right, until you reach Zanthia’s Laboratory.
ZANTHIA’S LABORATORY
Well, you have the BLUEBERRIES for Zanthia. But… where’s Zanthia? She seems to have disappeared. Notice the rug on the floor has been moved. Move the rug out of the way, and you’ll see a trapdoor. Drop all your items here, for safe keeping. Now open the trapdoor, and head on through the trapdoor.
A STRANGE STUMP
You find yourself in another forest. Search the tree stump to find a RAINBOWSTONE. Walk up 2 screens to A Tall Cliff.
A TALL CLIFF
Head right 3 screens to Dark Forest.
DARK FOREST
Walk up to A Tropical Lagoon.
A TROPICAL LAGOON
What a beautiful beach. You need to cross the ocean to continue your quest. But you’re not able to do that yet. Look at the gold Pegasus statues. Hmm, I wonder if that’s a clue that Pegasus could easily fly across the ocean. Take 2 ORCHIDS from the bush. Walk down to Dark Forest.
DARK FOREST
Walk left 3 screens to A Tall Cliff.
A TALL CLIFF
Walk down 2 screens to A Strange Stump.
A STRANGE STUMP
Climb down through the grassy trapdoor, back to Zanthia’s Laboratory.
ZANTHIA’S LABORATORY
You need to start mixing potions now. Zanthia’s cauldron is a good place for mixing potions. Potions need a coloured gemstone and another correctly-coloured item. Hopefully, you will have left the necessary items here earlier. SAVE YOUR GAME HERE. Throw a RUBY and an ORCHID into the cauldron. The water turns red. Now fill 2 EMPTY FLASKS with the RED POTION. If you need more flasks, simply leave Zanthia’s lab, then return. Throw a BLUEBERRY and a SAPHIRE into the cauldron. The water turns blue. Fill 2 EMPTY FLASKS with the BLUE POTION. Throw a TULIP and a TOPAZ into the cauldron. The water turns yellow. Fill 2 EMPTY FLASKS with the YELLOW POTION. You now have 2 potions of each colour. Now climb down through the trapdoor again, so you arrive in A Strange Stump.
A STRANGE STUMP
Walk down 2 screens to Dark Forest.
DARK FOREST
Walk left one screen to Dark Forest.
DARK FOREST
Go down 2 screens to A Rocky Wall.
A ROCKY WALL
Walk right one screen to Dark Forest.
DARK FOREST
Walk up one screen to The Crystals Of Alchemy.
THE CRYSTALS OF ALCHEMY
There are 2 huge crystals here. This is where you can mix 2 potions to create a 3rd potion. SAVE YOUR GAME HERE. Place a BLUE POTION and a RED POTION into the crystals, then take the resulting PURPLE POTION. Place a YELLOW POTION and a RED POTION into the crystals, then take the resulting ORANGE POTION. That’s all the potions you need. Now walk down one screen to Dark Forest.
DARK FOREST
Walk left one screen to A Rocky Wall.
A ROCKY WALL
Head up 2 screens to Dark Forest.
DARK FOREST
Go right one screen to Dark Forest.
DARK FOREST
Head up 2 screens to A Strange Stump.
A STRANGE STUMP
Climb down through the grassy trapdoor, back to Zanthia’s Laboratory.
ZANTHIA’S LABORATORY
Pick up APPLE that you left here earlier. Head left, and continue left, until you reach The Enchanted Fountain.
THE ENCHANTED FOUNTAIN
Go down one screen to A Natural Clearing.
A NATURAL CLEARING
Look at the cute wee door in the tree. Now walk left to Dark Forest.
DARK FOREST
Look at the ROYAL CHALICE floating in mid-air. Try to grab it, but it’s always just out of reach. Activate the blue Dispel Stone in your amulet. You manage to dispel the magic that’s keeping the ROYAL CHALICE afloat, but Pipsqueak will steal the ROYAL CHALICE, and run off with it. Walk right to A Natural Clearing.
A NATURAL CLEARING
Knock on Pipsqueak’s tiny door, but he doesn’t answer. If only you were smaller, then you could easily enter through Pipsqueak’s door. Okay, let’s make yourself smaller then. Drink the PURPLE POTION. Hey, you’re tiny now! Enter through Pipsqueak’s door.
PIPSQUEAK’S TREE HOUSE
After arguing with Pipsqueak, he’ll agree to give you back the ROYAL CHALICE, if you can give him something good. Give him the APPLE. He tells you that the ROYAL CHALICE is hidden outside. Leave the tree house.
A NATURAL CLEARING
Outside the tree house, you return to normal size. Look carefully at tree on the right, and take the ROYAL CHALICE that’s hiding behind it. Now walk up to The Enchanted Fountain.
THE ENCHANTED FOUNTAIN
Head right, and continue right, until you reach Zanthia’s Laboratory.
ZANTHIA’S LABORATORY
Pick up IRON KEY and ROSE that you left here earlier. Climb down through the trapdoor.
A STRANGE STUMP
Walk up 2 screens to A Tall Cliff.
A TALL CLIFF
Head right 3 screens to Dark Forest.
DARK FOREST
Walk up to A Tropical Lagoon.
A TROPICAL LAGOON
SAVE YOUR GAME HERE. You must be carrying ORANGE POTION, ROYAL CHALICE, ORCHID, IRON KEY, and ROSE at this point. After you cross the ocean, there’s no turning back. Now drink the ORANGE POTION – you turn into Pegasus, and you automatically fly up over the ocean.
~~~~~~~~~~~~~~~~~~~~~~~~~~~~~~~~~~~~~~
THE CASTLE
~~~~~~~~~~~~~~~~~~~~~~~~~~~~~~~~~~~~~~
A DARK ISLAND
You reach the Landing Point, and automatically change back into yourself. Walk up to A Misty Grave.
A MISTY GRAVE
Look at the gravestone – your parents are buried here. If only you could do something to honour their memory. Place the ROSE on the grave, and watch the scene with your mother’s ghost. She activates the red Invisibility Stone in your amulet. All 4 stones are now activated. Walk right 2 screens to The Gate Of Castle Kyrandia.
THE GATE OF CASTLE KYRANDIA
SAVE YOUR GAME HERE. You need to get through the gate, without the 2 dragon guards seeing you. If only you could turn invisible. Oh, wait a minute, you can! Activate the red Invisibility Stone in your amulet, then use IRON KEY in the gate to unlock it. Now head left into the castle.
CASTLE ENTRY HALL
Malcolm is here, and he confronts you for daring to enter ‘his’ castle. He also tells you that Herman is here, and he’s looking for you. If you remember, you lent your saw to Herman. After Malcolm leaves, walk left to A Royal Hallway.
A ROYAL HALLWAY
Walk up to A Royal Hallway.
A ROYAL HALLWAY
Walk right to The Great Hall.
THE GREAT HALL
You’re on the Ground level of the Great Hall. Enter through the top-left door, into A Small Study.
A SMALL STUDY
Explore the Study. Click on the huge grotesque statue head, and you’ll find yourself in some more catacombs.
A DARK, DUNGEON PASSAGE
Walk left 2 screens.
Walk up 2 screens.
Walk left 1 screen.
Walk up 1 screen.
Walk right 1 screen.
A DARK, DUNGEON PASSAGE
There’s a magical force field here. Activate your blue Dispel Stone to disenchant the force field. Now walk up to A Dark, Dungeon Passage.
A DARK, DUNGEON PASSAGE
Walk left 1 screen.
Look carefully at the ground. Move the stone, and pick up GOLD KEY.
Walk right 1 screen.
Walk down 1 screen.
Walk left 1 screen.
Walk down 1 screen.
Walk right 1 screen.
Walk down 2 screens.
Walk right 2 screens.
Walk down 1 screen.
A SMALL STUDY
You’re back in the Study. Look at books in the bookshelves, and notice that each book is marked with a different letter. Pull out the following books. All other books must be pushed in.
– ‘O’ for Opals
Purple book on the right side, bottom shelf
– ‘P’ for Potions
Grey book on the left side, top left shelf
– ‘E’ for Enchantment
Blue book on the left side, bottom left shelf
– ‘N’ for Nature
Blue book on the left side, bottom right shelf
That spells ‘OPEN’. And you’ve revealed a secret hiding place inside the huge grotesque statue head. Take ROYAL CROWN from the statue head. Now walk right to return to The Great Hall.
THE GREAT HALL
Enter through the top-right door, into A Royal Hallway.
A ROYAL HALLWAY
Walk right into A Kitchen.
A KITCHEN
Explore the kitchen. Take ROYAL SCEPTRE from table on the right. Now head left twice, back to The Great Hall.
THE GREAT HALL
Go through lower-left door, to A Royal Hallway.
A ROYAL HALLWAY
Walk down to A Royal Hallway.
A ROYAL HALLWAY
Walk right to Castle Entry Hall.
CASTLE ENTRY HALL
Climb up the stairs to A Grand Balcony.
A GRAND BALCONY
Walk left to A Royal Hallway.
A ROYAL HALLWAY
Walk up to A Royal Hallway.
A ROYAL HALLWAY
Walk left a few steps… Herman will appear, determined to return your saw. But he’s not acting like himself. In fact, he’s been poisoned! Activate your yellow Healing Stone to heal him – the effects of the magic knock him out cold. Walk left to A Bedroom.
A BEDROOM
Look at the stone statue of Zanthia. Hopefully, you can restore her, by defeating Malcolm. Look at the musical instrument in the foreground, and click on each bell to learn what note it represents. Now you have to play Do, Re, Mi, Fa, so pick up mallet at side of the instrument, and use it to hit Green Bell, White Bell, Gold Bell, Blue Bell. The painting on the back wall will raise up, revealing another hidey-hole. Take GOLD KEY from the hidey-hole. Now leave the room.
A ROYAL HALLWAY
Walk down to A Royal Hallway.
A ROYAL HALLWAY
Go right to A Grand Balcony.
A GRAND BALCONY
Climb down the stairs to Castle Entry Hall.
CASTLE ENTRY HALL
Walk left to A Royal Hallway.
A ROYAL HALLWAY
Head up to A Royal Hallway.
A ROYAL HALLWAY
Walk right to The Great Hall.
THE GREAT HALL
You’re on the Ground Floor of the Great Hall. Look at double-doors in the back wall, and use both GOLD KEYS in the double-doors to unlock them. Now walk up through the double-doors, into A Royal Foyer.
A ROYAL FOYER
SAVE YOUR GAME HERE. Notice the 3 pedestals against the back wall. It looks like 3 very important items should be placed there. So place ROYAL SCEPTRE on the left pedestal. Place ROYAL CROWN on the middle pedestal. Place ROYAL CHALICE on the right pedestal. Malcolm teleports in, and starts taunting you again. But this time, he pushes you too far, and you whack him. Then you automatically walk right into Chamber Of The Kyragem.
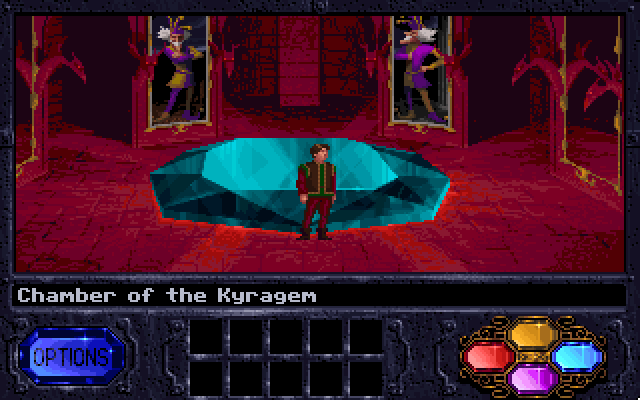
CHAMBER OF THE KYRAGEM
Activate your red Invisibility Stone, then step in front of the mirror on the right. Malcolm enters the room, but since you’re invisible, he doesn’t see you. He gets mad at your disappearance, and casts a red magical ball spell at the mirror… which reflects back onto him, turning him to stone. With Malcolm now a stone statue, all your friends are released.
Now sit back, and enjoy the ending.
Credit
This Walkthrough was written by Freaky Hobbit.


A game of very high quality. Although some aspects might have been executed better, we would recommend this game without hesitation.
A classic and enduring adventure, that despite its few flaws, is still a blast to play.


Top Adventure Games
More