


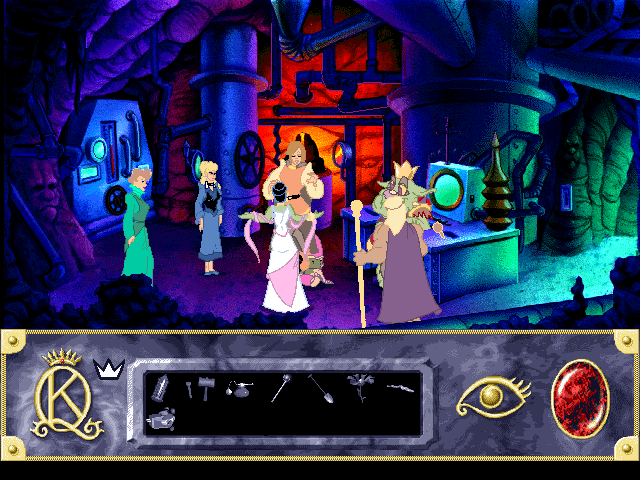
King’s Quest VII: The Princeless Bride
King's Quest VII: The Princeless Bride
Mac
PC
By: Sierra On-Line
CaliMonk
Senior Content Writer
Updated on
===============================================================================

                              FAQ/Walkthrough for
                     KING'S QUEST VII: THE PRINCELESS BRIDE

===============================================================================


GUIDE INFORMATION
-----------------

Author:   Tom Hayes
E-mail:   thayesguides(at)gmail(dot)com
System:   PC
Updated:  19th June, 2008
Version:  1.1


CONTENTS
--------

1. Introduction
2. Walkthrough
     2.1. Chapter 1
     2.2. Chapter 2
     2.3. Chapter 3
     2.4. Chapter 4
     2.5. Chapter 5
     2.6. Chapter 6
3. Item List
     3.1. Chapter 1
     3.2. Chapter 2
     3.3. Chapter 3
     3.4. Chapter 4
     3.5. Chapter 5
4. Copyright Information


VERSION HISTORY
---------------

1.1:  19th June, 2008  (Format update)
1.0:  20th July, 2005  (First version)


===============================================================================

1.                                Introduction

===============================================================================


King's Quest VII is the first game since King's Quest IV to feature Princess
Rosella as a main character, and the first of all King's Quest games to feature
two playable characters. One day Rosella sees a castle in a lake. Jumping in to
investigate, she finds herself transported to the land of Eldritch. Worried
when her daughter doesn't reappear, Queen Valanice jumps in after her. Though
both ending up in Eldritch, Valanice finds herself in the middle of a strange
desert, while Rosella gets even worse luck by being transformed into a troll.
Though the characters lead seperate adventures, often locations can be be
revisited by the characters at different times. The game involves Rosella and
Valanice's quest to find the way back to their own world.


===============================================================================

2.                                Walkthrough

===============================================================================


-------------------------------------------------------------------------------
2.1.                    Chapter 1: Where In Blazes Am I?
-------------------------------------------------------------------------------


The game starts in the desert. Valanice will walk into a thorn bush and will
tear her petticoat. Get the ripped petticoat from the bush. North. East. Knock
on the rare curiosities door at the right side of the area and talk to the
mole, who says that the jackalope has stolen his glasses. West. enter the cave.
Use all four of the pots to get the one pot that doesn't break. Get the basket.
Exit the cave. Look at the basket in the inventory. Open it by clicking on it,
and then hold down the left mouse button and move the cursor left to view the
corn kernel in the basket. Get the corn kernel and exit the view of the basket.

Use the corn kernel on the wet sand under the dripping water. Get the ear of
corn from the plant. Look at the drawings on the rock at the right side of the
cave entrance. While Valanice is looking at the drawings, the gourd at the left
side of the corn plant will open. Use the gourd to get a gourd seed. South.
West. Get the stick. Use the pot on the pool to fill it with salt water. Get
the salt crystals. Look at the symbols at the bottom of the statue. Put the
salt water in the statue bowl. Use the comb on Valanice and she will cry. Use
the comb on the statue bowl and she will cry into the bowl. Put the ear of corn
on the hand of the statue and it will change the salt water to fresh water.

Use the pot on the bowl to get the fresh water. Walk south to the desert. Walk
around the desert (keep walking one area east, and then one area west) until
the ghost appears. When he does, quickly talk to him and he will walk off. Find
the ghost again and talk to him. This time he will wait for Valanice to give
him something, so give him the fresh water. He will take Valanice to his
skeleton and tells her to choose something from the pouch. Get the rope and
then walk north twice to return to the desert path. East. Enter the temple.

When the scorpion appears, quickly combine the stick with the ripped petticoat
in the inventory to make a flag. Use the flag on the scorpion and it will stick
its tail into the wall. Use the stone block at the right side of the room.
Click the big raindrop icon to make a light appear. Get the red crystal and put
it on the sun icon. Get the yellow crystal and put it on the statue's right
hand. Get the blue crystal and put it on the statue's left hand. Get the
turquoise piece that appears. Exit the temple.

West. Use the rope on the cactus tree at the left side of the path and Valanice
will trip up the jackalope. Get the glasses that the jackalope dropped. Get the
jackalope fur from the cactus. North. East. Knock on the rare curiosities door
and give the glasses to the mole. Give the gourd seed to the mole and he will
give Valanice a turquoise bead in return. West. West. Use the stick on the bush
and get the prickly pear that drops from it. South. Use the head of the statue
to change it to the sun head.

Use the necklace of the statue and put the blue beads in the third hole on each
ring. Use the hand at the left side of the statue to reveal hidden steps in the
pool. Go down the steps. Look at the bowl held by the statue. Look at it again
in the zoomed view. Use the turquoise bead in the bowl and the statue will nod.
Look at the offering bowl and get the right turquoise piece. Go up the steps.
North. Combine the two turquoise pieces in the inventory to make the puzzle.
Look at the arrow on the statue and then use the puzzle on the arrow in the
zoomed view. Walk through the doorway to complete the chapter.


-------------------------------------------------------------------------------
2.2.                  Chapter 2: A Troll Is As a Troll Does
-------------------------------------------------------------------------------


Exit the bedroom to talk to Matilida. After the conversation, a girl will walk
past and drop her toy. Get the toy rat. Get the shield on the wall near the
throne. Walk through the north-east exit to enter the kitchen. The chef will
tell Rosella to leave. Enter the kitchen again and use the toy rat on the chef
to make him leave the kitchen. Get the gold bowl from the shelf and then look
at it in the inventory. Rotate the bowl to see the writing on the bottom. If
the writing says brass, then put it back on the shelf and get the other gold
bowl. Check the writing on the bowl and keep the gold one. Use the machine on
the middle of the counter to get the baked beetles. Exit the kitchen.

Walk north-west to the jacuzzi area. Exit the jacuzzi area. West. North. Get
the lantern at the back of the cave. Use the gold bowl on the small green pool.
Walk to the edge of the cliff on the left and select the pillar to jump to it.
Jump to the left edge and get the wet sulphur from the wall. Jump back across
the pillar and walk east to exit the cave. Put the wet sulphur in the fire to
make the working troll fall asleep. Get the tongs from the rack and use them on
the box to pick it up. Use the tongs on the bucket of water to cool the box,
which Rosella will then get the spoon from. Put the tongs back on the rack. Use
the bellows to increase the fire and then use the lantern with the fire to
light it. Walk up the steps to return to the main hall.

Walk through the south-east exit to enter an area with a wagon. Walk over the
bridge and a troll will appear to block Rosella's path. Look at the shield in
the inventory and get the spike from it. Look at the wagon at the top of the
slope and use the shield on the peg. Use the shield spike on the shield to
fasten the shield to the wagon. Ride the wagon to push the troll off the side
of the bridge. East. East. Talk to the dragon. Give the lantern with spark to
the dragon to receive a big gem. West. West. West. West. Talk to the troll with
the hammer and then give him the gem to receive the hammer and chisel. Walk up
the steps. South-east. East. East to return to the dragon.

Use the hammer and chisel on the tail of the dragon to get a dragon scale.
West. West. West. Give the bowl with green water, spoon, baked beetles and
dragon scale to Matilida to return to human form. Rosella will be returned to
the bedroom. Get the three stools in the room and put them (starting with the
largest stool and ending with the smallest stool) below the picture to move it.
Rosella climbs through the vent and drops down into the hall. Get the dragon
toad near the throne. Walk through the north-west exit and Matilida will return
to the hall. Show the dragon toad to Matilda and she will give Rosella an
enchanted rope. Try to walk through the south-east exit and Malicia will
appear. Use the toy rat on her and she will disappear. South-east. Use the
enchanted rope on the basket and then use the basket to complete the chapter.


-------------------------------------------------------------------------------
2.3.                     Chapter 3: The Sky Is Falling
-------------------------------------------------------------------------------


Give the prickly pear to the monster and it will leave the cave. North. West.
Talk to Attis the stag twice and he will mention the ancient rock spirit. West.
North. Jump across the stones on the river bed to cross to the other side of
the area. Use the basket on the spider to save the hummingbird. Free the
hummingbird from the web and it will offer to help Valanice in the future.
North. Use the small door to enter the town of Falderal. Show the comb to Fifi
and he will let Valanice explore the town.

Enter the china shop and talk to Fernando to find out that he has lost his
china bird. Exit the china shop. East. Move the cover on the cage at the right
side of the stall and then talk to the china bird. Valanice will tell the bird
about Fernando, and she will agree to come with Valanice. West. Enter the china
shop and give the china bird to Fernando to receive the mask. Exit the china
shop to see guests arriving at the town hall. Use the mask on Valanice and then
knock on the door to enter the town hall.

Use the carpet at the back of the room to enter a room with many staircases.
Walk east and follow the steps all the way to the door at the right side of the
room. Use the door twice to enter the mirror room. Use the third mirror from
the left to enter the study. Use the drawer and get the magic statuette. Use
the door to return to the staircase room. Follow the steps and go east at the
junction. Follow the steps to the staircase at the bottom of the room and then
go south to return to the entrance hall. Walk east to exit the town hall.

East. The moon falls into the pond and scares the crow away from its nest. Look
in the nest to get a wooden nickel. Use the salt crystals on Valanice and then
open the purple door to enter the faux shop. Give the nickel to the shop owner
to get a book. Give the mask to the shop owner to get a rubber chicken. Exit
the shop. West. West to exit the town. East. East. East. Look at the rubber
chicken in the inventory and get the tail feather. Use the feather on the nose
of the ancient rock spirit and he will tell Valanice to make the river flow.

West. West. South. Jump across the stones and continue south. East. East. Talk
to the hummingbirds in the flowers at the top-left corner of the area and then
give them the clay pot to fill it with nectar. Use the nectar on the vase held
by the statue to make the river flow. East. South. South to return to the
desert. East. East. Knock on the rare curiosities door and give the book to the
mole to receive a crook. West. West. Walk through the doorway. North to return
to the forest. Walk over the rainbow bridge and continue north. West. West.
North. Open the small door to return to the town of Falderal. East. Use the
crook on the moon in the pond to complete the chapter.


-------------------------------------------------------------------------------
2.4.          Chapter 4: Will the Real Troll King Please Stand Up
-------------------------------------------------------------------------------


Select the gravedigger's shovel to exit the hole. Talk to the gravedigger three
times and he will mention his rat. East. West. East. West to see the kid throw
something at the door of the house. East. Use the bucket at the bottom of the
rope to enter the pumpkin house. Get the back bone and the foot-in-a-bag. Use
the bucket to exit the house. West. Open the gate and then knock on the door of
the house to talk to the coroner. Give him the back bone to receive a weird
pet. Exit the house. East. Show the weird pet to the kids and they will lower
the bucket. Put the weird pet in the bucket to get the gravedigger's rat.

North. Give the rat to the gravedigger to get the horn. East. Use the hammer
and chisel on the box to get the extra life from the cat. West. West. South. If
the branch at the right side of the tree is pointing up, exit and return the
area until the branch is pointing down. Use the horn on Rosella to call the
gravedigger, who will move the bones out the way. Go down the hole. Use the
padlock and press the skull, bat and spider icons to meet Otar. Show the dragon
toad to Otar and then use the hammer and chisel on Otar's bracelet to arrive in
the graveyard. Get the black cloak from the gravestone and use it on Rosella.

West. North. East. Knock on the door and then talk to the coroner to get the
defoliant. Exit the house. East. North. Get the shovel. East. South. Use the
defoliant on the monster. Walk east and the plant will talk to Rosella. Give
the foot-in-a-bag to the plant and then get the flower. East. North to the back
of the house. Use the roots to reveal a hole. Use the shovel on the hole. If
the dog is barking, walk north, east, west and north to return to the back of
the house until it is quiet. Use the hole to enter the house.

After Malicia enters the room, go down and the dog will start sniffing Rosella.
Use the defoliant on the dog and Malicia will leave. Up. Open the bottom drawer
near the door and use it five times to find the mysterious device. Use the
clothes to put them back in the drawer. Get the woolen stocking. Use the
floorboard to exit the house. Use the black cloak to wear it. North. East.
Combine the silver pellet with the woolen stocking in the inventory to make a
sling. Walk east and use the sling on the bear to return to the forest. East.
East. North. West. West. North. Use the small door to enter Falderal.

Enter the town hall. Use the carpet at the back of the room to enter the
staircase room. Walk east and follow the steps to the door at the right side of
the room. Use the door twice to enter the mirror room. Look at the plaque on
the statue at the left side of the room. Use the woolen stocking on the plaque
to reveal the writing. Read the plaque. Use the hammer and chisel on the pillar
at the top-right corner of the room to get a golden grape. Use the grape on the
statue and the fountain will move. Combine the magic wand with the troll king
as scarab in the inventory. He will help Rosella open the statue. Use the
fountain to drop down to a tunnel. Walk north to complete the chapter.


-------------------------------------------------------------------------------
2.5.                    Chapter 5: Nightmare In Etheria
-------------------------------------------------------------------------------


East. Give the magic statuette to the stall owner to receive the were-beast
salve. West. Use the rubber chicken on the branch at the right side of the
area. Use the moon on the rubber chicken to put the moon back in the sky. West.
East. East. South. Cross the bridge and walk west. West. Combine the jackalope
fur with the were-beast salve and then use the salve on Valanice to run through
the forest. West. Open the gate to enter Ooga Booga.

West. East to the pumpkin house. Use the bucket to enter the house. Get the
femur bone from the mummy. Use the bucket to exit the house. North. West. Walk
west to see a big dog. Give the femur bone to the dog. Talk to him and then get
the medal that he offers. South. Give the medal to the woman. East. East. Get
the firecracker on the floor. West. West. Use the firecracker on the crypt.
Enter the crypt and open the sarcophagus. Use the sarcophagus to get the
horseman's head. Exit the crypt. Give the horseman's head to the headless
horseman that rides past. The horse will take Valanice to Etheria.

East. East. Up. Climb onto the tree and get the ambrosia. South. South. North.
Press the first string, fifth string, sixth string and fourth string of the
harp. Use the crystal on top of the harp to arrive in space. Talk to the three
Fates twice. South. West. Use the bottom-right rainbow to arrive in the forest.
Cross the bridge and use the ambrosia on the statue's vase. Get the
pomegranate. Cross the bridge. West. Use the pomegranate on the tree. Use the
horseman's fife on Valanice to return to Etheria.

Use the bottom-left rainbow to arrive at the entrance to Ooga Booga. Open the
gate. West. Knock on the door to talk to the coroner. Talk to the coroner in
his house. Use the coffin. Use the horseman's fife on Valanice to return to
Etheria. East. North. Press the first string, fifth string, sixth string and
fourth string of the harp. Use the crystal on top of the harp and talk to the
three Fates. South. West. Use the bottom-right rainbow to return to the forest.
West. Talk to Ceres. Use the horseman's fife on Valanice to return to Etheria.
Use the bottom-left rainbow to arrive at the entrance to Ooga Booga.

East. North to the back of the house. If the dog is barking, walk north, east,
west and north to return to the back of the house until the dog is quiet. Use
the hole to enter the house. Go down to hide when Malicia enters the room. Go
up to enter the room. Look at the lamp at the bottom-right corner of the room
to get the crystal shaft. Use the floorboard to exit the house. North. Use the
horseman's fife on Valanice to return to Etheria. Use the top-left rainbow to
arrive in the desert. North. North. East. Enter the temple and use the crystal
shaft on the statue to fill the crystal with sunlight. Exit the temple and use
the horseman's fife on Valanice to return to Etheria.

East. North. Press the first string, fifth string, sixth string and fourth
string of the harp. Use the crystal on top of the harp and talk to the three
fates to receive the dream catcher. South. East. Up. Try to enter the cave and
then use the dream catcher on the monster that appears. Enter the cave and talk
to the dream weaver. Give the dream catcher to the dream weaver to receive the
tapestry of dreams. Use the tapestry of dreams on Valanice to enter Dreamland.
Use the dream catcher on the nightmare. South. Enter the temple. Use the
crystal shaft with sunlight on the ice crystal to receive the magic bridle.
Valanice will be returned to Etheria. Up. Walk behind the left side of the cave
and then use the magic bridle on the ghost horse to complete the chapter.


-------------------------------------------------------------------------------
2.6.                     Chapter 6: Ready, Set... Boom!
-------------------------------------------------------------------------------


Look at the magic wand in the inventory and rotate it to see the letter on the
end. Select the other end of the wand to change the letter to F. Use the magic
wand on the troll with the green eyes and he will transform into Edgar. Malicia
appears and sends Rosella into a volcano. Use the shovel on the wall to exit
the volcano. North. Use the left eye, right eye and nose to open the door. Use
the mysterious device on the plug socket at the left side of the room. Use the
flower on the troll king. Get the mysterious device from the plug socket and
use it on Malicia. Use the extra life on Edgar to complete the game.


===============================================================================

3.                                 Item List

===============================================================================


-------------------------------------------------------------------------------
3.1.                          Chapter 1 Item List
-------------------------------------------------------------------------------


BASKET
  Found in the desert cave. It is looked at in the inventory to find the corn
  kernel. It is used on the spider in the forest in chapter 3.


BUG REDUCING POWDER
  Optional item. The powder can be found in the desert ghost's bag instead of
  the rope. It can be used on the scorpion in the temple.


CLAY POT
  Found by using the four pots in the desert cave. It is used on the pool to
  fill the pot with salt water. After turning the salt water into fresh water
  in the statue's bowl, it is used on the bowl to fill the pot with fresh
  water. After rescuing the hummingbird from the spider's web in chapter 3, it
  is given to the hummingbird in the forest to fill the pot with nectar.


CORN KERNEL
  Found by looking at the basket in the inventory. It is used on the wet sand
  outside the desert cave.


EAR OF CORN
  Found by using the corn kernel on the wet sand outside the desert cave. It is
  used on the hand of the statue's bowl.


FLAG
  Found by combining the stick with the ripped petticoat in the inventory. It
  is used on the scorpion in the temple.


FRESH WATER
  After putting the salt water in the statue's bowl, the fresh water is found
  by using the comb on Valanice and by using the ear of corn on the hand of the
  statue. It is given to the desert ghost.


GLASSES
  If the rope was selected from the desert ghost's bag, then the glasses are
  found on the sand after using the rope on the cactus tree in the area south
  of the desert cave. If the bug reducing powder was selected from the desert
  ghost's bag, then the glasses are found after blowing the hunting horn
  outside the rare curiosities shop. They are given to the mole in the rare
  curiosities shop.


GOLDEN COMB
  Available at the start of the game. It is used on Valanice to make her cry
  into the statue's bowl. It is shown to Fifi in Falderal in chapter 3.


GOURD SEED
  After using the corn kernel on the wet sand outside the desert cave, the
  gourd seed is found after Valanice looks at the drawings outside the cave. It
  is given to the mole in the rare curiosities shop to get a turquoise bead.


HUNTING HORN
  Optional item. Found in desert two areas south of start point. It is used on
  the right hole outside the rare curiosities shop. If the horn is blown, then
  the glasses and the jackalope fur are found in this area.


JACKALOPE FUR
  If the rope was selected from the desert ghost's bag, then the fur is found
  on the cactus after using the rope on the cactus tree in the area south of
  the desert cave. If the bug reducing powder was selected from the desert
  ghost's bag, then the fur is found after blowing the hunting horn outside the
  rare curiosities shop. It is combined with the were-beast salve in the
  inventory to make the were-beast salve with fur in chapter 5.


PRICKLY PEAR
  Found by using the stick on the bush near the arrow statue. It is given to
  the monster in the cave in chapter 3.


PUZZLE
  Found by combining the two turquoise pieces in the inventory. It is used on
  the arrow on the statue.


RIPPED PETTICOAT
  Found on the thorn bush in the area south of the desert cave. It is combined
  with the stick in the inventory to make the flag.


ROPE
  Found in the desert ghost's bag. It is used on the cactus tree in the area
  south of the desert cave.


SALT CRYSTALS
  Found at the edge of the salt water pool. They are used on Valanice in
  Falderal before entering the faux shop.


SALT WATER
  Found by using the clay pot on the salt water pool. It is used on the
  statue's bowl.


STICK
  Found in the area with the bowl statue. It is combined with the ripped
  petticoat in the inventory to make the flag.


TURQUOISE BEAD
  Found by giving the gourd seed to the mole in the rare curiosities shop. It
  is used on the bowl at the bottom of the salt water pool.


TURQUOISE PIECE
  Found after putting the crystals in the correct places on the stone block in
  the temple. It is combined with the other turquoise piece in the inventory to
  make the puzzle.


TURQUOISE PIECE
  Found by using the turquoise bead on the bowl at the bottom of the salt water
  pool. It is combined with the other turquoise piece in the inventory to make
  the puzzle.


-------------------------------------------------------------------------------
3.2.                          Chapter 2 Item List
-------------------------------------------------------------------------------


BAKED BEETLES
  Found by using the machine on the counter in the kitchen. It is given to
  Matilda in the throne room.


BIG GEM
  Found by giving the lantern with spark to the dragon. It is given to the
  troll with the hammer to get the hammer and chisel.


BOWL
  Found on the shelf in the kitchen. It is used on the green pool in the cave.


BOWL WITH GREEN WATER
  Found by using the bowl on the green pool in the cave. It is given to Matilda
  in the throne room.


DRAGON SCALE
  Found by using the hammer and chisel on the tail of the dragon. It is given
  to Matilda in the throne room.


DRAGON TOAD
  After Rosella has returned to human form, the dragon toad is found in the
  throne room. It is shown to Matilda in the throne room to get the enchanted
  rope. It is shown to Otar in chapter 4.


ENCHANTED ROPE
  Found by showing the dragon toad to Matilda in the throne room. It is used on
  the basket in the area south-east of the throne room.


HAMMER AND CHISEL
  Found by giving the big gem to the troll with the hammer and chisel. It is
  used on the tail of the dragon to get the dragon scale. It is used on the box
  outside the pumpkin house in chapter 4 to get the extra life from the cat. It
  is used on Otar's bracelet in chapter 4. It is used on the pillar in the
  mirror room at Falderal in chapter 4 to get the golden grape.


LANTERN
  Found at the back of the cave. It is used on the fire in the area with the
  trolls.


LANTERN WITH SPARK
  Found by using the lantern on the fire in the area with the trolls. It is
  given to the dragon to get the big gem.


SHIELD
  Found on the wall in the throne room. It is looked at in the inventory to get
  the spike. It is used on the wagon peg.


SHIELD SPIKE
  Found by looking at the spike in the inventory. After the shield has been
  used on the wagon peg, the shield spike is used on the peg.


SPOON
  After the wet sulphur has been used on the fire in the area with the trolls,
  the spoon is found by using the tongs on the bucket of water. It is given to
  Matilda in the throne room.


TOY RAT
  Found on the floor in the throne room. It is used on the chef in the kitchen.
  It is used on Malicia in the throne room after Rosella gets the enchanted
  rope.


WET SULPHUR
  Found on the wall in the cave. It is used on the fire in the area with the
  trolls.


-------------------------------------------------------------------------------
3.3.                          Chapter 3 Item List
-------------------------------------------------------------------------------


BOOK
  Found by giving the wooden nickel to the faux shop owner. It is given to the
  mole in the rare curiosities shop to get the crook.


CHINA BIRD
  After talking to Fernando in the china shop, the china bird is found by
  talking to the bird in the cage outside the stall in Falderal. It is given to
  Fernando in the china shop to get the mask.


CROOK
  Found by giving the book to the mole in the rare curiosities shop. It is used
  on the moon in the pond in Falderal.


FEATHER
  Found by looking at the rubber chicken in the inventory. It is used on the
  nose of the ancient rock spirit in the forest.


MAGIC STATUETTE
  Found in the drawer in the study in the town hall at Falderal. It is given to
  the stall owner in chapter 5 to get the were-beast salve.


MASK
  Found by giving the china bird to Fernando in the china shop in Falderal. It
  is used on Valanice to enter the town hall. It is given to the faux shop
  owner to get the rubber chicken.


MOON
  Found by using the crook on the moon in the pond in Falderal. After using the
  rubber chicken on the branch of the tree in chapter 5, the moon is used on
  the rubber chicken.


NECTAR IN POT
  After rescuing the hummingbird from the spider's web, the nectar in pot is
  found by giving the clay pot to the hummingbird. It is used on the statue's
  vase near the river.


RUBBER CHICKEN
  Found by giving the mask to the faux shop owner. It is looked at in the
  inventory to get the feather. It is used on the branch of the tree in
  Falderal.


WOODEN NICKEL
  Found by looking at the nest on the tree in Falderal. It is given to the faux
  shop owner to get the book.


-------------------------------------------------------------------------------
3.4.                          Chapter 4 Item List
-------------------------------------------------------------------------------


BACK BONE
  Found in the pumpkin house. It is given to the coroner to get the weird pet.


BLACK CLOAK
  After using the hammer and chisel on Otar's bracelet, the cloak is found on
  the gravestone in the graveyard. It is used on Rosella.


DEFOLIANT
  After finding the black cloak, the defoliant is found by talking to the
  coroner. It is used on the monster outside Ooga Booga. It is used on the dog
  in Malicia's house.


EXTRA LIFE
  Found by using the hammer and chisel on the box outside the pumpkin house. It
  is used on Edgar in chapter 6.


FOOT-IN-A-BAG
  Found in the pumpkin house. It is given to the plant outside Ooga Booga to
  get the flower.


FRAGRANT FLOWER
  Found by giving the foot-in-the-bag to the plant outside Ooga Booga. It is
  used on the troll king in chapter 6.


GOLDEN GRAPE
  Found by using the hammer and chisel on the pillar in the mirror room at
  Falderal. It is used on the statue in the mirror room.


GRAVEDIGGER'S HORN
  Found by giving the gravedigger's rat to the gravedigger. It is used on
  Rosella outside the boogeyman's house.


GRAVEDIGGER'S RAT
  Found by using the weird pet on the bucket outside the pumpkin house. It is
  given to the gravedigger to get the gravedigger's horn.


MAGIC WAND
  Found after meeting Otar. It is combined with the troll king as scarab in the
  inventory. It is looked at in the inventory in chapter 6 to change the
  letter.


MYSTERIOUS DEVICE
  Found in the bottom drawer in Malicia's house. It is used on the plug socket
  in chapter 6. The charged mysterious device is used on Malicia.


SHOVEL
  After finding the black cloak, the shovel is found in the graveyard. It is
  used on the hole under the roots at the back of Malicia's house. It is used
  on the wall in the volcano in chapter 6.


SILVER PELLET
  Available at the start of the chapter. It is combined with the woolen
  stocking in the inventory to make the sling.


SLING
  Found by combining the silver pellet with the woolen stocking in the
  inventory. It is used on the bear in the forest.


TROLL KING AS SCARAB
  Found after meeting Otar. It is combined with the magic wand in the
  inventory.


WEIRD PET
  Found by giving the back bone to the coroner. It is used on the bucket
  outside the pumpkin house to get the gravedigger's rat.


WOOLEN SOCKING
  Found after putting the clothes inthe bottom drawer in Malicia's house. It is
  used on the plaque in the mirror room in the town hall at Falderal. It is
  combined with the silver pellet in the inventory to make the sling.


-------------------------------------------------------------------------------
3.5.                          Chapter 5 Item List
-------------------------------------------------------------------------------


AMBROSIA
  Found on the tree at the top of the cliff in Etheria. It is used on the
  statue's vase in the forest to get the pomegranate.


CRYSTAL SHAFT
  Found in the lamp in Malicia's house. It is used on the statue in the temple.


CRYSTAL SHAFT WITH SUNLIGHT
  Found by using the crystal shaft on the statue in the temple. It is used on
  the ice crystal in Dreamland to get the magic bridle.


DREAM CATCHER
  After getting the crystal shaft with sunlight, the dream catcher is found by
  talking to the three fates in Etheria. It is used on the monster outside the
  cave at the top of the mountain in Etheria. It is given to the dream weaver
  in the cave to get the tapestry of dreams. It is used on the nightmare in
  Dreamland.


FEMUR BONE
  Found on the mummy in the pumpkin house. It is given to the dog in Ooga
  Booga.


HORSEMAN'S FIFE
  Found by giving the horseman's head to the headless horseman in Ooga Booga.
  It is used on Valanice to return to Etheria.


HORSEMAN'S HEAD
  Found by using the sarcophagus in the crypt in Ooga Booga. It is given to the
  headless horseman.


HORSEMAN'S MEDAL
  Found by talking to the dog in Ooga Booga after giving him the femur bone. It
  is given to the woman outside the crypt.


LIT FIRECRACKER
  After giving the medal to the woman outside the crypt, the lit firecracker is
  found outside the pumpkin house. It is used on the crypt.


MAGIC BRIDLE
  Found by using the crystal shaft with sunlight on the ice crystal in
  Dreamland. It is used on the ghost horse at the top of the mountain in
  Etheria.


POMEGRANATE
  Found by using the ambrosia on the statue's vase in the forest. It is used on
  the tree in the forest.


TAPESTRY OF DREAMS
  Found by giving the dream catcher to the dream weaver in the cave at the top
  of the mountain in Etheria. It is used on Valanice to travel to Dreamland.


WERE-BEAST SALVE
  Found by giving the magic statuette to the stall owner in Falderal. It is
  combined with the jackalope fur in the inventory to make the were-beast salve
  with fur.


WERE-BEAST SALVE WITH FUR
  Found by combining the were-beast salve with the jackalope fur in the
  inventory. It is used on Valanice to exit the forest.


===============================================================================

4.                           Copyright Information

===============================================================================


This file is Copyright 2005-2008 Tom Hayes. As it can be difficult to keep
track of websites that haven't posted the latest version of this file, please
do not distribute it without my permission. Send an e-mail to me if you would
like to post this file on your website and you will likely receive a positive
response. If you do post the file, please keep it in its original form with all
of the sections intact and credit the author (Tom Hayes) as the writer of the
file.


Our Verdict
Good
A solid adventure that is generally enjoyable, though it lacks enough polish or ambition to recommend without caution.
An eminently playable, if not revolutionary, adventure game.


Top Adventure Games
More
Cantaloupe Chronicle
Today marks the beginning of your internship at the Cantaloupe Chronicle! Step into the shoes of a young reporter in a classic Point & Click Adventure as you uncover the mysteries of the small town. Write compelling articles, snap intriguing photos, and talk to the quirky townsfolk.
Linux
PC

Incremental Island
Build and expand a vibrant civilization on a procedurally generated island. Trade and conquer with other island nations to grow your wealth.
PC
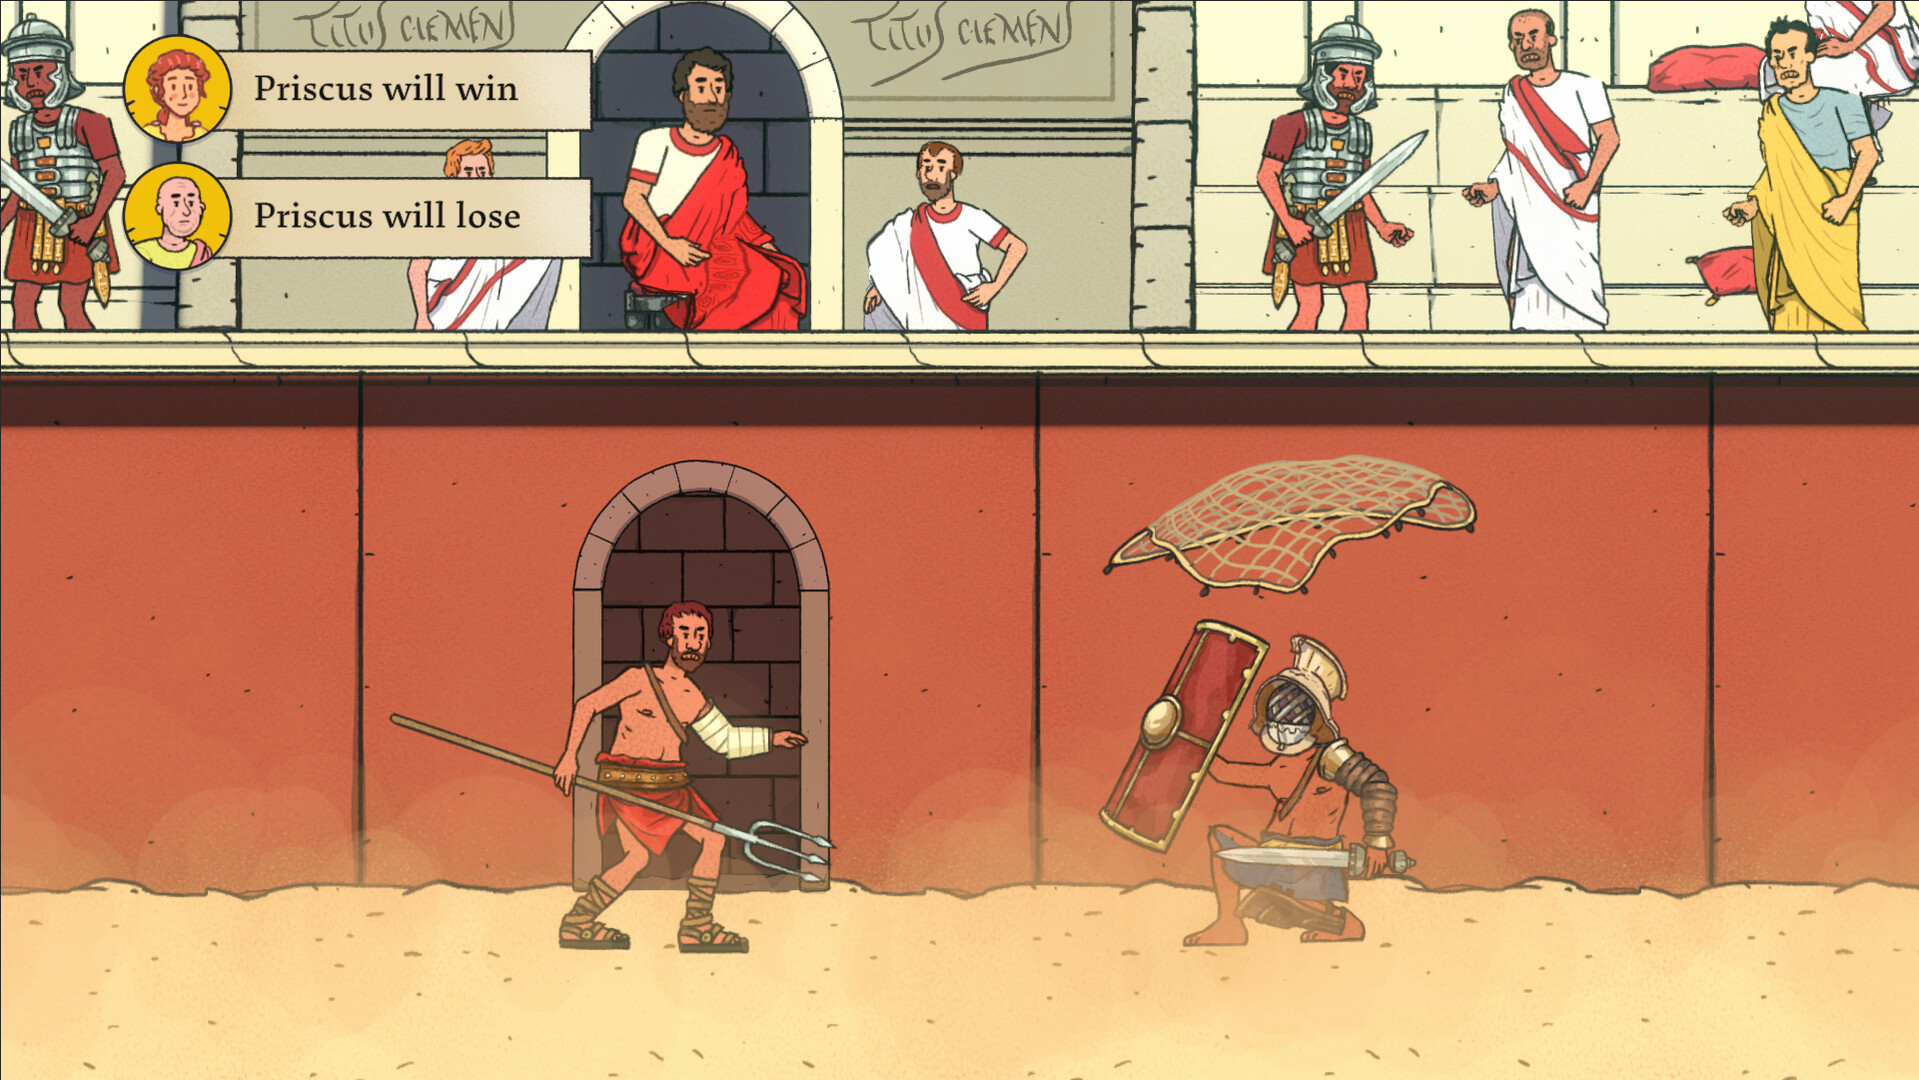
Danger in Pompeii
Danger in Pompeii is an adventure puzzle game where you relive the city’s final day. Explore its streets, help its people, and solve the mystery of Mercury. Can you escape the eruption of Mount Vesuvius and save your friends?
PC
Beyond The Board
A single-player puzzle game that transforms traditional chess into a minimal, immersive journey. Every move is a step deeper into the world Beyond the Board, where shifting tiles and puzzles reveal the hidden fractures within the game’s very foundations.
PC

Kejora
When Kejora realizes that her peaceful village has been reliving the same day over and over, she and her friends seek out to try and uncover the origin of the mysterious time loop cursed on her village
PC