Walkthrough for The St. Christopher’s School Lockdown
THE ST CHRISTOPHER’S SCHOOL LOCKDOWN
by
Classroom Graffiti Productions
Walkthrough by chrissie November 2018
LAUNCH MENU: NEW GAME / LOAD / SETTINGS / BONUS / EXIT.
Settings: Adjust music & sound effects. Change resolution.
INTERFACE This is a point & click game played using the left mouse button. The keyboard is used in some of the puzzles.
Clicking on an item or person displays a choice of actions that can be performed represented by: a magnifying glass to look; a gear to interact; a hand to pick up, take or use; an ear to eavesdrop/listen & a mouth to talk.
Pressing the TAB key shows all hotspots.
During dialogue either click on a choice of response if available or click on the screen to progress/end the dialogue.
Click on the ‘escape’ sign to enter/exit an area.
INVENTORY: Move the cursor to the top of the screen to access during the game. Items can be looked at with the magnifying glass, interacted with using the gear icon & picked up/used with the hand icon. Items can be combined by dragging one onto another with the hand icon & separated using the gear icon.
Click on the INSIGNIA in the bottom left-hand corner of the screen during the game to access the game locker:
IN-GAME MENU: SAVE / LOAD / SETTINGS / MAIN MENU / EXIT.
Saving: There are 20 save slots which can be over-written. Saves are labelled with the location & date.
ALUMNI BOOK: Not used.
VOODOO COLLECTION: You can acquire up to 4 (or 5?) dolls which are used to compete in a game called Voodoo Wars. See the details about each doll & the rules of the game.
MAP: When this feature becomes available, you can click on the globe & then a location to move directly there. Areas are added as you access them.
TO-DO LIST: Shows the current objectives.
MOOD FIX: Click on the fish bowl to adjust your mood.
ABOUT THIS GAME
The game can be very slow to launch & load. Some transitions & responses within the game are very slow also.
Be VERY patient & wait as trying to hurry the game can cause it to crash. Save often!
Dialogue is only voiced in key parts.
There are 15 ACHIEVEMENTS to be gained in the Steam version of the game. Unfortunately only 13 of them seem to register.
ABOUT THIS WALKTHROUGH
It is based on the version of the game with update 1.0.8
This is just one way of playing the game and may not necessarily include all there is to find. Some details may vary on different playthroughs.
It’s not clarified, but talk to everyone & look at everything. Sometimes talking or looking more than once can reveal additional info.
*Accumulative items, actions &/or dialogue choices that contribute towards an achievement are marked with an asterisk & a number.
___________________________________________________________________________________________________
INTRO
See protagonist Kayleigh crashed-out in a camper van. She’s gradually being awoken by a guy called Brian nagging her to wake up!
Exit the van.
DAY 1
“I knew who I was this morning, but I’ve changed a few times since then.”
Lewis Carroll, Alice in Wonderland
FIND OUT WHERE YOU ARE
Car park
Outside there’s no sign of Brian & you note that this is not where the van was parked last night before you fell asleep.
See police on the other side of the railings. Listen to their conversation.
Enter the van. Pick up the clothes to get a pile of clothes in inventory, & then look at them to see that you have a school uniform. Interact with the pile of clothes to change into them.
Find yourself outside the van.
Enter the van, pick up the hanger then exit the van again.
Try to enter through the back entrance. It’s currently locked but you can hear people chattering inside.
Interact with the gate but that’s locked too.
Side of School
Try to enter through the door.
See that one of the windows is slightly open. (You might be able to enter through the window or it may be stuck.)
Look at the blue flame car & the red fiesta. Look at the old car which is a 1982 sedan. See that the boot is partially open. Use the hand icon to rummage through it. You see an empty bottle of weed-killer.
School Front
Try the front door.
Look at, and then pick up the protest signs to get a wooden stick.
Side of School
*Use the wooden stick on the blue flame car. [1]
ACHIEVEMENT: Rebel Yell (Hit the car with your trusty stick)
School Front
Look at the Frankenstein mask & try to take it. In inventory interact with the hanger to make a wire hook. Combine this with the wooden stick to get an upgraded stick. Use the upgraded stick on the Frankenstein mask to get a rubber mask. Combine the rubber mask with the upgraded stick to get a portable mask.
Gate
(To the south). Click on the sign to see that you’re in the grounds of St Christopher’s School. You see the police on the other side of the gate & wonder why the school is surrounded. Click on the police to listen to their conversation.
For fun, use the portable mask on the policemen. (N.B I couldn’t find any other use for the mask!)
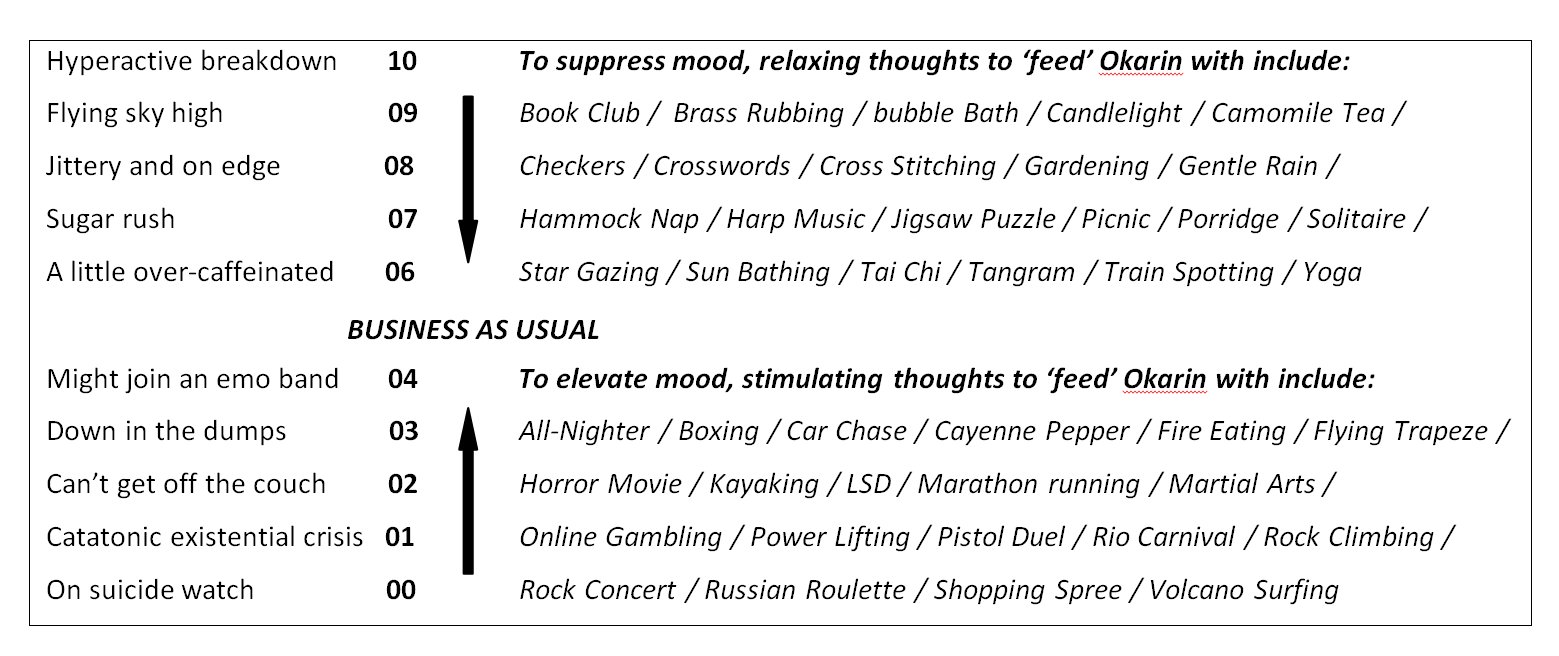
FIX YOUR MOOD
While you’re at the gate you may get an alert e.g. MIGHT JOIN AN EMO BAND on a gadget that appears in the top right corner of the screen. The sight of the police has lowered your mood.
On the gadget click on HELP.
Read through the MOOD FACTS to learn about your mood fluctuations.
Click on MOOD FIX to read how you meditate to control your mood when you do not have any medication.
Click on MOOD EFFECTS to read the physical effects of these mood swings.
At the bottom of the gadget a number will indicate at what level your mood is at e.g. MOOD: 04
If you choose to ACT instructions will appear on the screen.
Click on START, then click & drag the lily pads labelled with the relevant thoughts onto Okarin your koi fish to encourage him towards the centre of the stream.
Retry if necessary until your mood is BUSINESS AS USUAL.
EXPLORE THE SCHOOL
Side of School
There doesn’t seem to be any other way into the school so try to enter through the window again.
(N.B Depending on what order you do things in you may find it possible to enter through the back entrance)
If the window’s stuck, interact with the portable mask in inventory to separate the rubber mask from the upgraded stick.
You can use the upgraded stick on the red fiesta to carve the letter K on it if you want.
Use the upgraded stick on the window.
Hallway
Check out the art & sculptures. Look at & try to take Moose Ahoy’s hook.
Nurses Office
Interact with the nurse’s office. The door is locked.
Cafeteria
(The entrance is at the bottom of the screen)
Look around.
Look at & interact with the *HUASO HAT (1) to try it on.
Student Lounge
Look around.
Look at & interact with the *AUSSIE HAT (2) to try it on.
Art Room
Look around. Try to take the rope.
Foyer
Look around.
Look at the reception desk for a close-up. Look at & pick-up the numbers book.
Hallway (library)
Check out the sculptures & the portraits. Chilean exchange student Sancho Guerrero created the windmill piece. (The guy sleeping in the cafeteria.)
Look at the lockers numbered A 1 – 6 to see through a layer of red paint “Feminism is Cancer”.
Library
Try to enter. The door can only be opened with a keycard.
Interact with the card reader to get a closer look.
Sports Hallway
Look around.
Look at & speak to the hipster girl. (Anemone)
Look at & talk to the solemn youth. (Stephen).
Look at & listen to the role-players. (They include Pauline & Harold)
Talk to the roleplayers. Talk to the roleplayers again & ask about yesterday. A skirmish with tear gas is mentioned.
Stalls/Gym
Look around.
Look at the hedgehog sign. The mascot of the school is a blue & gold hedgehog.
Look at & listen to the red-headed boy (Martin) talking on his phone. Look at him again & then again. He winks at you.
Gym/Stage
You wonder why all of these kids are in school on a Saturday.
You realise you need to call Brian & remember that you tossed your phone out into the car park.
Look at & listen to the serious-looking guys to get confirmation that you’re in the midst of a school protest.
Exit to the car park by clicking on the sign above the doors.
Car Park
You meet Helen. She offers to look for your phone.
You find yourself back in the building.
Gym/Stage
You can now identify the two serious-looking guys as Roger & Drake.
Roger addresses the students from the stage. You learn how the protest got underway & glimpse some flashbacks as Roger relates the events of the night before. (Briefly see him gagged).
Drake then takes over to lay down some rules.
You can now move around the school quickly using the MAP in your locker. Locations will be added as you access them.
GET STUDENT 1.D.
You talk to Drake.
Talk to Roger. Ask about the protest. Respond with *”They deserve a brick or two to the head” [2]
Ask about the priceless paintings to learn that those by former student Damon Ribaldi are pretty expensive.
Talk to the enterprising young man in the ‘off licence’. Shilling could help you with a Student I.D. Card if he knew who sent you.
Look at the Shilling Shop Sign & then look again to read the small note.
Look at & interact with the *PERUVIAN HAT (3).
Backstage
Look at & interact with the knight’s *HELMET (4). Look at the bi-plane. Look at & interact with the *AVIATOR’S HAT (5) near the costumes at the back.
Talk to the guitar-playing guy (Kevin).
Stalls /Gym
Look at & talk to the guy on the laptop (Clive). He thinks he knows you from somewhere. Choose any response.
Look at & talk to the Goth girl (Taylor). She describes Drake as being a total control freak. When you ask her about the I.D. she tells you to talk to Shilling.
Look at & listen to the red-headed boy (Martin).
Sports Hallway
Talk to the hipster girl about how long the protest will last. See that she’s wearing sunglasses.
Talk to the roleplayers. They’re too busy playing. You learn that the name of Harold’s character is Ragnarok, the merchant of death.
Talk to the solemn youth (Stephen) about the Student I.D. He gives you a password which now makes sense of what Shilling meant.
Gym / Stage
Talk to the enterprising young man & tell him “Gavroche sent me”. Shilling wants you to win a doll from Anemone by playing a game of Voodoo Wars with her. He gives you a description of her & voodoo doll *BRUSHGUY (1).
Sports Hallway
Click on the INSIGNIA bottom left of the screen to open up your locker. Click on the Voodoo Collection to see BRUSHGUY.
Read his bio & about the spells you can use.
Move the cursor over the minions to read their names.
Click on the RULES & then the headings: COMBAT / MINIONS / PINS / DOLLS / SPELLS.
Talk to the hipster girl (Anemone). Play Voodoo Wars. Talk to Anemone to replay if you lose. Win OSCAR MILDE (2). (This is the only time it’s necessary to play Voodoo Wars. Future games are optional).
Gym/Stage
Talk to Shilling. He lets you keep the doll & gives you the fake I.D.
Talk to Drake to show him the I.D. He notes your phone number & tells you that Helen is looking for you.
Changing Room
Talk to Helen. She gives you your phone.
Pick up the tweezers from the sink unit. Take some tissue from the dispenser to get paper towel.
DRY OUT THE PHONE
In inventory use the paper towel on the phone. Use the tweezers on the phone to remove the back of the case & have an
open phone. Use the last bit of paper towel to wipe off all of the water you can see.
You still need to get the last drop of water out & see the interior of the open phone.
Alternatively, you can use the phone with the bag of rice in the cafeteria to absorb the water, & then interact with the phone in inventory to see the interior of the phone without using the tweezers.
Read the instructions.
The aim is to guide the ball from the top section to the EXIT in the bottom section.
Click on each section containing the ball by rotating it left or right, using the corresponding mouse buttons. Manoeuvre the ball into one of the holes. (Take care not to accidentally click on either of the other two sections!)
1 TOP SECTION: Guide the ball to the BLUE-rimmed hole: R - L - R - L - L - L - L - R.
It emerges from the blue-rimmed hole in the middle section.
2 MIDDLE SECTION: From the blue-rimmed hole, guide the ball to the ORANGE-rimmed hole: R - R - L - L - R - L - R - R - R.
It emerges from the orange-rimmed hole in the bottom section.
3 BOTTOM SECTION: From the orange-rimmed hole, guide the ball to the GREEN-rimmed hole: R - L - L - L - R - R - L.
It emerges from the green-rimmed hole in the middle section.
4 MIDDLE SECTION: From the green-rimmed hole, guide the ball to the YELLOW-rimmed hole: L - L - L - R.
It emerges from the yellow-rimmed hole in the top section.
5 TOP SECTION: From the yellow-rimmed hole, guide the ball to the PINK-rimmed hole: R - R - L - L - R - R - R - R - L - R.
It emerges from the pink-rimmed hole in the bottom section.
6 BOTTOM SECTION: From the pink-rimmed hole, guide the ball to the EXIT: L - R - L - R - R - L - L.
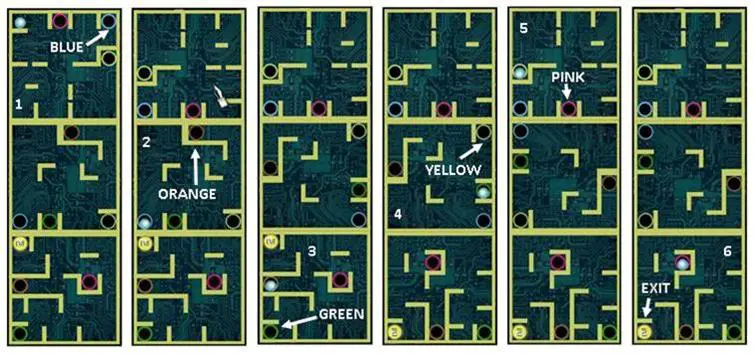
You call Brian. Jono answers. You owe him money & you’re running out of time.
You call Uncle Vincenzo & hear an answer-phone message. You’ll have to try again later.
Gym/Stage
Drake gives you an assignment. He wants you to walk around, listen to the students, & weave their words into a manifesto to be sent to the media. Kevin has already written part of a first draft.
Backstage
Talk to Brody.
She gives you a recording device.
In inventory interact with the device & click on ‘?’ to read the instructions.
See the draft of the manifesto in the left section with blanks in some of the sentences. (Use the arrows at the bottom to scroll up/down.) There are 8 blanks.
The recorder is context sensitive. It will automatically appear after a conversation with a selection of 3 phrases/words of interest shown in the top section.
From these, click on one phrase to be entered into the section on the right.
(If you think you’ve picked the wrong one, the other phrases can be added again by listening/talking to the student(s) again).
Click & drag the phrases that best fit into the blanks in the manifesto.
COMPLETE THE MANIFESTO
Gym/Stage
Talk & listen to Kevin & Shilling.
Note Shilling’s favourite children’s day-time telly show.
Changing Room
Listen to the ‘denim group’ (Kiera, Rachel & Sandra)
Note that Stephen is able to hack into the school’s database.
Backstage
Talk to Brody.
Stalls/Gym
Talk to Stephen.
Listen to Clive talking to Martin.
Glean from the conversation that a member of Martin’s family, Imogen, is in a TV show.
Talk to Martin. When he asks what you think when talking about the protest, respond with *”Yeah, I wish they’d let us do something more radical”. [3]
Sports Hallway
Talk & listen to the role-players. (Pauline, Harold & Anthony)
Art Room
Talk & listen to the potheads (Gerald & Scott)
Note that Martin is supplying pot. Learn what his father’s job role is.
Student Lounge
Talk & listen to Helen & Drake. The machine doesn’t respond to their conversation.
Note that Helen addresses Drake as Elliot.
Cafeteria
Talk & listen to Taylor & Cressida.
Glean that a new P.E. uniform has been introduced by Jenkins who’s also referred to as Morty &Mortimer.
Once you’ve filled in all of the blanks, interact with the device in inventory. Click on PRINT to get the completed manifesto.
THE COMPLETED MANIFESTO
We marched all night, not me for rest, so
We now present our manifesto
Do we have your full attention?
Or will you throw us in detention? (Stephen - stalls/gym)
We do no fear you, either way
And here is what we have to say
Our first demand is plain to see
Our school tuition should be free (Clive – stalls/gym)
The current fees are fucking shite
We’re begging you to set this right
These greedy fat cats getting rich (Potheads - art room)
Are giving us the right to bitch (Kevin & Shilling – gym/stage)
As for our second demand
We ask you for a helping hand
To make us try our very best
Let final tests be self-assessed (Denim group - changing room)
We’d take our futures in our hands (Brody - backstage)
If we could grade our own exams
The third demand within this song
School weekends should be four days long
There are more life lessons out of school (Taylor & Cressida - cafeteria)
Then we could learn under your rule
We’re worried we’re not strong enough
And the school of hard knocks makes you tough
And finally our last demand
Buck down and let us take a stand
We will not take a second more
Of prejudice against the poor (Role-players - sports hallway)
Old-fashioned social class disputes
Have no place in our institutes
We’ll rise above it, make the grade
We’ll show you we aint gonna quit
This song is like a hate grenade
And we don’t have to take your shit
Student Lounge
Talk to the radical think tank (Drake, Taylor, Martin, Kevin & Roger).
Hallway (library)
Now seems to be a good time to ring your Uncle Vincenzo. You tell him that you borrowed money from the wrong people & go on to tell him about the idea that you & Brian had.
FLASHBACK 1: THE WILD WEB CAFE
Kayleigh & Brian arrive on a street corner in Soho. Kayleigh is ‘dressed up to the nines’ ready to attend a charity benefit event.
You need to get enough money to pay Jono back tonight. Brian gives you ten pounds which should be enough for a 1 hour pass.
Look at Brian to learn that he’s Kayleigh’s brother.
Look at the van. It looks like a tradesman’s van. Look at the van again to see a sign in the back window for “The Flush Busters”.
Interact with the phone booth. Take the posters to put into your inventory: naughty poster, french maid poster,
buddha poster, finger poster, chakras, english A-levels, christian au pair poster & glamour model announcement.
Exit the phone booth.
Enter the Wild Web Cafe. (Recognise some people Kayleigh hasn’t met yet).
Talk to Donovan to buy a pass. He tells you that all of the computers are being used. The two free ones are waiting to be fixed.
Kebabs are half-price with every purchase.
Talk to the patrons:
The boy (Drake), using the printer, assumes you’re a student at St Christopher’s. If you confirm this he gives you a free drink ticket & tells you that the concert begins in a couple of hours.
The blue-haired girl (Cressida) is chatting to her boyfriend in Vienna & will be ages.
The chav girl (Kiera) is talking to someone on her phone while surfing. Ask her about the picture. It was taken of her while she was drunk & has been uploaded by her ex boyfriend Greg. She’s not leaving the computer until the picture has been taken down. You learn of a classified web page dedicated to the gossip at St Christopher’s School.
The toddler (charming child!) is eating a kebab but tells you that there’s nothing tasty on it. Talk to him again. He tells you that he’s with his babysitter & points to Kiera.
The guy (Hornby) in the corner booth is looking at pictures of glamour girl Pinky Bustierre & has no intention of leaving just yet.
Luigi, sat at the left computer desk, is playing euchre. He’s on a winning streak today & it’s unlikely that he’ll be done soon.
Look at him & see from the logo on the back of his work suit that he works for a plumbing company. The logo matches the one on the van outside.
TO FREE-UP A COMPUTER
There are 3 ways but you can choose you to free-up all 3 computers if you want!
METHOD 1:
Exit the cafe, look at the van again to see a phone number. Interact with the phone booth & click on the telephone to call the plumbing company. Exit the phone booth & enter the Wild Web Cafe to find Luigi gone.
METHOD 2:
Look at each of the posters from the phone booth in inventory. Interact with the glamour model announcement to see on the back that Pinky Bustierre is one of the girls who will be signing autographs all day. Give this poster to Hornby.
METHOD 3:
Try to interact with the condiments (in the bottom right-hand corner). Talk to Donovan & buy a kebab. You’re left with eight pounds.
Interact with the condiments again. Look at the ketchup bottle to see that the label is a little loose.
Pick up the ketchup & hot sauce. In inventory interact with the ketchup to remove the label.
Combine the label with the hot sauce to get hot sauce with label.
*Give the hot sauce with label to the the toddler. [4] See what happens!
Interact with the free computer.
INTERNET RESEARCH:
(You can skip this puzzle at any time by exiting the computer, ‘knowing who your target is’, clicking on the wrong answer & choosing to ring Brian).
Otherwise click on the pictures on the homepage to read the information in each of the 3 sections. Use the left arrow at the top of the computer screen to return to the home page.
The aim is to work out who the richest man is, the ailment he suffers from, his make of car & his preferred holiday destination.
Start by identifying the ailments, makes of car, holiday destinations & names of the 6 richest men.
Ailments: Asthma, diabetes, ulcer, psoriasis, haemorrhoids & panic attacks.
Makes of Car: BMW, Ferrari Cabriolet, Bentley, Porsche, Saab & Maserati.
Holiday Destinations: Santorini, St Remy, Lake Como, Bahamas, Mustique , Bali
Names: Frances Bertram, Salvador Potestry, Rodney Blaire , Freddy McDowell, Bartholomew Klane & Manuel Estevez.
Make a note of what you know about each man from the information in the articles. (1)
Then by cross-referencing & a process of elimination you can work out the ailments, makes of car & holiday destinations pertinent to each man. (2) & (3)
(N.B I couldn’t glean from the information the position of all of the men in the rich list).
IS WEALTH KILLING YOUR HEALTH?
(1) Francis Bertram suffers from asthma.
(2) The 2nd richest man has diabetes. He’s crazy about ice-cream but doesn’t eat anything white. He can eat chocolate ice-cream.
(2) The man who has a villa in Santorini has an ulcer.
Other complaints include psoriasis and haemorrhoids the latter attributed to sitting for long hours.
(3) The richest man has panic attacks.
WHEELS OF FORTUNE
(1) Salvador Potestry drives a BMW
(1) Rodney Blaire drives a Ferrari Cabriolet & spends time in St Remy.
(1) Frederick McDowell drives a Bentley. He has a special air cushion to help with his private health condition. (Deduce that he suffers from haemorrhoids)
(1) Bartholomew Klane drives a Porsche.
(3) The 4th richest man drives a Saab.
(2) The man who has a Maserati suffers from asthma.
A LITTLE PLACE UNDER THE SUN
(2) The man who likes to visit Lake Como loves Italian ice-cream but can’t eat Gelato. (Deduce that this is the 2nd richest man who loves ice-cream but doesn’t eat anything white due to diabetes).
(1) Salvador Potestry has a home in the Bahamas.
(1) Rodney Blaire has a villa in St Remy & suffers from psoriasis.
(1) Freddy McDowell has a house in Mustique.
(1) Francis Bertram goes to Bali.
(1) Manuel Estevez goes to Santorini.
|
|
Frances Bertram |
Rodney Blaire |
Manuel Estevez |
Bartholomew Klane |
Frederick McDowell |
Salvador Potestry |
|
AILMENT |
ASTHMA (1)
|
PSORIASIS (1)
|
ULCER (2) |
DIABETES (2)
|
HAEMORRHOIDS (1)
|
PANIC ATTACKS (2)
|
|
CAR |
MASERATI (2)
|
FERRARI CABRIOLET (1)
|
SAAB (2) |
PORSCHE (1)
|
BENTLEY (1)
|
BMW (1)
|
|
HOLIDAY DESTINATION |
BALI (1)
|
ST REMY (1) |
SANTORINI (1)
|
LAKE COMO (1)
|
MUSTIQUE (1)
|
BAHAMAS (1)
|
|
PLACE ON RICH LIST |
1ST 2ND 3RD 4TH 5TH 6TH |
1ST 2ND 3RD 4TH 5TH 6TH |
1ST 2ND 3RD 4TH (3) 5TH 6TH |
1ST 2ND (2) 3RD 4TH 5TH 6TH |
1ST 2ND 3RD 4TH 5TH 6TH |
1ST (3) 2ND 3RD 4TH 5TH 6TH |
Exit the computer. You can either decide that you’ve done enough to know who your target is or keep researching.
The richest man in these articles drives a.... BMW
The health problem he suffers from is....Panic Attacks
He has a second home in....The Bahamas
His name is....Salvador Potestry
You can now choose to leave it at that if you want.
SAVE GAME
If you choose to find out more about Sal you’ll be confronted with a search engine page from Whazoo.
Click on the headings to read the snippets of information & gossip on each of the websites. Pay particular attention to the works of Salvador Potestry & any details mentioned pertaining to those.
Exit the computer & automatically be outside the cafe.
Interact with the phone booth & then with the phone to ring Brian........
BACK IN THE PRESENT
Hallway (library)
......your phone call is interrupted by Taylor.
Stalls/Gym
Listen to Stephen & the conversation that he, Martin & Cressida are having about Roger.
SAVE GAME
Gym/Stage
It’s time for the ‘Extracurricular Evening Entertainment Extravaganza’ hosted by Kevin.
PART 1: ST CHRIS TRIVIA
You get roped into competing with Harold. To win you just need to answer more questions than the other person. For a chance to win the grand prize you’ll have to score at least seven points out of ten.
Kevin presents the quiz.
Q: What is the name of the band featuring me, Taylor and Roger?
A: Indecent Exposure (On Kev’s hat)
Q: What did the police use to stop our march?
A: Tear gas (The roleplayers tell you when you first talk to them if you ask about yesterday)
Q: What type of liquor does Brody enjoy the most?
A: Vodka (Drake tells you to follow the vodka trail when you need to find Brody to get the recording device)
Q: What television show does Shilling draw his inspiration from?
A: A Pound a Day (Mentioned by Kevin & Shilling while completing the manifesto)
Q: What is the name of the school’s headmaster?
A: Mortimer Jenkins (Mentioned by Taylor & Cressida while completing the manifesto)
Q: What is the TV show that Martin Carrington’s little sister is currently on?
A: It Girlz (Mentioned by Clive & Martin while completing the manifesto)
Q: What does Martin’s father do?
A: Shadow Minister of Education (Mentioned by the potheads while completing the manifesto)
Q: What is the name of Harold’s role-playing character?
A: Ragnarok, Merchant of Death (Mentioned by Harold when you talk to the roleplayers while looking for I.D.)
Q: How long will the protest last?
A: Until we are forced out (Mentioned by Anemone)
Q: What does Shilling currently not sell?
A: Aspirin (Stated on a note on Shilling’s shop sign)
If you win, your prize is the voodoo doll *JOHN LEMMON (3).
ACHIEVEMENT: One Little Victory (Won the extracurricular evening extravaganza trivia contest)
*Losing will contribute towards a different achievement. [5]
(You have a chance to win the John Lemmon doll later.)
PART 2: E.E.E.E. SCAVENGER HUNT
Taylor presents the next part of the evening’s entertainment.
You’re given a list of riddles & a polaroid camera.
The aim is work out what items each of the 7 riddles refer to, walk around the school & use the camera on them to take a photo.
Backstage
See Drake. Take a photo of the palm tree.
RINGS WITHOUT ANY FINGERS. LEAVES BUT STAYS NEARBY. HIDING DOWN BELOW OUR FEET, BUT I CAN BE SEEN BY LOOKING HIGH.
Changing Room
Take a photo of the discarded paper towels.
THE MORE I DRY, THE WETTER I BECOME. HUNG FOR MY DEEDS, THOUGH THEY RE NOT CRIMES.
Foyer
Hear the phone ringing. Click on the desk & the phone. The police want to talk to Roger. You can choose the polite reply or say *”Fuck off, we don’t negotiate with state terrorists.” [6]
Take a photo of the envelope.
I START WITH AN “E”, I END WITH AN “E”, BUT I USUALLY CONTAIN ONLY ONE LETTER.
Hallway
Take a photo of the bear sculpture.
I AM A VICIOUS BEAST, REDUCED AND DECLAWED. CHILDREN SHOULD FEAR ME, BUT FIND COMFORT IN MY ARMS.
Art Room
Take a photo of the rope. (You can talk to the potheads to play Voodoo Wars if you want to win the John Lemmon doll. Click on the arrows to choose either GUYBRUSH or OSCAR MILDE for the game.)
I AM TWISTED YET VERSATILE. I CAN BE A FRIEND AND HOLD YOUR THINGS TOGETHER, YET IF NEED BE, I CAN ALSO TAKE YOUR LIFE.
Student Lounge
Look at the computer to see the close-up. Take a photo of the keyboard.
I HAVE KEYS BUT DON’T UNLOCK. I HAVE SPACE, BUT NOT ROOM. YOU MAY ENTER, BUT NOT LEAVE.
Cafeteria
Taylor may or may not be here to give you a hint depending on what order you visited the locations.
Car Park
Hear Roger & Martin having a discussion about the protest.
Enter the van & take a photo of the book (dictionary). See a note addressed to Kev from Roger.
THE ONLY PLACE IN THE WORLD WHERE SATURDAY COMES BEFORE THURSDAY AND YESTERDAY FOLLOWS TOMORROW.
Hear an alarm going off in the school.
Gym/Stage
Shilling’s shop is on fire. Roger & Kevin are trying to put out the flames. Drake is standing by.
Interact with the alarm to see a puzzle. Click on the hexagons to turn them. The aim is to match the symbols along each edge with those on the adjacent hexagons.
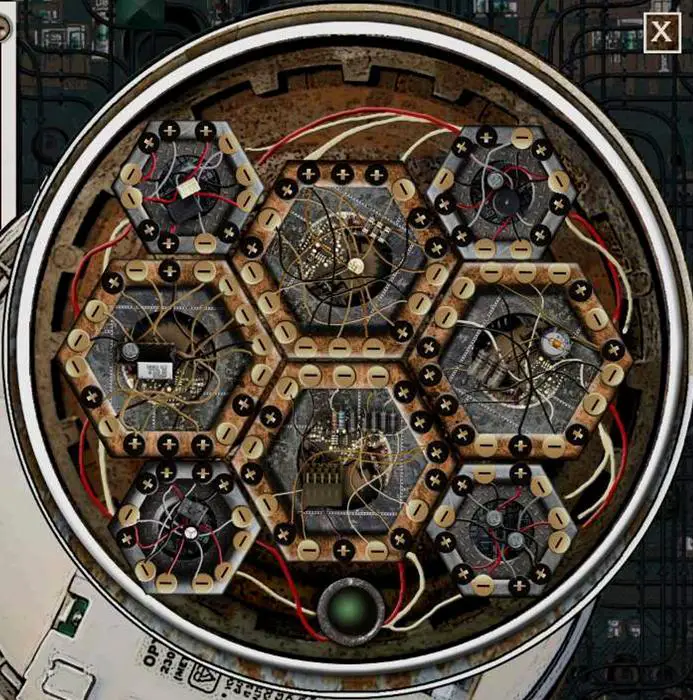
SAVE GAME
Try to interact with the fire extinguisher to the right of the backstage door when Roger asks you to. You burn your hand.
THE DRINKING GAME
Backstage
You chat with Roger. You think the wiring behind the extinguisher may have been tampered with.
You answer the phone when your friend Kevin rings from Ohio.
You continue to chat with Roger & get to choose, for fun, what you think the prize might have been for the scavenger hunt.
Roger suggests a drinking game to help you learn more about his circle of friends. He asks you some questions. For each one you get right, he drinks & for each one you get wrong, you drink.
Q: What did Drake get me for my birthday earlier this year?
A: A set of monogrammed vellum index cards
Q: Helen was voted “Most likely to”.......
A: Become secretary-general of the United Nations
Q: What did Kevin deliver as his final project for art class last year?
A: A model of St. Chris made out of lego bricks and plasticine
Q: Who did Shilling dress up as for Halloween this year?
A: A zombified John D. Rockerfeller
If you win you get a *CROWN (6)
ACHIEVEMENT: God Save the Queen (Beat Roger in the trivia drinking game)
*Losing will contribute towards a different achievement. [7]
DAY 2
“My thoughts were full of other things when I wandered off the path.”
Dante Alighieri, Inferno
Backstage
See Kayleigh wake up. Decide how much of a mistake you made.
See Clive. He talks to you. He’s seen the news & recognises you from the K.L.A.T.U charity party 2 nights ago.
Student Lounge
FIX YOUR MOOD.
Look at the TV to see the news report on ‘Crime Stoppers’.
You call Uncle Vincenzo & tell him about the charity do & your predicament with Clive.
FLASHBACK 2: THE PICCADILLY MANOR
Ballroom
Talk to the waiter (Clive) to get appetisers.
SAVE HERE
Talk to Salvador Potestry.
Tell him that you’ve read all of his books. He asks you for your opinions.
SCENARIO 1: (If you give the right answers)
Q: So, which one did you like best?
A: The Caravan of Failures
Q: And what did you think about Heribert?......
A: His silence spoke volumes!
Q: I tried to do the same thing with Frederick in “Waiting to Order.........” What did you think of it?
A: The omelette scene was a revelation!
ACHIEVEMENT: I Write the Book (*Answered all of Salvador Potestry’s questions successfully) [8]
SCENARIO 2: (If you give a wrong answer).
Salvador is not impressed & concentrates on watching the magic act.
Talk to Father Jeremy to learn that his dog Genesis is part of the act.
Give the appetisers to Genesis.
ACHIEVEMENT: I Wanna Be Your Dog (Disrupted Father Jeremy’s show by giving Genesis canapés)
Talk to Salvador. He’ll either mention that he’s feeling a little chilly or that it’s getting a little cold in here.
Interact with the thermostat left of the door, behind the stage area, to turn the temperature down.
The waiter gets annoyed & turns it back up.
Talk to the respectable society matron/wealthy lady. She’s having hot flashes.
Talk to the waiter & he agrees to turn the temperature down.
Talk to Salvador. He’ll now go to the bar.
Bar
Talk to Salvador. You need to convince him that you’re someone worth talking to.
Talk to the bartender. Salvador had a glass or two of white wine but seemed terrified that his wife would catch him in the act.
Talk to the guest. He foists a martini on you. Look at it in inventory to separate the partially dissolved pill from the spiked martini.
Take the scissors from the cocktail decorations.
Orangerie
Talk to the fashionable guest to listen to the conversation she’s having with the avant-garde eccentric.
He introduces himself as Holden Burke.
Mirabelle tells him she will be interviewing Salvador later on behalf of the Nobel Prize Committee. When he asks her for her card, she also gives you her business card when you mention that you would like one too. Look at the card in inventory.
Listen to the conversation between the subservient twit/older man & the commanding man/stern man to glean that they are Mortimer Jenkins & Martin’s father Archie respectively.
Bar
Use the business card on Salvador to make him believe you’re Ms.Mirabelle Okadigbo. He’s expecting you to be wearing a corsage as promised.
Ballroom
Use the scissors on either of the vases to get a flower. Then use the scissors on the ribbons flowing from the woman in couture.
In inventory combine the flower & the ribbons to create a corsage.
Bar
Use the corsage on Salvador. Talk to the bartender & order a grapefruit juice.
In inventory combine the grapefruit juice with the partially dissolved pill to get roofied juice. Give this to Salvador. He wants a nap. You offer to take him up to your room.
See what happens in the elevator.
BACK IN THE PRESENT
Student Lounge
Uncle Vincenzo will see what he can do to help. Meanwhile he recommends trying to blackmail Clive. “Everybody has a skeleton or two in their closet”.
BLACKMAIL CLIVE
Gym/Stage
Talk to Helen. Clive’s excellent at football & is at the school on some kind of athletic scholarship.
Changing Room
Talk & listen to the girly collective (Rachel, Anenome & Emily). There’s nothing on Clive, but you discover that Emily has just managed to get into the school unnoticed by the police.
Cafeteria
Look at the complaints list.
Talk to the denim-wearing group to ask Sandra about Clive’s locker. It’s the one next to hers locker A3.
Hallway (library)
Look at & try to interact with the lockers.
Backstage
Click on the tools behind Clive to pick up a hammer.
Hallway (library)
Look at the lockers & then use the hammer on them.
In the close-up of the locker, interact with the trainers to get Clive’s car key.
Your phone rings. Kevin is going to be in London in a month or so & needs the use of his motorbike stored in your garage.
Side of School
Use Clive’s car key on the blue flame car to open the boot. Pick up the video tapes to get porn videos. Pick up the pill bottle. Interact with the gym bag to get a disciplinary letter. In inventory, look at the letter addressed to his parents Mr & Mrs Corby from academic adviser Frances Molten. Learn that Clive’s scholarship will be terminated if his grades don’t improve.
Sports Corridor
Remember that you heard that Stephen is able to hack into the school database.
Listen to the nerdy bunch & talk to them to ask Stephen about passwords. He hands you a disc with a grade hacking code
Student Lounge
Use the ‘porn videos’ on the TV. (Are you reminded you of kebabs?)
Look at the computer & in the close-up use the grade hacking code on it.
See the screen & click on HELP to read the instructions.
The aim is work out the number or sequence of numbers that correspond to each of the letters in the word ‘MODIFY GRADES’.
Do this by clicking on each of the boxes in the left column, & typing in (using your keyboard) up to 10 different four letter words. Click on the arrow next to each word to see a series of numbers corresponding to the letters in each word appear in the right column. The idea is to choose words which will help to pinpoint the code for each letter. Enter the codes for each letter in the right section. Type in the full code for MODIFY GRADES where it says INPUT COMMAND & press ENTER.
This is an example only! The codes are random & change each time you try.

You change Clive’s grades & get a print out of the doctored grades.
Backstage
Try giving Clive the pill bottle & then the video tapes. Give him the doctored grades.
You get a text from Jono. You have 24 hours to pay him back.
LOOK FOR THE PAINTINGS
Changing Room
Talk to Helen & Emily about the priceless paintings.
Stalls/Gym
Talk to Taylor & Brody.
Taylor tells you that that an ex student Damon has some pieces around here.
Sports Corridor
Give the grade hacking code back to Stephen if you want.
Hallway
Talk to Martin. He’ll tell you about the paintings if you help him get into the nurse’s office. Drake has most of the master keys to rooms in the building.
Gym/Stage
Try to take Drake’s briefcase.
Backstage
Use the wooden stick to get the golden briefcase. Look at it in inventory. “Camp is the new black”.
Hallway (library).
Look at the xenophobic graffiti to see it’s crudely sprayed in black paint.
Art Room
Look at the pot brigade (Gerald, Anthony & Scott) & see that Anthony‘s hands & trousers are smudged in black splotches.
Talk to the pot brigade. Anthony denies having black paint.
Hallway (library).
Use the polaroid camera on the xenophobic graffiti to get a graffiti photo.
Art Room
Use the photo on the pot brigade. Talk to Anthony to set him off on his racist rant.
Use the recording device on him to get a voice recording. Use this on the pot brigade to get spray paint.
In inventory combine this with the golden briefcase to get spray-painted briefcase.
Gym/Stage
Talk to Shilling.
While Drake is distracted, use the spray-painted briefcase on his briefcase to switch them.
Automatically be outside the nurse’s office.
Nurse’s Office
You talk to Martin. He knows you’re lying about the paintings.
He helps himself to the mind-altering meds & tells you he’ll text you later about the paintings.
Take the always there magnet. Pick up the book.
In inventory, look at the book. It’s the first one in the Bakerloo Line Quartet by Holden Burke.
Hallway
See Drake. He wants you to take a key up to Roger & hands you a key ring with the pantry key.
Drake needs to phone his nan. He has a personal situation.
Foyer (upper)
Go upstairs. Look at the magazines. (See the same partridge portrait as the one hanging in the bar at The Piccadilly Manor).
Look at the varnish, paint & paint thinner.
TEACHERS’ LOUNGE
Entrance
See Roger trying to access the computer. He asks you to look through Leslie’s pigeon-hole to see if you can find the password.
Leslie is the school secretary. Talk to Roger.
Look at both the photo of the old headmaster & the one of the new headmaster. Look at the metal plate below them to see that Mortimer is re-enacting the pose of the 1st headmaster.
Look at & interact with the *STRAW HAT (7) to try it on. Take the hat & look at it in inventory to see that it belongs to Leslie D.
Exiting right from the entrance leads to a sitting area. Exiting to the left leads to a kitchen area.
Sitting Area
Take the plant & pick up the planter. Take the lacrosse Sticks. Look at & try to interact with the trunk. Roger urges you to find the password.
Kitchen Area
Take the knit bag. Look at it in inventory to get a knitting needle & a copy of crochet special.
Look at the magazine in inventory to see that it’s the property of Leslie M. & find a love letter. It mentions a CD-Rom the author found in one of the computers. “If I am right about who’s behind it, it would be so painful, so sad. Such a lovely child, albeit troubled”..... ”So why carry on with that reprehensible poisonous web site?”
Interact with the crochet special to imagine yourself wearing the *CROCHET HAT (8)
Look at & then take the fridge Photo. Look at it in inventory to see one of the men wearing the straw hat. See what’s written on the back. Now that you have the surname of the secretary, interact with the cubby holes to get a close-up.
Look at the cubby holes.
(Before you type in the secretary’s name you can try some of the other names to see if they’re hiding anything!)
Type in DUMAS & click ‘READY?’ to find a password.
The lights go out suddenly & you find yourself by the entrance. You can’t go anywhere without a light.
FIND A BETTER SOURCE OF LIGHT
Entrance
Look at the key ring to see that a faint green light emanates from Captain Centollo. Interact with the key ring to use the light. It’s just enough to move around with.
Try to exit through the door. The door is firmly locked. Talk to Roger twice to find out where he left the key. He left it in the lock. Interact with the locked door to bang on it & call out.
Try using the love letter on the locked door & then the knitting needle.
Sitting Area
Interact with the confiscated items in the trunk. In the close-up look at the items & take the pocket knife, wine, buzzing bunny & mighty puffer. (Click on the arrow top-left of the trunk to exit the close-up.)
Kitchen Area
Take the wooden crate from the shelf. Look at it then take the candles.
Entrance
Give the candles to Roger. While he’s searching for a lighter, Shilling emerges from the closet protesting. Someone’s pouring paint thinner under the door.
Roger climbs up to try & open the vent.........
You get a mood alert. You’re jittery & on edge but you need to do something about the paint thinner quickly.
Kitchen Area
Interact with the wine in inventory to get a chilean cork & a corkless bottle. Interact with the sink to turn the tap on & use the corkless bottle on it to fill it with water. You need something much bigger.
In inventory use the pocket knife on the chilean cork to get sliced cork. Use the sliced cork on the planter to plug the holes & get a sealed planter. Use the sealed planter on the sink to get water.
Entrance
Use the water on the paint thinner. FIX YOUR MOOD.
Search (hand icon) Roger to get Roger’s phone. Interact with it in inventory to find it’s password protected.
Search Roger again to find a wallet. Look at it to extract a family photo, postcard, condom, credit card & pet photo. Look at & interact with these items to see if any of them hold a clue for the password.
Try using the family photo, postcard & pet photo on Roger. He’s not very coherent but his mutterings offer some clues.
Interact with the drawer & then look at it to get a stolen CD & a pencil.
Look at the CD-Rom in inventory to see the title, & that it belongs to Roger.
Interact with Roger’s phone, type in BOWIE & then press enter on your keyboard.
Interact with the phone again. There’s no signal but it emits a brighter light than the Captain Centollo key ring.
Talk to Shilling to find out what he’s doing here. Play Voodoo Wars if you want.
In inventory, look at the mighty puffer. It doesn’t have any batteries. Look at the buzzing bunny & use the pocket knife on it to get batteries. Use the batteries on the mighty puffer to get a mightier puffer! You can give it to Shilling to play with if you want.
To capture the flying toy, look at & then use the lacrosse sticks on it.
Kitchen Area
Interact with the cabinet door next to the oven.
Try to interact with the valve & see a ‘man-eating’ spider. Use the straw hat on it, then the crochet weekly to trap the spider. You can give the spider to Shilling.
ACHIEVEMENT: Boris the Spider (Successfully captured the spider.)
ESCAPE THE TEACHERS’ LOUNGE
SAVE GAME
METHOD 1:
Entrance
Look at the photos of the old & new headmasters to see the photos side-by-side. See what the difference in the background is.
The cabinet has moved.
Sitting Area
Look at the chair in the corner & the sofa. Interact with the cabinet 3 times to reveal a boarded-up fireplace.
Pick up the bronze bust & use it on the fireplace. Look at the open fireplace.
Talk to Shilling to show him what you’ve found.
Interact with the cabinet again to push it further out of the way with Shilling’s help.
Shilling disappears into the chimney to go & get help.
ACHIEVEMENT: Chim Chim Che-ree (Escaped the teachers’ lounge using the fireplace)
METHOD 2:
Kitchen Area
Look at the oven & the stove. Look at the H & S device on the wall right of the fridge. Use the pocket knife on it to remove it from the wall to get the gas detector.
Interact with it in inventory to see that it has no batteries. Use the pocket knife on the mightier puffer (or the buzzing bunny) to get the batteries. Use them on the gas detector to get charged detector.
Interact with the valve in the cabinet again so that the gas is hissing. Interact with the stove to turn the gas on. You should see fumes rising. Use the charged detector on the stove to set the alarm off.
ACHIEVEMENT: Fire Escape (Escaped the teachers’ lounge using the gas detector.)
(N.B I found that this achievement didn’t register)
METHOD 3:
Kitchen Area.
Look at the vent. You need some sort of hook .Take the umbrella from the stand by the entrance to get the brolly in inventory.
Use the brolly on the vent to remove the cover.
In inventory, use the pencil with the password to write an S.O.S. to get loaded Note. Use this with the mightier puffer to get loaded puffer.
Use the loaded puffer with the vent. It gets stuck.
You see a pipe puzzle. You can swap the squares by clicking & dragging them to a different position. Click on a square to rotate it.
Complete the pipe puzzle to clear the vent.
ACHIEVEMENT: Pipes of Peace (Escaped the teachers’ lounge using the mighty puffer.)

Entrance
After successfully summoning help, Drake arrives in the teachers’ lounge.
He tells Roger that he has to leave for the evening. “My Mum – it’s not good” & says he’ll be back tomorrow. He states that you weren’t locked in. The door was unlocked.
DAY 3
“All the pieces were there from the beginning, but no one knew how to put them together.”
Paul Auster, Moon Palace
Backstage
Drake turns up & shows you the headlines of today’s paper. You have another look at the newspaper to see pipes & valves in the background of the picture. Cressida could still be in the school.
Look at the vodka bottles. It seems you’ve spent the night drinking with Roger but nothing more!
Look at the tools. See the drill & notice the wires that lead to the fire extinguisher.
SEARCH THE SCHOOL FOR CRESSIDA
Stalls/Gym
Talk to the gaggle of girls (Emily, Anemone & Brody)
Last time they saw Cressida she was hanging out with Martin by one of the vending machines.
Cafeteria
‘Take’ the number list to enter the phone numbers into your phone.
Enter the boiler room.
Boiler Room
Picked up the pieces of rope from the floor to get rope fragments.
Pick up the cufflink, lighter, masking tape & newspaper. Pick up the toolbox to get wire & pliers.
Look at the lighter in inventory to see the letter ‘H’ written on the bottom in ink.
Interact with your phone to call Drake. Try to call Cressida. Her phone goes straight to voicemail.
Look at the service tunnel hatch.
Stalls/Gym
Show the cufflink to the gaggle of girls. It’s Martin’s.
Try to call Martin. His phone just keeps ringing.
Backstage
Talk to Taylor & Kevin. They suggest looking upstairs as no one has searched there yet.
Teachers’ Lounge
There’s no one here. Click on the fridge decor in the kitchen to take Pedro.
Foyer (upper)
Take paint thinner.
Try to call Martin again. You hear a phone ringing in the distance. It seems to be coming from beyond the door to the rooftop.
Go upstairs & try the door. Something is keeping it shut.
Art Room
Listen to the stoners (Scott, Gerald & Gaz) while you’re there.
Take the long rope.
Hall
Use the pliers on Moose Ahoy’s hook to get a pirate hook.
Boiler Room
Interact with the table. Pick up wood from the broken table.
You can make a shoddy grappling hook by using the pliers on the wire to get a wire hook & combining it with the rope fragments.
To get a super grappling hook combine the long rope with the pirate hook. Use this on the service tunnel hatch. Enter the service tunnel.
Rooftop
Look at the brush. See strands of blue hair tangled in it.
Try calling Martin’s phone again. Hear the ringing come from somewhere inside the water tank. You automatically call Roger.
Interact with the water tank to bang on it & call out to the occupants. Hear a distinct cough followed by a loud “Shhhh”.
Interact with the water tank pipes to get a close-up. See an open space underneath the water tank. Look at the broken valve. Exit the close-up.
Interact with the pallet at the end to unblock the door.
Boiler Room
Use the pliers on the valve. Use the masking tape on the steam geyser.
Rooftop
Interact with the water tank pipes again to get the close-up.
SAVE HERE
There’s 2 ways to force out whoever’s hiding in there.
METHOD 1:
Use the valve from the boiler room on the broken valve.
METHOD 2:
Use the wood on the open space. Use either the newspaper or the paint thinner on the wood. Then use the lighter.
See a small crowd gathered on the rooftop: Cressida, her ‘kidnappers’, Roger & yourself.
Roger berates Martin. You agree by saying *“It was disrespectful and dangerous.” [9]
Drake emerges from the rooftop door to inform Roger that the headmaster called. He’s furious & demands to speak to Roger immediately.
Students Lounge
Hear Roger talk to Morty. They have 24 hours to end the protest or Roger loses his entire scholarship. Drake offers to take the blame to avoid Roger being implicated.
You suggest trying to dig up something incriminating to blackmail Morty with.
Either Roger will have the key & search Morty’s office with you or,
Drake will tell you it’s unlocked & you will get a phone call from Martin when you’re in the hall. Martin will tell you that he’s already in Morty’s office.
FIND ‘DIRT’ ON MORTY
Headmaster’s Office
Talk to Roger or Martin depending on which of them is there.
Interact with the closet door.
Interact with the lockbox on the shelf to find a strange coin.
Interact with the BOWLER HAT (9) to try it on.
ACHIEVEMENT: You Can Wear My Hat (Found and worn all 9 hats in the game.)
(N.B The achievement registered but I found the illustration of the Huaso hat missing from the WORLD OF HATS in the BONUS section. )
Look at the armillary sphere. Try to pick the globe up to get a closer look.
See 3 holes around the perimeter.
Interact with the lamp to get a close-up. Take the ‘switch’ from the base to acquire a screw.
Interact with the left-most chair to find another screw.
Look at the left painting to get a close-up. Try to take the screw from the lower part of the frame. Use the Pedro magnet on it. It’s not strong enough. Maybe a second magnet would help.
Nurse’s Office
Even if you already have the always there magnet, visiting the nurse’s office now will give you the opportunity you to win another voodoo doll.
Talk to Alex Valero. He only arrived that morning. Challenge him to a game of Voodoo Wars. Win *Lizzy 1 (4)
Gym/Stage
Talk to Helen. She mentions how stressed Drake is.
Listen to Shill n’ Hash.
Headmaster’s Office
In inventory use the masking tape with the Pedro magnet. Combine this with the always there magnet to get combined magnets.
Look at the left painting again & use the combined magnets on the screw.
Either Roger or Martin will meanwhile discover something you might like to have a look at & hand you a classified disc.
Pick up the armillary sphere again & use the screws on the holes. The sphere opens & you get a cassette & a key.
(GLITCH: DON’T look at the cassette without saving the game 1st. There’s no way of exiting the close-up.)
Here’s a picture of the close-up of the cassette:
Use the key on the filing cabinet lock.
Interact with drawer A - C to find 2 letters. Both are from Archibald Carrington.
If you’re with Roger, you will read a letter about his scholarship & automatically hand it over. He leaves the office upset.
If you’re with Martin, you will read a letter about his father’s plan to send him to military school & he’ll snatch it away. He leaves the office angry.
In both cases you will be left with the other letter in inventory. Interact with it to read. (GLITCH: DON’T look at it as you can’t exit the close-up.)
Interact with the drawer J – L to see another letter about one of the students. It refers to disturbing behaviour exhibited by someone from/connected to a highly respected family
Interact with the right cupboard to find a poz dispenser. Then interact with the left cupboard to find a small key.
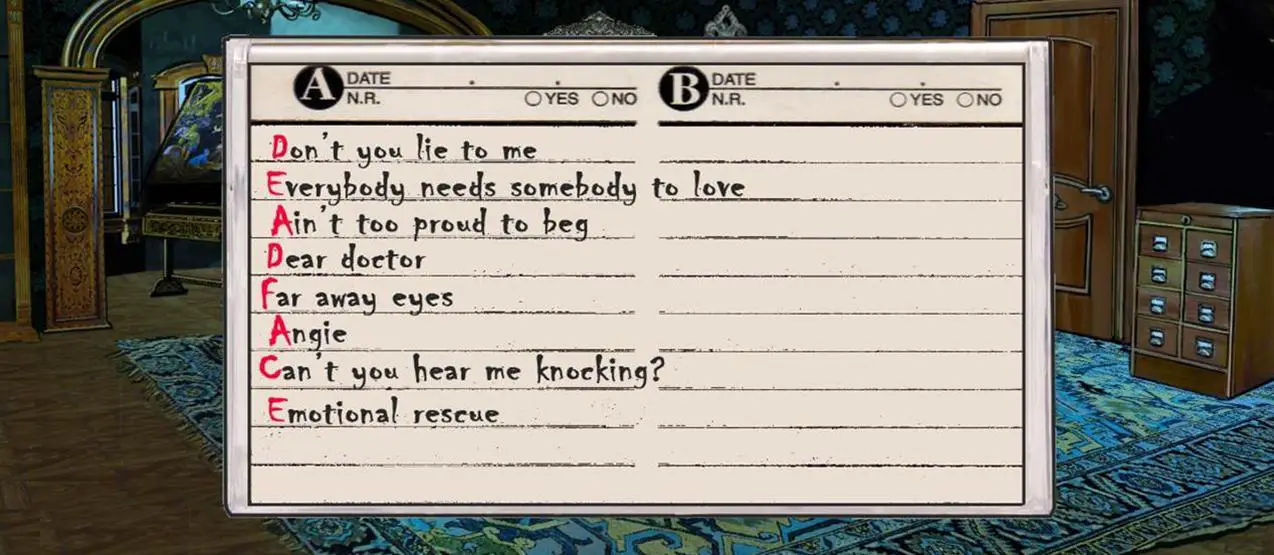
Interact with the harpsichord to find it locked. Use the key on it. Interact with it again to see a close-up of part of the keyboard.
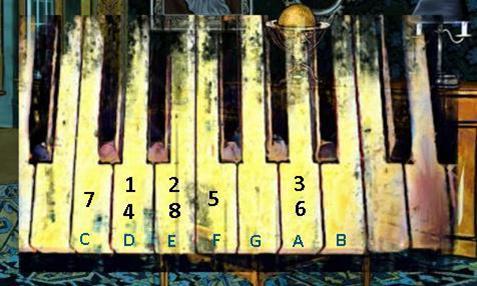
Click on the keys corresponding to the musical notes: D E A D F A C E as seen on the cassette. (N.B you don’t need to see the cassette in close-up to trigger the puzzle.)
Hear something heavy sliding nearby. Interact with the closet door again & enter the secret room.
MORTY’S MAN CAVE
Interact with the leather jacket to find another strange coin.
Take the jacket stand.
Look at the jukebox to see a close-up.
Look at the coin slot & see printed below INSERT 35. Use the strange coins that add up to 30 on the coin slot.
Interact with the helmet case. There doesn’t seem to be any way of opening it.
Use either the jacket stand or the hammer on it to smash the glass. Try to take one of the helmets to get a 3rd strange coin with a value of 5.
Look at the jukebox & use the strange coin on the slot.
Pick up the documents. Read the letter from Edna. Exit the close-up of the letter to see some photographs. You now have incriminating letters.
Take the letters from the top shelf to see the painting sale letter regarding Damon Ribaldi’s art.
Taylor calls you to ask if you’ve found anything.
You can choose to LIE or BE HONEST.
You call Jono.
ACHIEVEMENT: Give peace a chance (Went with Roger to find blackmail on Mortimer)
ACHIEVEMENT: Anarchy in the U.K. (Went with Martin to find blackmail on Mortimer.)
(N.B Criteria needed to achieve Anarchy in the U.K. is marked [1] - [9] in the walkthrough. Thanks Laney Berry.)
___________________________________________________________________________________________________
LIE TO TAYLOR:
This leaves you free to blackmail Morty yourself.
BLACKMAIL MORTY - PART 1
Morty’s Man Cave
If you have the numbers book from the reception desk, you will automatically enter Morty’s number into your phone.
Interact with your phone & call Morty. He’s not threatened by your evidence so you need to try & identify the red-head.
Foyer
Look at the poster & see that the woman in the picture resembles the woman in the photographs. (N.B is that her portrait in the hall outside the library?)
Interact with your phone & call Morty again. This time he agrees to pay but he can’t pay you immediately.
Maybe you’ll have more luck with Mrs Carrington but you don’t have her phone number. Look at the poster again to see that her new book is called “Forlorn Frontiers and Other Mishaps”.
BE HONEST WITH TAYLOR:
This leaves you free to try & steal the painting.
STEAL THE PAINTING - PART 1
Student Lounge
Talk to Drake & Roger. You hand over the letters & photos.
Talk to Drake & Roger again. Roger tells you that the woman in the photos is Martin’s mum.
Regarding the painting, Martin still owes you a favour! Maybe he’s still on the roof.
Roof
Talk to Hash & Martin.
Ask Martin about the famous painting. He tells you it’s in the library but you can’t get in without an I.D.
___________________________________________________________________________________________________
GETTING INTO THE LIBRARY
Student Lounge
Look at the computer & use the classified disc on it. See from a note attached to it that the disc was found on Brody Burton’s desk. ”The contents are disturbing”.
Look at the book you picked up from the nurse’s office, the first one in the Bakerloo Line Quartet by Holden Burke.
See the title, Baker Street, & the list of names of people who took it out.
Before Martin it was Emily then Brody.
Exit the close-up to see a barcode on the back.
Hallway (library)
Interact with the card reader to get a close-up. Try to use the book with the barcode scanner. You need to insert a keycard before returning a book.
Pick up the empty bag of chips. Look at it to see a barcode covered with smudged greasy fingerprints.
Gym/Stage
Use the book on Kevin, Shilling & Emily. She lends you the 2nd book in the series.
Look at it in inventory to see the title, Regent’s Park, & that the last person to take it out was Helen.
Exit the close-up to see the barcode on the back.
Use the book on Helen. You learn that if there’s any smudge on the barcode you have to type it in manually to return a book.
Backstage
Talk to Brody about the classified disc. It doesn’t matter which response you give. Talk to her again & she lends you her key card.
Hallway (library)
Interact with the card reader & use the keycard on it. The keycard doesn’t work.
Backstage
Talk to Brody. There is a way to fix the card but she can’t remember it.
Foyer
Talk to Stephen about the card not working.
Foyer (upper)
Use the key card on the varnish by the ladder.
Alternatively you can use the masking tape in inventory with the key card.
Hallway (library)
Interact with the card reader. The reader accepts the card, but the door won’t unlock until Brody has returned her overdue book.
Neither of the other 2 books will be accepted by the barcode scanner as Brody didn’t borrow them.
Backstage
Talk to Brody. She doesn’t have the overdue book with her but gives you the 4th book in the series.
Look at it in inventory to see the title, Piccadilly Circus.
Exit the close-up to see the barcode on the back.
Hallway (library)
Kevin rings you. He tells you that the Bakerloo Quartet was titled after consecutive stops on the Bakerloo Line.
Interact with the card reader & try Brody’s book in the barcode scanner. It’s not due back for a couple of days so you decide to keep it until you’ve opened the library door.
Gym/Stage
Talk to Shilling to see if he might have a map of the London Underground. He trades you a tube map for the Captain Centollo key ring. (N.B alternatively you can break the 4th wall here by Googling the map!)
Look at the tube map to see that the stop between Regent’s Park & Piccadilly Circus is Oxford Circus.
You can now work out from the titles & the barcodes of the:
1st book: Baker Street: BURK1985BAK4362
2nd book: Regent’s Park: BURK1985REG4363
4rd book: Piccadilly Circus: BURK1985PIC4365
the code for the 3rd book Oxford Circus.
Hallway (library)
Interact with the card reader & use the keycard on it.
Use the knife on one of the books to damage the barcode.
Use either this book or the empty bag of chips with the barcode scanner. As the reader can’t identify the barcode, enter the code of the overdue book BURK1985OXF4364
The door unlocks.
___________________________________________________________________________________________________
BLACKMAIL MORTY - PART 2
Library
FIX YOUR MOOD
Interact with the catalogue drawers to see an index card with the name of the book, “Forlorn Frontiers and Other Mishaps” by Edna Carrington. Its location in the library can be read in the top left corner. Exit the close-up.
Interact with shelf E in bookcase VI to get the book.
Interact with the book in inventory to see a business contact number at the bottom which is entered into your phone.
Interact with your phone to talk to Edna Carrington.
Drake, Kevin & Taylor enter the library.
STEAL THE PAINTING - PART 2
Library
FIX YOUR MOOD
Look at the control panel to see that the paintings are connected to an alarm system.
Interact with the catalogue drawers to see an index card with the name of a book about young British artists. Its location in the library can be read in the top left corner. Exit the close-up.
Interact with shelf F in bookcase IV to get the young brit’s art book.
Interact with the book in inventory & from the descriptions identify which painting in the library is the work of Damon Ribaldi.
Upper left: The painting has a signature. Damon avoids signing his work.
Upper middle: Scribbles. Damon uses a real, representational approach.
Upper right: the painting is a “Direct portrayal of the human form”. Damon avoids direct portrayal of the human form.
Lower right: Abstract. Damon avoids abstract.
Lower middle: Contains all of the colours. Damon doesn’t use purple.
Lower left: Haunting solitary footstep is etched into the emptiness. Damon captures the vestiges of human life in all of its minutiae. He likes to exaggerate negative space.
The lower left painting fits the description of Damon Ribaldi’s work. See that it’s connected to the orange light.
Interact with the control panel. You need only to concentrate on directing the orange light beam to the orange painting, by adjusting the mirrors, to disable its alarm. Adjust the mirrors to direct the other coloured light beams out of the path of the orange beam.
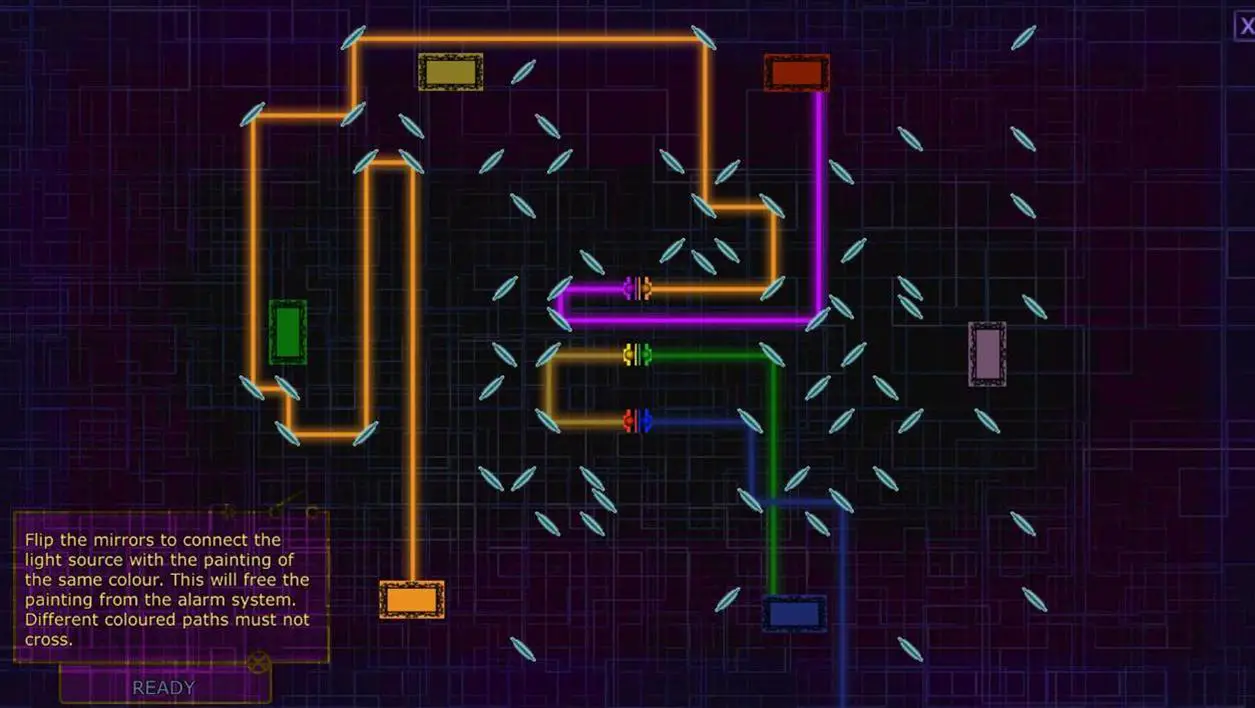
Click on the orange painting & then again to choose YES to take it
The painting’s title is “The more you take, the more you leave behind!” as mentioned in the painting sale letter.
Drake, Kevin & Taylor enter the library.
___________________________________________________________________________________________________
ESCAPE
Boiler Room
Pick up the journal.
Interact with it in inventory to see the 3 disturbing pages.
Hear knocking on the other side of the service tunnel hatch & Roger’s voice.
Rooftop
You tell Roger everything. You glimpse flashbacks as you explain your way of life & how you came to be at the concert.
Hallway (library)
Roger tells you that St Christopher’s used to have a secret society back in the day. ‘The brothership of the bong’ which funded the building of the secret passage.
To access the secret passage find & interact with the tiles (there are 4), that upset the symmetry of the pattern.
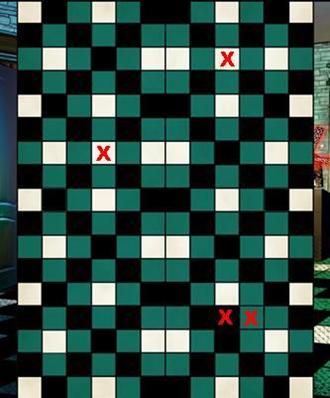
See Kayleigh try to open the trap door....... & Roger’s reaction.
THE END
ACHIEVEMENT: Another Brick in the Wall (Finished the entire game)
For a few more details pertinent to the story:
Read the additional pages of the journal in BONUS in the Main Menu.
ACHIEVEMENT: Madness (Read the journal and all of its horrific contents)
Read the additional articles, particularly the one about Drake, in CLASSIFIED.
RE: ACHIEVEMENT: Voodoo Child (Won all dolls in the game.)
(N.B I found that this achievement didn’t register after acquiring 4 dolls. There are 4 spaces for the Voodoo Collection in the locker but 5 spaces on the screen when you challenge someone to a game. I couldn’t find a 5th doll - the BARRY doll? )


")
