Walkthrough for Tex Murphy: The Pandora Directive - Mission Street (The Good Path) - Part 3
TEX MURPHY: THE PANDORA DIRECTIVE
MISSION STREET (THE GOOD PATH)
GAME PLAYER LEVEL
WALKTHROUGH - PART 3
*******************************************
Back to part 1 of the walkthrough.
Back to part 2 of the walkthrough.
~~~~~~~~~~~~~~~~~~~~~~~~~~~~~~~~~~~~~~
DAY EIGHT: A MESSAGE FROM THE DEAD
~~~~~~~~~~~~~~~~~~~~~~~~~~~~~~~~~~~~~~
TEX’S OFFICE
You start the day, eager to crack the code on Malloy’s disc. You get a vid message from Archie Ellis. He’s in Bermuda! He’s glad that you warned him to get out of town, cos someone broke into his shop, and trashed the place. But who cares? He’s in Bermuda! Now your vid phone is beeping, telling you that you have messages. Listen to them. You have a message from Lucia Pernell, telling you that she has the list of anagrams you asked her for. You also have a message from Chelsee, saying that she’s coming home tomorrow. Yippee! Okay, now call Lucia Pernell - she’ll fax you the list of anagrams, and send a courier to collect the PROJECT EUPHORIA FILE. End conversation, and hang up your vid phone.
True to her word, your fax machine is beeping, indicating that you have a fax - it‘s the list of anagrams Lucia promised you. Take fax from the fax machine, and look at LIST OF ANAGRAMS in your Inventory. Only one anagram jumps out at you - MERGE THE FOUR RARE CASES TO SEE MAPS. Go to your Computer Room.
TEX’S COMPUTER ROOM
Use MALLOY’S DISC in the laptop. Enter security code MERGE THE FOUR RARE CASES TO SEE MAPS. Read through all the info. At the end, you’ll find a phone number for Elijah Witt. It seems like he has one of the boxes, so you have to get in contact with him. But he’s rather reclusive, and he’s not gonna just tell you where he lives. You’ll need to be a bit devious here. Travel to the Electronics Shop.
ELECTRONICS SHOP
Look at counter on the right, and look at the ROBCO CALL TRACER. It wasn’t there before. Talk to Zack Williams, and buy ROBCO CALL TRACER. End conversation. Now return to your office in the Ritz Hotel.
TEX’S OFFICE
Attach ROBCO CALL TRACER to your vid phone. Dial Elijah Witt’s number, and use the following options.
B. Patriarchal bluff.
A. Ride it for all it’s worth.
B. Help with a few little reminders.
C. Add the finishing touch to the bluff.
C. Refer to Dr Malloy.
C. Couldn’t take any chances.
C. Explain about the disc.
C. Mention Malloy’s message to Witt.
The call tracer does it’s job, and traces the call back to an address in Maple Street. Ask Elijah to meet you in the Imperial Lounge. However, you have no intention of being there! You just wanted to get Elijah out the way, so you can search his apartment. End the call, and hang up your vid phone.
Travel to Elijah Witt’s apartment in the North America Map.
ELIJA WITT’S APARTMENT
As soon as you enter the apartment, SAVE YOUR GAME HERE. An alarm is activated in the apartment, and you need to turn off all 4 parts of it, before you are caught.
Go to the back left corner of the room. Look behind the potted tree, and turn off the green switch. Look for the masks hanging on the wall, near the lift and the number chart. Move the top mask, then turn off the purple switch. Look for the pot of bamboo poles next to the fireplace. Take a BAMBOO POLE. Use it to turn of the red switch that’s high up on the wall to the left of the fireplace. Ride the lift up to the bedroom area. Look at the plant on the dresser to your right. Move the plant, then turn off the blue switch. That’s all 4 parts of the alarm turned off now. You can relax… for now.
In the bedroom area, look at chest of drawers under the blue switch. Open bottom drawer and take the SCRAPBOOK. Examine SCRAP-BOOK in your Inventory to get PHOTO OF WITT’S STATUE. Look at this photo, and you’ll see the following numbers on back of the photo.
- 70
- 12
- 84
- 65
- 39
- 67
These numbers are an important clue. Look over the railing, and look at the wall hanging on the wall. Use BAMBOO POLE to get the WALL HANGING, then examine the PLAQUE in your Inventory. Pick up WITT’S NOTES from the bed, and examine this in your Inventory. Look at the other chest of drawers, and take TWEEZERS from on top of the drawers. Ride the lift back down to the living room area.
Pick up CULTURE BOOK that’s on the floor behind the 2 chairs, and examine it to see how the numbering system works. Pick up CALENDAR BOOK that’s on the floor next to the settee, and examine the book in your Inventory to see the Mayan calendar. Look at the fireplace, and look at the potted plant to the left of the fireplace. Move the potted plant to reveal a switch in the wall. It’s well concealed - it’s a diamond shape. Press the switch to turn off the fireplace. Now look at the fireplace again, and look at the FOIL PACKET. It’s too hot to pick up with your fingers (try it, for some fun), so use TWEEZERS to pick up the FOIL PACKET. Now examine the FOIL PACKET to find a COPPER KEY.
Look at statue in the corner. It looks just like the one in the photo. Or rather… the photo looks just like this statue. Look at the keyhole in it’s belly. Look at the CULTURE BOOK again, then SAVE YOUR GAME HERE. Use COPPER KEY in the keyhole. Time for another sliding puzzle.
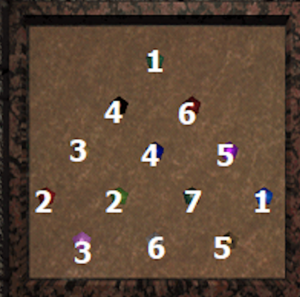
You have to re-arrange the tiles to match up with the numbers on the back of Witt’s photo. This is how it should look.

After you complete it, you hear something move. Turn around, and go back to the bookcase near the front door. Well what d’ya know? The bookcase has opened, to reveal a hidden compartment. Take WITT’S PUZZLE BOX from the hidden compartment. SAVE YOUR GAME HERE, then examine WITT’S PUZZLE BOX in your Inventory. This puzzle is incredibly complex, and in order to open the box, you have to set a modern calendar date on the left, and the equivalent Mayan calendar date on the right. Now this puzzle is very complex, and you may want to refer to WITT’S NOTE, the CALENDAR BOOK, the CULTURE BOOK, and the PLAQUE from the wall again. You need to set 4 dates - remember to click on ‘Set Dials’ after each pairing. The red light turns to green when it‘s correct. So click on the circles, until you get the following combinations.
- 8 Sept & 4 Ahau
- 20 May & 10 Chuen
- 17 April & 3 Muluc
- 12 July & 11 Men
That was hard work! Now examine WITT’S UNLOCKED PUZZLE BOX to find ONYX PIECES and MALLOY’S DEVICE PIECE #3.
You’ve done all you can here, so leave Witt’s apartment, and travel to the Garden House Boarding House in the San Francisco Map.
GARDEN HOUSE BOARDING HOUSE
In Malloy’s room, take PACKAGE from the bed, and open it to find GARDEN HOUSE PUZZLE BOX and UNTRANSLATED LETTER. Examine the UNTRANSLATED LETTER, and combine it with YUCATEC MADE EASY BOOK. Examine the TRANSLATED YUCATEC LETTER to learn that this puzzle box was intended for someone named Oliver Edsen. Examine GARDEN HOUSE PUZZLE BOX, then combine it with your ONYZ PIECES. Now examine GARDEN HOUSE BOX W\ ONYX. You have to fit the onyx pieces into the box, with lighter pieces at the top, and darker pieces at the bottom. When all the pieces are fitted correctly, examine GARDEN HOUSE UNLOCKED BOX to find MALLOY’S DEVICE PIECE #4. Combine MALLOY’S DEVICE PIECE #1, MALLOY’S DEVICE PIECE #2, MALLOY’S DEVICE PIECE #3, and MALLOY’S DEVICE PIECE #4. Now combine ASSEMBLED PANDORA DEVICE with the POWER CELL (ITEM 186), and examine it in your Inventory. SAVE YOUR GAME HERE, then travel back to your office in the Ritz Hotel.
TEX’S OFFICE
Watch the cut scene as you insert the final piece into Pandora’s Box, then you, Fitzpatrick, Witt, and Regan watch the revelation of the greatest scientific discovery in history. As usual, all Regan is interested in, is the money that this discovery can make. You take Fitzpatrick and Witt back to their hotel. When you arrive back home, Regan is waiting for you in your bed, determined to seduce you. Use the following option.
A. Refuse.
Regan’s not happy about being rejected, but that’s just too bad! She leaves, and the day ends.
~~~~~~~~~~~~~~~~~~~~~~~~~~~~~~~~~~~~~~
DAY NINE: A BLACK SUN ASCENDING
~~~~~~~~~~~~~~~~~~~~~~~~~~~~~~~~~~~~~~
NOTE: I cannot complete the Arcade-style Fireball Chamber in here, so I have switched to Entertainment Level at this point.
SNAKE CHAMBER
Watch the cut scene as you arrive in the Snake Chamber of the structure. Look at the ceremonial altar in the middle of the room. Pick up the PAPYRUS ROLL from the bench, and examine it in your Inventory. Now the idea here, is to find 14 MAYAN PUZZLE PIECES that are scattered around the room. Most of them are pretty easy to spot. Here’s where you can find them.
1. On the floor, near the bench.
2. On the floor, in front of the Snake Door.
3. On the floor, between the bench and the Altar.
4. On the floor, behind the giant statue.
5. On the floor, in the corner.
6. On the floor, between the giant statue and the altar.
7. On base of the giant statue.
8. On the floor, between the other bench and the Altar.
9. On the floor, under one of the benches.
10. On the floor, in a different corner.
11. On the floor, beneath pillars of the monolith.
12. On top of the monolith (look up).
13. On top of one of the benches.
14. On top of the other bench.
Now use one of the MAYAN PUZZLE PIECES (it doesn’t matter which one) on the ceremonial altar. You have to fit all the pieces together, like a jigsaw. This is what it should look like.

It serves as a map, to help guide you through the temple. Now look above each of the doors, and notice the different symbols above the doors. Enter through door with the star symbol above it.
STAR SYMBOL PASSAGE
Notice the CHARCOAL on the ground here. Pick up the CHARCOAL. Combine PAPYRUS and CHARCOAL to make a sketch of the map you assembled on the altar. Now it’s easy to get lost in here, so I suggest you SAVE YOUR GAME at notable ‘landmarks’. Now navigate the passage like so.
Walk forward to the first intersection. Turn right. Follow passage to the end. Turn left. Follow passage to the end. Turn left. Walk forward a few steps, to end of the passage. Turn left. Walk forward, and look at the dead man (Oliver Edsen).
Take PRESCRIPTION GLASSES from the ground, and examine them in your Inventory to get WHOLE LENS and BROKEN LENS. Take LANTERN from the ground, and examine it in your Inventory to see some LANTERN FUEL. Take GUN from the ground, and examine it in your Inventory to get BULLETS. Take HANDKERCHIEF from the ground. SAVE YOUR GAME HERE.
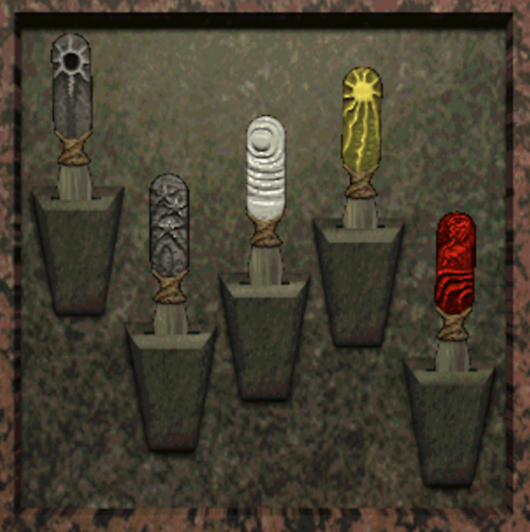
Turn around. Follow passage back to the first intersection. Turn right at this intersection. Walk forward a few steps, and take WHITE DAGGER from the ground.
Turn around, and go back to the intersection. Turn right, and follow passage to the end. Turn right again. Walk forward to the first intersection. Turn right, and follow passage to the end. Get SMALL STONE CUP. SAVE YOUR GAME HERE.
Turn around, and follow passage back to the first intersection. Turn right, and follow passage along to the end. Turn right again, and follow passage along to the first intersection. Follow passage along to the end. Climb up the stairs, and look at the Mayan Warrior. Take MAYAN SHIELD. Look at HEMP CORD wrapped around the Warrior’s hand, and use BROKEN LENS on the HEMP CORD to cut it. Now take HEMP CORD and take MAYAN SPEAR. SAVE YOUR GAME HERE.
Turn around, and follow passage back the way you came. At the first intersection, turn left. Follow passage along to the end. When you see the Snake door, enter it, so you’re back in the Snake Chamber.
SNAKE CHAMBER
Enter through door with the sun symbol above it.
SUN SYMBOL PASSAGE
SAVE YOUR GAME HERE. Follow passage along to the intersection. Turn right, and follow passage to the next intersection. Now turn right, walk forward a few steps, and take BLUNT HATCHET. SAVE YOUR GAME HERE.
Turn around, and follow passage back to the first intersection. Turn right, and follow passage to the end. Get SILVER DAGGER.
Turn around, and follow passage back to the intersection. Walk along to the end of the passage, then follow passage along, all the way through to the end (no turn-offs). Now turn right. Climb up the stairs and enter the Bird Chamber.
BIRD CHAMBER
Look at the wall, then look at the altar. This is another puzzle - you have to match the crystals into pairs that make the same sound. Use BLUNT HATCHET on the crystals, and hit them like so.
Now exit the chamber through door with the star symbol above it.
SUN SYMBOL PASSAGE
SAVE YOUR GAME HERE. Follow passage to the end. Turn left, and follow passage through all the twists and turns to the end. Get GOLD DAGGER.
Turn around, and follow passage back to the first intersection. Turn right, and follow passage along to the door. Enter the Wasp Chamber.
WASP CHAMBER
Look at wasp head above door on the right. You need to get rid of these wasps ASAP. In your Inventory, combine HANDKERCHIEF with LANTERN OIL, then combine OILY HANDKERCHIEF with MAYAN SPEAR. Combine SPEAR, OILY HANDKERCHIEF with MATCHBOX to light it, then use FIERY SPEAR on the wasp head. Those wasps aren’t gonna mess with you, Tex.
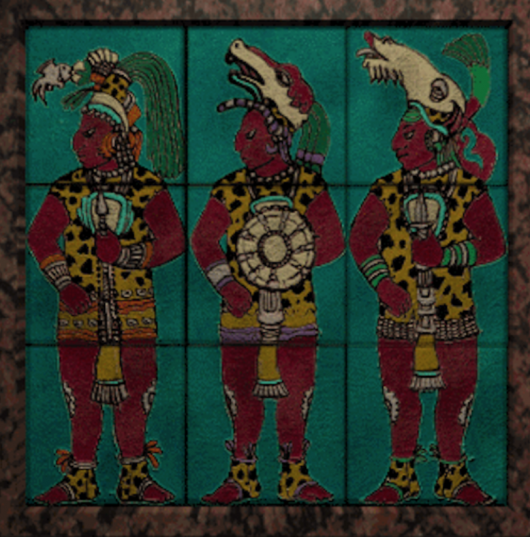
Now explore the chamber. Take KING TILES from the floor. Look at the wall to see the 3 Mayan Kings - pay close attention to their headgear, torso, and feathers on their shoes. Now use KING TILES on the Altar. You have to place each tile in the correct place, according to the Mayan Kings on the wall. This is how it should look.
Exit the chamber through door with the moon symbol above it.
MOON SYMBOL PASSAGE
SAVE YOUR GAME HERE. Walk forward to the intersection. Turn right. Follow passage through the twists and turns. When you reach the intersection, go straight ahead to end of the passage. Get RED DAGGER.
Turn around, and follow passage to the intersection. Turn left. Look at door, and enter into the Dagger Chamber.
DAGGER CHAMBER
Look at the Altar. Use one of the DAGGERS (doesn’t matter which one) on the Altar. Now you have to place the daggers correctly. It should look like this.
Exit chamber through door with the black sun symbol above it.
BLACK SUN SYMBOL PASSAGE
SAVE YOUR GAME HERE. Follow passage through all the twists and turns, until you see the Pentagon door. Enter into the Pentagon Chamber.
PENTAGON CHAMBER
As soon as you enter, the floor drops out from under you. You fall through a long tunnel, eventually landing in the Mayan Ascension Chamber far below.
MAYAN ASCENSION CHAMBER
Watch the cut scene with Regan. Now, how on earth did she get here? No matter, you need to find a way out of here!
Look at the 4 pedestals, and look at the giant statue. Talk to Regan. Pick up REGAN’S BACKPACK from the corner, and open it to find some ROPE. Use ROPE on the giant statue, then move the statue - you and Regan pull it over, and it smashes into fragments. Look at the fragments to see a crack in it. If you could break the fragments into 2 pieces, they would be small enough for you to lift. In your Inventory, combine JACKKNIFE with BULLETS, then examine that to get GUN-POWDER. Pour GUNPOWDER into SMALL STONE CUP to get PRIMITIVE EXPLOSIVE. Combine HEMP CORD with LANTERN FUEL to get PRIMITIVE FUSE. Insert PRIMITIVE FUSE into PRIMITIVE EXPLOSIVE. Finally, use MATCHBOX with PRIMITIVE EXPLOSIVE to light it. Now use LIT PRIMITIVE EXPLOSIVE with the statue fragments. BOOM!!!
SAVE YOUR GAME HERE. Pick up STATUE FRAGMENT #1. Pick up STATUE FRAGMENT #2. Place STATUE FRAGMENT #1 on one of the pedestals (doesn’t matter which one). Place STATUE FRAGMENT #2 on another pedestal. Now watch a cut scene as you and Regan hop onto the vacant pedestals, and rise up through the roof.
You emerge in a clearing, near the 2nd alien spaceship.
JUNGLE CLEARING
Watch a long cut scene with Regan, Jackson Cross, and Gordon Fitzpatrick. It turns out that Regan and Jackson have been working together since the beginning.
ALIEN SPACESHIP
Gordon Fitzpatrick takes you all into the spaceship. Regan and Jackson find themselves trapped in the Power Cell Room, but not before Jackson fatally shoots Gordon Fitzpatrick. As Fitzpatrick lays dying in your arms, he reveals that he has alien DNA inside him. He also tells you that the spaceship contains anti-hydrogen pods, and that you need to get the ship as far from Earth as possible, before it explodes. He starts to tell you the launch sequence, but dies before he can finish. It’s up to you now, Tex. Only you can launch the ship and save Earth.
You automatically see the launch controls now. Press them as follows.
- Press the black sun symbol at top of the panel.
- North, Circle, Red
- East, Cross, Orange
- South, Triangle, Yellow
- West, Diamond, Green
You escape from the ship just in the nick of time, with Regan and Jackson still trapped in the Power Cell Room. Watch the cut scene as Elijah Witt arrives, and gives you a lift home.
~~~~~~~~~~~~~~~~~~~~~~~~~~~~~~~~~~~~~~
DAY TEN: JUST DESSERTS
~~~~~~~~~~~~~~~~~~~~~~~~~~~~~~~~~~~~~~
CHELSEE’S APARTMENT
You and Chelsee finally have that long overdue date. Finally, things are going right for you, and you couldn‘t be happier! Nice work, Tex.
Congratulations on stopping Regan and Jackson, saving the world, AND winning Chelsee’s heart. You are a true hero!
The End


