Walkthrough for What Makes You Tick?
INTRO
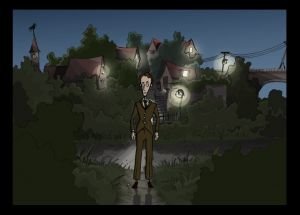
Watch the intro, as you (Nathan) arrive in town to begin your search for the missing Dr Coppelius.
OLD WELL
Open your Inventory, and look at PICTURE to see the house where he used to live. Now look at the crow in the tree to see that it has a golden chain with a key attached to it's leg. If only you could get that key - it might be important. Open lantern on the right, then use you LIGHTER on the lantern to light it. You will now see a shiny object reflecting in a coffin on the right. Look at the coffin. Look at shiny object, and take shiny object - it will show as MUDDY THING in your Inventory. Now look at the stone well, and use handle. The well will fall apart (hee hee). Pick up HANDLE from the ground, then cross the wooden bridge to the Strange House.
STRANGE HOUSE
Look at the house to realise that this is the house from your photograph. This is where Dr Coppelius used to live. Knock on the door, but there is no reply. Take FLAG and then take STICK from bottom of screen. Now head down to the Field Of Wheat.
FIELD OF WHEAT
Talk to Nora, and ask her about everything. She is waiting for her Grandfather, who is doing some kind of business nearby. Take LEATHER GLOVE that is lying on the bench next to her. But what good is one glove, without a pair? You need to find the matching glove. Now look at barrel with scrap iron, and take COCKTAIL SHAKER from the barrel. Notice the stone slab on the ground next to the barrel. Lift stone, and then take WORM that was hiding underneath. Finally, take some WHEAT from the field of wheat, then head up through the field, to the pier.
PIER
Talk to the Sailor about everything. You learn that his dog can find any
mushroom you desire, just be seeing the name of that mushroom written down. The sailor also gives you his CAPTN MATT'S GUIDE TO LIFE BOOK. Use the BOOK in your Inventory, and you will learn ‘How To Stun A Raven’. Perhaps you could use the same technique to stun the crow at the well. Talk to the dog, but you are told he will not help you unless you give him some fish. Where are you going to get fish from? Oh wait, you are at the pier. The sea is full of fish. It's just a pity you don't have a fishing rod. Look at the old timetable board, and take FISHING CLUB LEAFLET from the timetable. You automatically pick up a FISHING HOOK as well. Look at LEAFLET in your inventory to learn how to make a fishing rod (isn't that handy). Now take CORKED BOTTLE OF ALCOHOL from crate at the lower right. Now make your way back to the old well, where you started out.
OLD WELL
A stranger has appeared here. Talk to the stranger, and ask him about
everything. He gives you a CAN O‘ DR PEPPER. Isn't that nice of him. You are feeling thirsty, so open CAN O‘ DR PEPPER, and then drink it. That was good! You’re left with the EMPTY CAN. Now return to the pier where you found the sailor.
PIER
Walk right a little bit, and look at hermit crab to see that it is living in an
old glove. You were looking for a second glove, to match the one you
already have. This would be ideal. However, the crab won't give up its
home so easily. Perhaps you should try to find somewhere better for it
to live. Give your EMPTY CAN to the crab, and it will quickly abandon the glove. Pick up OLD GLOVE, and use it with the SINGLE GLOVE in your Inventory to make a PAIR OF GLOVES. Now walk left, back to the Wheat Field.
WHEAT FIELD
Look at barbed wire fence at bottom left, and use PAIR OF GLOVES to
get some BARBED WIRE. Now walk right to the Strange House.
STRANGE HOUSE
Look at raven gate at top left. Try to open the gate, but it is locked. Use your BARBED WIRE on the gate to pick the lock. Now head up through the gate, and look at sundial.
SUNDIAL
Look carefully at small tree on the edge of the cliff, and take STRING from the tree. Head right, and make your way back to the pier.
PIER
At the pier, walk right onto the boardwalk. This looks like a good spot for fishing. all you need is a fishing rod. Have a look at the FISHING CLUB LEAFLET you got from the old timetable - it tells you how to make a fishing rod. In your Inventory, bite CORKED BOTTLE OF ALCHOHOL. Now combine LONG STICK, STRING, HOOK, CORK, and WORM. Hey presto! You now have a FISHING ROD WITH BAIT. Now use FISHING ROD WITH BAIT with the sea, and after a few seconds, you manage to catch a FRESH FISH. Give FRESH FISH to Shroom, the old dog, and he will finally wake up. Show CAPTN MATT'S GUIDE TO LIFE BOOK to the dog, and he will find the Sete de Merte mushroom for you. Pick up MUSHROOM, then return to where the old well.
OLD WELL
The KEY is still attached to the crow's leg. If you could sedate the crow, you might be able to get the KEY. In your Inventory, combine COCKTAIL SHAKER, HANDFUL OF WHEAT, BOTTLE OF ALCOHOL and MUSHROOM. Now shake the cocktail shaker to mix it all together and create some SEDETIVE SEEDS. Give SEDETIVE SEEDS to the crow, and keep feeding him the seeds until he flies away. You need to find him if you want that key from his leg. Head up to the Strange House.
STRANGE HOUSE
Walk up through the raven gate at top left, so you are at the Sundial.
SUNDIAL
The crow is here, and he is finally sleeping! Take KEY from the crow, and look at it in your inventory to discover that it is only a KEY PART - part of a larger key. You still need to find the other parts. Return to the Wheat Field.
WHEAT FIELD
Look at Nora. There's something wrong here, she looks sick! Talk to her, and she will try to give you something, but she drops it. You automatically pick up the TINY KEY PART from the ground. Now in your Inventory, combine TINY KEY PART with KEY PART you got from the crow to create a LARGER KEY PART. But there is still a part missing. Walk right to the Strange House.
STRANGE HOUSE
Immediately return to the Wheat Field.
WHEAT FIELD
Nora has gone. Where could she be? Walk up to the pier.
PIER
Nora is here. Try to talk to Nora, but she is too sick to say much right now. Talk to McManus, the sailor, and he tells you that Nora's grand-father brought her here. Nora and the sailor are to wait here for him. Go back to the Wheat Field.
WHEAT FIELD
You will finally meet Nora's mysterious grandfather. Talk to him about everything. He tells you that Nora will be fine (phew, that's a relief). He also tells you to find a way into the Strange House, and one of the key parts is hidden under the doormat. Head right to the Strange House.
STRANGE HOUSE
Lift the doormat, then take the TINY KEY PART. In your Inventory, combine all 3 key parts to create a COMPLETE KEY. Now use COMPLETE KEY with the door to unlock it, then enter the house.
INSIDE STRANGE HOUSE
Look at Golden Bird Figure in the middle of the room, and notice the oval shaped holes at the base. It seems like you have to put something in these holes to activate something. Look at Grandfather Clock to see that it is showing the wrong time. Now look at the various books on the left, and take INTERESTING BLUE BOOK. In your Inventory, open INTERESTING BLUE BOOK to find an ADVENTURE PLATE. Hey, it's Guybrush! So you have found one plate, but you still need to find another one. Remember that shiny object (muddy thing) you found in the coffin? This would be a good time to clean it. In your Inventory, use BOTTLE OF ALCOHOL with PIECE OF CLOTH, and then use WET CLOTH with MUDDY THING. You will end up with a DEATH PLATE (yikes, it's the Grim Reaper). Well done, you have two plates now. Use ADVENTURE PLATE and DEATH PLATE with oval shaped holes at base of the Golden Bird Figure (not the figure itself) to reveal a secret passage. Climb down the stairs, through the newly-revealed entrance, and into a small room.
SMALL ROOM
There’s a Notice Board near the window. Look at note and look at larger note to read about the pod prototype, and also a warning about Nora. It's all very mysterious. Now look at photograph on the pillar next to the gate. Touch PHOTOGRAPH, and you will discover a hidden socket. Touch the socket to see an arrow going in a clockwise direction, indicating that something should be turned clockwise. Use your HANDLE in the hole, then turn HANDLE to open the gate. Now go right through the gate.
Look at Stranger With Cape. Could this be Dr Coppelius? Talk to the Stranger - he’s a scary guy! Watch a cut scene with Dr Coppelius and the evil Vincent. Wait a minute. Dr Coppelius and Nora's grandfather are one and the same? Anyway, it turns out that Vincent is trying to steal a mysterious invention from Dr Coppelius, but he can't find where it is hidden. You are knocked unconscious, and when you come to, you and Dr Coppelius are locked in his lab, and all your items have been taken. Look at old photograph on the desk to learn about Vincent's history. Talk to Dr Coppelius about everything, and you will warn him that he is in great danger (it seems that you are a little bit late to warn him). Apparently Dr Coppelius has invented a mechanical heart, and he has hidden it inside Nora to keep her alive. Vincent is looking for that heart, but he doesn't know about Nora. After you have talked about everything, walk left to the gate.
Damn! Vincent locked the gate, preventing you from escaping. Talk to the crow to wake him up, then talk to him again until he jumps onto the handle, opening the gate. Now open cupboard under the binoculars, and take things from the cupboard to get some of your stuff back. Look at stairs at bottom left to discover that the secret entrance has been closed. Return right, to the room that Dr Coppelius is in.
You need to find a way to escape from here. Dr Coppelius has already told you about the escape pod, but it's up to you to activate it. First, you need to start the fire, then you need to throw in everything flammable. Okay, in your Inventory, use your LIGHTER with FISHING CLUB LEAFLET, then throw BURNING LEAFLET into the boiler tank on the right, which is connected to the escape pod. Now throw WET CLOTH, SEDATIVE SEEDS, and BOTTLE OF ALCOHOL into the tank. The pod will open now, so use the pod to escape, and you will end up at the Sundial behind the raven gate.
SUNDIAL
Okay, so YOU’VE escaped, but what about Dr Coppelius ? You still need to rescue him. Walk right to the Strange House.
STRANGE HOUSE
Enter the Strange House.
INSIDE STRANGE HOUSE
Pick up GOLDEN PLATES from the floor, and insert both plates (Death Plate and Adventure Plate) into oval shaped holes at base of the Golden Bird Statue. The secret entrance will open again. Climb back down the stairs, through the newly-revealed entrance, and into a small room.
SMALL ROOM
Watch a cut scene with Dr Coppelius. You both return to the pier.
PIER
You and Dr Coppelius hope to find Nora at the pier, only to discover that she has been kidnapped by a strange man on a boat. It seems that Vincent has found Nora after all. What will become of her?
Congratulations. You have completed What Makes You Tick. Now sit back and enjoy the ending.
The End!


