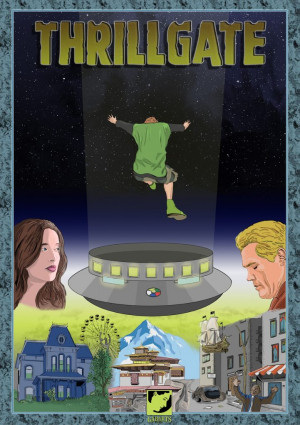
Walkthrough for Thrillgate
THRILLGATE
by
Gabriele Ciucchi
Walkthrough by chrissie July 2020
The main menu is accessed by moving the cursor to the bottom of the screen & clicking on the cogwheels on the right.
On this screen you can also choose to play in Italian or English by clicking on the appropriate flag.
The main menu consists of NEW GAME, LOAD/SAVE, OPTIONS, RESUME & QUIT.
There are 6 over-writeable save slots.
OPTIONS gives an overview of the game controls.
Clicking on the puzzle icon to the left of the cogwheels takes you to a stickers’ screen where you can follow your progress. When the blue puzzle piece is lit clicking on it is needed to help solve a puzzle in-game.
Click on the house icon to return to the game screen.
Inventory can be accessed by also moving the cursor to the bottom of the screen.
Right-click on items for a description.
About this walkthrough: It only includes the minimum of direction to progress in the game so be sure to look at everything & exhaust all dialogues. A lot of the items/actions can be collected/performed in any order. This is just one order of gameplay.
Tip: Left & right click every time you encounter the cog wheel, hand, speech bubble & magnifier.
Chapter 1
“The Mysterious Wreck”
Click on the right arrow button to scroll through the comic strip.
House: Playing as Gabriel pick up the Floppy disk from the desk.
Interact with the wardrobe. Look at the clothes then right-click on them to get Keys.
Check the inventory to see that you already have a Comic book & a Wallet.
If you look at the wallet you’ll see that its contents include money & an “Arcade Nation” membership card.
Exit the house.
Go right & talk to Tom.
Look at the mailbox & take the Envelope. Check it in inventory - it’s addressed to The big foot’s lair.
Deliver the envelope
Go further to the right & use the keys on the garage. Interact with the tools to get a Screwdriver.
Click on the car to exit the area & access a map of locations.
Clearing: Find the road blocked. Talk to the soldier.
You need to find a way to pass.
Arcade Nation: Talk to Sullivan & then Penny. Show Penny the envelope & talk to her again about it.
She wants to eat - she’d like raspberries & a cold drink.
Green Lodge Lake: Try Mike’s home.
Look at the wooden box then use the screwdriver on it. Click on the open box to get a Wrench & Duct tape.
Gabriels home: Talk to Tom & ask for raspberries. He needs to fix his hose first. Give him the duct tape.
Exit the area. Return later & click on the raspberries basket to get Raspberries
Arcade Nation: Give the raspberries to Penny.
Use your wallet on the vending machine to get a Soda can. Give this to Penny.
Talk to her again to see if she’s remembered the place - a new location should appear on the map.
Bigfoot’s lair: Take the plastic Bottle from the counter. Use the envelope on Leland & in return he gives you a Magnet.
Talk to him about all subjects & then ask him how you can join the contest. He gives you a Polaroid camera.
Access Sully’s back room
Arcade Nation: Inside the shop interact with the electrical system to reveal a fuse box.
Right-click on this to see that a fuse is missing.
Talk to Sully about this to learn that the electrical system is linked to the fire-alarm.
Gabriels home: In his house use the screwdriver on the radio to get the Fuse.
Arcade Nation: Use the fuse on the fuse box.
Use the wrench on the hydrant outside.
Use the bottle on the hydrant to fill it with water.
Use the bottle on the loose wires of the vending machine to set off the alarm.
Gabriel automatically picks up a Note from Sullivan’s desk.
Look at the note in inventory to see a code. Enter this on the keypad of the backroom.
(N.B You just need to tap in 6 random numbers to exit the close-up of the keypad if you don’t yet have the code).
After entering the code 242314 go into the back room.
Look at the drawer then right-click to get Shears.
Interact with the Akari XT & look at the hard disk which you can’t explore.
Use the floppy disk on the Akari XT to copy the files from the hard disk to get Data files.
Try these on the Akari XT but they’re not readable.
Gabriel’s home : Inside the house use the data files on the Akari XT to make them readable.
Arcade Nation: Go to the back room & use the now readable data files on the Akari XT.
Click on the floppy disk icon. Interact with the map.
Take the Print from the printer.
Look at it in inventory to see that it’s a detailed map of the underground sewers.
Accessing the sewers
Green Lodge Lake: You can if you like take a photo of the weird sign & try presenting the instant photo to Leland.....
Otherwise use the shears on the weird sign & then use the Polaroid camera on the footprint to get Instant photo.
Bigfoot’s lair: Give the instant photo to Leland. Talk to Leland about your photo.
Take your prize - the Bucket.
Clearing: Use the magnet on the street sign.
While the soldiers are busy automatically get the Rope.
Gabriel’s home: In inventory combine the bucket with the rope to get Bucket with rope.
Use this on the old well then go down into the sewers.
Sewers: Look at the sign to see that the tunnels lead to the old mine.
Go to the right & try to interact with the passage. Right-click to note that there’s a passage after the jump.
Click on the puzzle icon at the bottom of the screen to access the stickers’ screen.
Interact with the lit puzzle icon.
Return to the game screen & click on the puzzle pieces. Gabriel makes an observation about the map he’s printed off & jumps over.
Go through the arch.........
It’s getting late.......
Climb the ladder......
Look at the crashed vehicle then use the Polaroid camera on it.
Chapter 2
“The Five Pieces of the Device”
Read through the next few pages of the comic strip.
Device: Interact with the control panel to see that there are 5 inserts. The goal is to find the missing pieces.
Exit through the opening on the left to see a map screen showing another five locations.
The blue piece
Haunted house: Enter the office & take the Piece of meat.
Leave the office & go to the right to exit the area.
The reactor: Pick up the Crowbar leaning against the sign. Go to the right & look at the pond. Use the piece of meat on the pond to contaminate the meat.
Explore the rest of the area but there’s nothing else you can do just yet.
Go left of the stone sign to exit to the map.
Zombieville: Give the piece of (contaminated) meat to the chained zombie. Take the Shovel. Enter the house. Look at the cupboard & then right-click on it 3 times to move it.
Look at the crack & right-click on it to see a piece of stone you can’t reach.
Go up the stairs to the roof.
Use the crowbar on the hatch before the zombie gets too near to you. Once the hatch is open see what happens to the zombie. Pick up The blue piece.
Go downstairs & pick up the Bone. Leave the house & go left to exit to the map.
The red piece
Haunted House: Enter the office & use the bone on the guard dog. After automatically leaving the office re-enter it.
Interact with the electric panel to activate it.
Leave the office & go up to the house.
Interact with the niche on the clock & then interact with it again to get a Lens.
Right-click on each of the paintings to get a description.
See that left-clicking on them flips them over to face the wall. Right-click to flip them back.
Recognise the stone sign in the middle painting as being in the reactor location & the city in the right painting as Zombieville. Left-click on both of them to flip them over so that only the painting of the island is displayed.
Pirates island: Pick up the Fishing rod.
Haunted House: Arrange the paintings in the house so that only the one of the stone sign is on display.
The reactor: Look at the secret box that has now been revealed to get a Little key
Go to the right & use the fishing rod on the pond to get a Vial - it looks dangerous.
Go further to the right & enter the building.
Interact with, in this order, the control rods, power level then heat control machines. Use the little key on the main panel & then click on the button.
(N.B. Another order may work but if nothing happens straight away you just need to persist with clicking on the machines & the button).
When the settings are correct a panel opens in the foreground.
Pick up The red piece.
The yellow piece
Pirates Island
Go to the ship & use the lens on the telescope. Click on it & note than you can move it to 3 different positions.
Use the vial on the chest to get a Pirate map. Look at it in inventory to see that it has musical notes. Leave the ship.
Go up the steps on the right. Look at the mirror & click on it to note that it also can be moved to 3 different positions.
Use the pirate map on the bone organ & then look at it to see a close-up of a music puzzle. (N.B There doesn’t seem to be any clues within the game to help solve it. If you can’t read music & aren’t familiar with a piano keyboard you’ll have to break the 4th wall by finding the info you need on-line).
The interactive ‘fingers’ on the organ correspond to the notes on a piano keyboard & from left to right are C, D, E, F, G, A, B.
The notes on the sheet music from left to right are C, A, B, E, G, D, F so click on the organ keys in that order.
Alternatively numbering the ‘fingers’ from left to right 1, 2, 3, 4, 5, 6 & 7 click on 1, 6, 7, 3, 5, 2 & 4.
Go back down to the beach & enter the newly accessible cave on the right.
Use the shovel on the huge X to get a Treasure chest.
Look at it in inventory to see that it’s locked.
Look at the solar flare on the wall.
If the moon phases on the wall are indistinguishable adjust the ship’s telescope & the mirror by the bone organ so that they are both in the central position.
The moon phases should be now be clear displaying from left to right a crescent, half-moon & full moon.
Leave Pirate Island.
The Temple: Look at the sign & then at the symbols on the right pillar of the gateway. You don’t understand the language. Go up through the gateway & pick up the Gloves.
Try to talk to the oracle. You need to give answers to their riddles.
Go up the steps on the right to enter a temple.
See three columns showing the phases of the moon. Click to rotate them until you get the same sequence as you saw in the cave on the island i.e. from left to right: crescent, half-moon & full moon.
Pirates Island: Enter the cave & look at the alcove to take the Pirate key.
In inventory use this on the treasure chest to get the The yellow piece.
The White piece
Haunted House: Arrange the paintings in the house so that the only the one of the city is on display.
Zombieville: Go up to the roof of the house & take the Rod that wasn’t there before.
Downstairs use this on the crack to reach the Stone block.
Haunted House: Arrange the paintings in the house so that they are all facing the wall. Look at the bookcase to get an Old book. (N.B. you need to have tried to talk to the oracle first).
The Temple: Use the gloves on the sludge to get a Figurine.
Use the old book on the symbols. Their precise order of the sun, the elephant, the ship etc indicates a word: ‘The shadow of fate’.
Go through the gate & take the Crystal ball.
Look at the old book in inventory then talk to the oracle again. Answer UGHTNAM, PROBARICUS & LOOMIS & then The shadow of fate.
Take the Figurine from the alcove.
Go up the steps to enter the temple.
Place the two figurines in the alcoves on the right. You may notice that depressing the central floor tiles opens an alcove on the left to reveal another figurine.
Use the stone on these tiles & take the Figurine from the left alcove.
Place it in the remaining empty alcove on the right.
Look at the now open mouth of the large Buddha to get the The white piece.
The green piece
Haunted house : Place the crystal ball on the stand.
Left-click on the clock & then right-click on it to see that the time is stuck at 1.23.
Interact with it again.......
Pick up The green piece from the floor. Exit to the map screen.
Activate the device
Device: Use each of the coloured pieces on the device panel. Interact with the device panel to get a close-up & see that each represents a characteristic.
Exit the close-up & access the stickers’ screen. Click on the puzzle piece. Return to game screen, interact with the device panel & click on the puzzle pieces in the close-up.
Exit the close-up....
Chapter 3
“The Thing”
After reading the comic strip find yourself at the entrance to a maze.
Talk to the maze guardian.
Go through the door.
(N.B. Patience is required for this very tedious ‘maze’ as navigation is randomized. Unfortunately you have to revisit it on other occasions & may have to persist with changing direction i.e. going back & forth to reach a couple of places).
Start off with going to the right & hopefully if you continue your path will reach a place where your path is blocked & you see a strange crack on the main wall. Use the crowbar on the strange crack. Go through the hole to emerge from an arch left of a marble statue.
Go through the gateway on the right to see some machinery. There’s nothing to do here just yet so go back to the statue.
Activate the machinery
Go through the middle arch to the castle entrance & talk to Mike through the hole in the wall on the left.
You now play as Mike & have Gabriel’s inventory. So as Mike pick up the Mug.
Go to the left & take the metal object to acquire a Handle.
Go right to the hole in the wall & talk to Gabriel to switch back to playing as him & pass him the inventory.
Go to the marble statue & use the mug on it to fill it with water. Go back to the castle entrance & use the mug on the mud on the right to soften it. Take the Gear.
Leave the area & go through the right arch. Use the gear & handle on the machinery but something else is needed!
Go through the gateway left of the statue to re-enter the maze. You need to persist with switching between going to the right for a while, back to the left, to the right etc etc until hopefully you will encounter some Red rope dangling from a wall that blocks your way.
Go through the same palaver to find your way back into the castle grounds.
Go back to the machinery. Use the red rope on it & then click on the handle to activate it. Pick up the Entrance ticket (1).
Go back to the hole in the wall to hand over your inventory & play as Mike.
Interact with the ladder to enter the tower.
Pick up the Mistery box.
Exit the tower & talk to Gabriel.
As Gabriel look at the mistery box in inventory.
Opening the mistery box
Enter the maze again & navigate back to the maze entrance (located by walking mainly to the left). Use the mistery box on the maze guardian to get a Keeper’s key.

The mistery box has a reflective strip A with a small sun symbol above so find a section of wall in the maze where there is a hotspot labelled ‘light’(located by walking mainly towards the right). Use the mistery box on it to open compartment B. Click on the small button that is revealed.
Navigate back to the castle entrance & talk to Mike. As Mike enter the tower & use the keeper’s key on the little locker to get a Metal bar. Pick up the Entrance ticket (2).
Talk to Gabriel. In inventory use the metal bar on the mistery box which fits part C. This opens drawer D.
Take the Secret key & exit the close-up.
In inventory use the secret key on the mistery box to slot it into the small keyhole E. This open drawer F which shows a sequence of 3 coloured splatters.
Click on button G to open drawer H. Click on switch J to open panel K to reveal a sequence of coloured buttons.
Click on button G to close the drawer again & the coloured buttons K until the sequence matches that of the splatters in drawer F (from left to right blue, green & orange). If done correctly drawer L should open.
Click on the button in drawer L, click on button G to open the drawer yet again.
Click on the large button M on the top of the box.
Take the Entrance ticket (3) from the now open drawer N.
At the castle entrance use each of the 3 the entrance tickets on the collection box to open the doors. Look at the entrance.....
Click on the puzzle icon to access the stickers’ page & click on the puzzle icon there. Exit the page & click on the puzzle pieces to enter the castle..........
Chapter 4
“Epilogue”
Read the last part of the comic strip.
Luna Park
Playing as Penny check your inventory to see that you have a Car key.
Go to the rightmost part of the park & talk to the ticket man - you need to get help.
Go back to the entrance of the park & try to interact with the phone booth but you need some coins.
Go back & talk to the ticket man to automatically help yourself to Coins.
Use the coins on the phone booth.
Talk to Leland about the accident, then go to the right. Look at the fence - you need the fence keys.
Go back & talk to Leland who suggests taht they’re in the ticket office.
Go to the ticket office & talk to the man on the stretcher.
Talk to Leland yet again.
Pick up the ‘strange object’ on the right side of the Comics stand to get a Metal detector.
Use it on the ‘look’ hotspots on the ground - there are 5 of them towards the right side of the park.
(N.B. You may have to wait a few seconds when using the metal detector before Penny is seen to react).
When you find the right spot the metal detector makes a sound & you automatically pick up the Fence keys.
Use them on the fence & try to talk to Gabriel. The puzzle icon should flash so click on it to access the stickers’ page. Click on the blue puzzle icon then return to the game screen. Click on the puzzle pieces over Gabriel.........
Enjoy the cut scene.
THE END


