Walkthrough for Quest For Glory 5: Dragon Fire (Magic user)
============================================================
SIERRA ORIGINAL
MAGIC USER
============================================================
******************************************************************
WELCOME TO SILMARIA
******************************************************************
ERASMUS’S HOUSE
You arrive in Silmaria, in Erasmas’s bizarre mystical house. Listen to Erasmus explaining why you have been brought here - the king of Silmaria was assassinated, thus, the Rites Of Rulership have been initiated in order to determine a new king. Erasmus asks you if you want to jump straight into danger, or if you want to explore Silmaria first. Since you are not really equipped to deal with danger yet, you should choose Silmaria.
Erasmus teleports you out of his house.
SILMARIA
Cross over the bridge, go left to the Arena, and enter the Arena. Talk to Ferrari about everything. Talk to Abdum about everything. You can’t do anything else here for the moment, so leave the Arena.
Head left and enter the Hall Of Kings. Make your way forward, until you see Logos and your old friend Rakeesh. Listen to what they have to say. Ask Logos about everything, and then Agree To Enter Rites Of Rulership. Now talk to Rakeesh about everything. When you’re ready, leave the Hall Of Kings.
Head right, all the way along, until you see Rakeesh on the platform. Talk to Rakeesh about everything. He gives you the KATTA PIN you got back in Shapier. When conversation is over, open your Inventory, select the KATTA PIN, and Equip (wear) the KATTA PIN, so that all Katta will know that you are a friend.
Go left to the Notice Board. Click on the Notice Board, click on each of the Notices, and click on each announcement on the Notices to get the details. There’s a lot of quests shown on these Notices. When you’ve read a Notice, it will turn grey, but keep checking back here, as quests are frequently updated. When you’re ready, click on Done to leave the Notice Board.
Walk through doorway on the left to go down the stairs into the Main Square. Now this section is kind of a big circle, so don’t worry about missing anything.
That large white building next to the stairs is the Bank Of Silmaria. Enter the bank and talk to the Banker about everything. You discover that you need 1000 DRACHMAS in order to enter the Rites Of Rulership… but you don’t have that much money yet, so just leave the Bank for now.
Head right and cross over the bridge. Enter the Magic Shop.
Inside the Magic Shop, walk left, until Shakra appears. Shakra is Rakeesh’s son, and he runs this Magic Shop. Talk to Shakra about everything. Now talk to him again, and Purchase Something. Buy the MYSTIC MAGNETS. Buy a MAGIC DAGGER. Don’t buy anything else yet - you can come back for the other things later, when you have more money. Leave the Magic Shop for now.
Look at the Fruit Stall. Talk to Marrak, the Katta who runs this stall, and ask about everything. Don’t buy anything from him yet. Salla is sitting on a bench near Marrak, playing the flute. Give her a DRACHMA to show you appreciate her music.
Continue right, and enter the Apothecary. Hey, it’s your old pal Salim. And Julanar - the Tree Woman you helped in QFG2. Talk to Salim about everything. Buy some HEALING PILLS - 3 will do for now. Buy some POISON CURE PILLS - 3 will do for now. Buy some STAMINA PILLS. Unfortunately, Salim doesn’t have any STAMINA PILLS left - he needs some PEGASUS FEATHERS in order to make more. Talk to Julanar about everything. Take a JALAPENO PEPPER from the bunch near Julanar. When you’re ready, leave the Apothecary. Now, outside the Apothecary are some FLOWERS. Take a few bunches of FLOWERS.
Walk right, climb up the stairs, walk along the pathway, and down the next set of stairs. Now below the stairs is Wolfie’s stall. Talk to Wolfie about everything. Now talk to Wolfie again, and Purchase Something. Buy the MAP. Don‘t buy anything else from him just yet. Continue right to the katta Still. Talk to Sarra, who runs the stall, and ask about everything. Don’t buy anything from her yet.
So now you’ve gone full circle, and ended up back at the beginning of this little circle. Head left again, and go through the exit next to Wolfie’s stall (don’t go up the stairs).
Start heading left, until you reach Gnome Ann’s Land Inn.
GNOME ANN’S INN
Enter the Inn - notice Rudolph and his flashing nose above the door (hee hee). Talk to Gnome Ann about everything. Now sit down at the table, and she’ll bring a meal out to you. She’s rather long- winded!
After the meal climb up the stairs, and she’ll give you a KEY to your room. Now again, climb up the stairs. Your room is the door on the right, so Unlock The Door and enter the room.
Open the chest of drawers and take the spare SHEET. Now notice that storage locker in the front of your room. You can store items in this storage locker. Hopefully you’ve already bought the MYSTIC MAGNETS from the Magic Shop - store one (and keep the other one) of the MAGNETS in the storage locker here. This means that where-ever you are, you can use the MAGNET you’re still carrying to quickly teleport back here. You’ll probably want to store other things here as well, as the game progresses. Now check the time by clicking on your portrait at the boom left - it’s probably pretty late by now. Click on the bed, and for a bit of fun, Jump On The Bed (Wheeeeee!). Now click on the bed again, Go To Sleep, and Sleep Until Morning.
The next morning, leave your room and go downstairs. Sit down at the table - Gnome Ann will bring your breakfast out to you. Talk to Ann about everything. When you’re ready, leave the Inn.
SILMARIA
Let’s do some more exploring. Head right, cross the bridge, and enter the Adventurer’s Guild. Click on the logbook next to the door - Examine Logbook, Read Logbook, and Sign Logbook. Now look at the Notice Board, and study all the Notices, just like you did with the other Notice Board at top of the stairs. Have a shot on the treadmill to improve your strength. Now walk left a little bit, so you see Toro. Toro is the Guild Master here in Silmaria. Talk to Toro about everything. It seems Elsa has also entered the Rites Of Rulership. When you’re ready, leave the Adventurer’s Guild.
Head right and go through the archway.
You’ve reached the Pier area. If Andre is here (on the boat), talk to him about everything. Andre is a fisherman, and he often leaves the pier early to go fishing, so if he’s not here, don’t worry about it.
Look at The Dead Parrot Inn. It only opens in the evening, so you won’t be able to enter it at the moment.
Walk right a little bit, and talk to Pholus at the Weapons Stall, and ask about everything. Now talk to him again and Purchase Something. Buy THROWING SPEAR - just 1 will do for now. Don’t buy anything else from him yet.
Walk right a little bit more. Now enter the Famous Adventurer’s Correspondence School (it opens at 9am), which is the building next to the barn.
The Famous Adventurer’s Correspondence School seems to be some kind of library. Have a look around - there’s a lot of interesting things to see here. Talk to the Famous Adventurer (FA) and ask about everything. Now click on the books near front of the screen, and Read A Book (it’s a book about swimming), Examine The Books, and Ask For Man’s Autograph. Now open your Inventory, select the Handbook Of Swimming, and Read it. Congratulations, you now know how to swim. Leave the Famous Adventurer’s Correspondence School for now.
Immediately enter the Famous Adventurer’s Correspondence School again. Talk to Famous Adventurer about everything. You learn about the Hippocrene water - remember that for later. The Famous Adventurer sounds he misses his glory days - poor old man. Anyway, when conversation is over, leave his building.
Go right, and go through the tall Portcullis gate.
SCIENCE ISLAND
Walk left, and continue left, until you see the Windmill contraption. Walk right up to the contraption and pull the lever to set the windmill in motion. Slightly to the right, is another (blue) control mechanism. Look at it to see that it’s a brake device for Science Island. Now interact with the lever, and Examine Lever, Pull Lever, Push Lever, Use Force On Lever - OOPS! You broke it. You need to find something to use in place of the lever. Open your Inventory, and use a THROWING SPEAR in the blue contraption. It fits perfectly! Okay, now pull the repaired lever to start the gondolas running. Time it correctly, and when a gondola pulls up at the edge of the platform, pull the brake lever again to stop it from moving. Now climb into the gondola. Now when you’re in the gondola, Cast FORCE BOLT at the brake lever to start the gondola moving again. The gondola takes you to Science Island.
As you may have guessed, Science Island is a small island dedicated to the pursuit of science. The Entrance to the Lab is a huge gear wheel, but it’s currently closed off. SAVE YOUR GAME HERE. Look at the small green screen next to the gear wheel, and you’ll see the Science Academy Quiz screen. Click on Take Test. Now you have to answer a series of questions in order to prove yourself a worthy scientist. Answer the questions as so :
WHAT IS THE PURPOSE OF SCIENCE?
2. To discover the true meaning of life.
WHAT IS THE GOAL OF THE TRUE SCIENTIST?
D. All of the above.
WHAT DOES EVERY SCIENTIST NEED?
3. A diploma.
WHAT IS A QUARK?
D. All of the above.
WHY IS SCIENCE ESSENTIAL?
1. Without science, the world would be destroyed.
You’ve answered the questions correctly, and the door to the science lab is now open to you - enter the lab.
SAVE YOUR GAME HERE. Look at the pie chart poster on the wall, and note what pizza it‘s advertising (either artichoke & anchovy, or pepperoni & jalapeno). You’ll have to make both types of pizza, but we’ll get to that later. Now notice there is another green screen next to the poster - this is the Science Aptitude Test. Click on the test, Take Test, and answer the questions like so :
MATHEMATICS: WHAT IS A HYPERBOLA?
3. A curve formed by the intersection of a cone.
PHYSICS: WHAT IS FLUID MECHANICS?
B. A branch of mechanics dealing with fluid and mechanics.
GEOMETRY: WHAT IS PI R SQUARED?
2. The surface area of the top of a pizza.
ASTRONOMY: WHAT IS “A.U.”?
C. Astronomical Unit.
BIOLOGY: WHAT IS A BACTERIUM?
3. A single cell organism.
Congratulations, you have passed the test, and you are now a qualified Lab Assistant. You are given a Password. Take note of the Password, because it changes for every game, and you’re going to need it later. Make your way round to the table, and talk to the scientist about everything (NOTE: Dr Pretorius is here from 6pm-6am, Dr Mobius is here from 6am-6pm).
There’s nothing else you can do on Science Island at the moment, so let’s head back to the main island. Now you COULD leave the lab, get on the gondola, and travel back that way. But it’s much easier and quicker to use your MYSTIC MAGNETS to teleport back to your bedroom at Gnome Ann’s Inn, so do that now.
GNOME ANN’S INN
Those MYSTIC MAGNETS are handy, aren’t they? Back in the Inn, leave your room, climb downstairs, and leave the Inn.
SILMARIA
Outside the Inn, make your way right, cross over the bridge, and continue right, and go through the arch to the pier. If it’s after 5pm, the Dead Parrot Inn will be open, so enter it.
DEAD PARROT INN
Head up stairs on the left to a private table. Talk to Ugarte about everything. Talk to Ferrari about everything. It seems that Ferrari owns this Dead Parrot Inn. Go back down the stairs to the main area of the pub.
There is a man - Arestes - dressed in red sitting at one of the tables. Notice that he only has one arm. Talk to Arestes about everything.
Now walk right to the bar. Talk to Budar about everything. Talk to Nawar about everything. Now this is where you can earn a bit of money, as well as improving your throwing skills, so SAVE YOUR GAME HERE. Talk to Nawar again and Play Wheel Of Fortune. To begin with, you can only play the ‘Catch A Colour’ variant of the game, which is to hit 3 of the same colour. SAVE your game after each successful turn (you win money), and reload your game when you don’t win. After a few successful wins, you can also play the ‘3 In A Row’ variant, which is to get 3 of the same colour lined up. Each time you win, the game will become harder, and faster. When you’ve had enough of Wheel Of Fortune, climb up stairs on the right to go to the upper-area of The Dead Parrot.
SAVE YOUR GAME HERE. When you see the ghost in this upper-area, click on it for some extra points.
Now leave The Dead Parrot Inn.
SILMARIA
Practice Casting FORCE BOLT for a while. This is a good spell for attacking enemies.
When you’ve had enough of Casting spells, use your MYSTIC MAGNETS to teleport yourself back to your bedroom at Gnome Ann’s Inn.
GNOME ANN’S INN
Lie down on your bed, and Sleep Until Morning.
Next morning, you awake much refreshed. Leave your room, head downstairs, and sit at the table. Gnome Ann will bring your breakfast for you. When you’re ready, leave the Inn.
SILMARIA
Walk right a little, and head up through the portcullis.
EXPLORING THE WILDERNESS
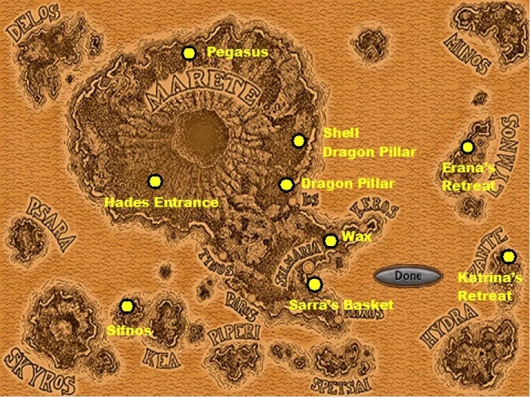
Make sure you have FORCE BOLT spell in your belt for easy access. Now SAVE YOUR GAME HERE, and head right into the wilderness. Be aware that time moves a lot faster out in the wilderness. Now if you remember, one of the notices on the Notice Board, said that the Katta Sarra has lost her basket. So let’s go an find it. It’s on a beach, south of Silmaria - keep searching until you find it.
In the Dragon Pillar North-East of Silmaria, get some WAX from the beehive. From the Dragon Pillar North of that, pick up the SHELL.
Return to Silmaria.
SILMARIA
You should have a bit more money now, so you can buy some more supplies.
Head up to the Main Square. Talk to Wolfie about everything. Now click on Wolfie again and Purchase Something. Buy some AMPHORAS from him - 20 should be enough. Also buy BALLOON PAINTING from him. Now walk right a bit more, to Sarra’s stall. Talk
to Sarra about everything - she comments on the KATTA PIN you’re wearing. Now hopefully, you have Sarra’s lost BASKET - it’s on the beach just south of Silmaria. Give her the BASKET, and she rewards you with a BEAD NECKLACE.
Enter the bank. OH NO! The bank has been robbed! Talk to Banker about everything. Now take the INTERESTING TOOLKIT from the floor - this could be valuable evidence. Now leave the bank.
Climb up stairs next to the bank. Walk right, all the way along, until you see the Spinning Hat device. This teleports you to Erasmus’s Mystical House. Stand inside the device and Cast Trigger on one of the beams supporting the Teleport Device.
ERASMUS’S MYSTICAL HOUSE
You find yourself somewhere up in the clouds. Click on the cloud face on the left. The cloud face will ask you 3 questions before he will let you pass. Answer the questions like so:
WHAT IS YOUR NAME?
Tell the cloud your name.
WHAT IS YOUR QUEST?
To save Silmaria.
WHAT IS THE MEANING OF LIFE?
Ours is not to reason why. Ours is but to do and die.
You have answered the questions correctly, so the cloud face lets you pass.
You walk through the cloud, and see a magnificent castle. Walk along the red carpet, click on the door, and Knock On The Door. The door opens, and you enter into the castle.
You find yourself floating in the room you first arrived in. Float around until you find Erasmus. Talk to Erasmus about everything. Show Erasmus the INTERESTING TOOLKIT, and he’ll see if he can find anything out about it for you. Hmmm, he sees an arm coming and going. What a strange clue. Now if you remember, Arestes from the Dead Parrot Inn had one arm missing. I wonder if he has anything to do with the bank robbery. Talk to Erasmus again and ask about everything again. There’s nothing more you can do here at the moment, so leave Erasmus’s castle.
Walk down the red carpet, and into the Teleport Device to return to Silmaria.
SILMARIA
Check the time, and when it’s after 5pm, make your way down to the Dead Parrot Inn.
DEAD PARROT INN
Notice that Arestes, the one-armed man, is leaving the Inn. Follow him.
SILMARIA
Follow Arestes left through the arch, and watch as he enters a hidden doorway under the bridge next to the Adventurer’s Guild.
Approach the door, SAVE YOUR GAME HERE, and look at the hidden door. Now Cast DETECT MAGIC on the door, TRIGGER on the door and OPEN on the door. You walkthrough the door, into the Thieves Guild.
Arestes is here in the Thieves Guild, and he’s not pleased to see you. Talk to him about everything. You convince him to turn himself in for the bank robbery, and the guards place him under arrest. Next morning, you are automatically sent to the bank.
The Banker is delighted that the thief was caught and all the money is returned. Talk to Banker about everything. When conversation is over, leave the bank.
Walk right, cross over the bridge, and enter the Magic Shop. Talk to Shakra about everything. Take a mental note of what he says about the MAGICAL STAFF. Teach Shakra the FROSTBITE spell and the AURA spell. Click on Shakra again and Purchase Something. Buy RIP spell, BOOM spell, and FASCINATION spell. Also buy some MANA PILLS from him - 30 should be enough for now. Buy MANA POTION from him - 10 is enough for now. When you’re ready, leave the Magic Shop.
Continue right to Marrak’s fruit stall, and talk to Marrak about everything. Now click on Marrak again and Buy Things. Buy 2 each of GYRO, ARTICHOKE PIZZA, PEPPERONI PIZZA, and SOKOLATAK.
Go right slightly, and enter the Apothecary. Talk to Julanar about everything. Talk to Salim about everything. Now leave the Apothecary.
Make your way to the pier. Andre should be here on his boat, so talk to him about everything. Make sure you ask him about ANCHOVIES - he gives you some.
Now make your way to Science Island, using the gondola to cross over to the island. Check the map I made, if you get lost.
SCIENCE ISLAND
You answered all the science questions last time you were here, so you can just enter the lab without answering the questions again.
SAVE YOUR GAME HERE. Now look at poster on the wall, and take note of which pizza it’s advertising - Artichoke & Anchovy or Pepperoni & Jalapeno. It’s day time, so it should be Artichoke & Anchovy. In your Inventory, select the ARTICHOKE PIZZA. Now drag the ANCHOVIES onto the pizza, and voila! One ARTICHOKE & ANCHOVY PIZZA. Walk right a little bit, and talk to Dr Pretorious about everything. Give him the ARTICHOKE & ANCHOVY PIZZA.
You can’t do anything else here for the moment, so use MYSTIC MAGNETS to teleport back to Gnome Ann’s Inn.
GNOME ANN’S INN
Leave your room and leave the Inn.
SILMARIA
Head right, and notice Arestes in the jail cell. Talk to Arestes about everything. You lean the story of how he lost his arm - poor Arestes.
Go up to the Main Square, then continue up stairs next to the bank. Walk all the way right to the Spinning Hat Teleporter. Walk into the Teleporter and Cast TRIGGER on one of the beams supporting the Teleporter.
ERASMUS’S MYSTICAL HOUSE
Walk left through the cloud face. Now walk along the red carpet, to the castle. Knock On Door and enter the castle.
Talk to Erasmus about everything. Make sure you Ask About Spells - he’ll teach you the WHIRLWIND spell.
Use MYSTIC MAGNETS to return to Gnome Ann’s Inn.
GNOME ANN’S INN
Leave your room and leave the Inn.
SILMARIA
Make sure you have FORCE BOLT spell in your belt for easy access. Now SAVE YOUR GAME HERE, and head right into the wilderness.
EXPLORING THE WILDERNESS
If you run into any monsters, attack them with FORCE BOLT if you like. But since your not really a fighter, you might prefer just to avoid them.
Make your way up to top of the map, and look for Pegasus Peaks. It’s marked by Pegasus head.
PEGASUS PEAKS
This is Pegasus’s home, and you can see her flying around here. There’s a few things you need from this area.
Walk to the far-right of this area, so you can see the Hippocrene stream. Take a drink from the Hipoocrene stream - it tastes incredible! Fill all your AMPHORAS with Hippocrene water.
Walk around, behind the tall stone mesas (pillars), so you can see the path. Follow path up & round, until you reach the edge. Cast LEVITATE to rise up to the path above you. Now follow the path up to the top. Take the PEGASUS FEATHERS. Actually take a few PEGASUS FEATHERS - it will save you coming back later.
Use your MYSTIC MAGNETS to return to Gnome Ann’s Inn.
GNOME ANN’S INN
Leave your room and leave the Inn.
SILMARIA
Make your way to Science Island, using the Gondola to get across to the island.
SCIENCE ISLAND
Wait until 6pm, then enter into the lab and SAVE YOUR GAME HERE. Look at the poster on the wall to see what pizza it’s advertising. Since it’s after 6pm, it should be Jalapeno & Pepperoni. In your Inventory, select the PEPPERONI PIZZA. Now drag the JALAPENOS onto the pizza to create JALAPENO & PEPPERONI PIZZA. Walk right a little bit, and talk to Dr Mobius about everything. Now give JALAPENO & PEPPERONI PIZZA to Dr Mobius. You’ve now given both scientist their favourite pizza, so you have free reign of the lab now. Have a look around if you want. When you’re ready, use MYSTIC MAGNETS to teleport back to Gnome Ann’s Inn.
GNOME ANN’S INN
Leave your room and leave the Inn.
SILMARIA
Outside, practice Casting some of your spells for a while. Eventually, you should aim to get each spell up to at least 400. When you’ve have enough of Casting spells, return to Gnome Ann’s Inn.
GNOME ANN’S INN
Sit down at the table so that Gnome Ann can bring a meal for you. After the meal, go up to your room.
Lie down on the bed and Sleep Until Morning.
Next morning, leave your room and sit down at the table, ready for Gnome Ann to bring your breakfast to you. After breakfast, leave the Inn.
SILMARIA
Head right to the Adventurer’s Guild, and have a shot on the treadmill to improve your strength. Check the Notice Board for any new notices. Talk to Toro about everything. Elsa is also here, so talk to Elsa about everything. Now leave the Adventurer’s Guild.
Make your way to the pier, and then right to the Famous Adventurer’s house. Enter the house and give some HIPPOCRANE WATER to Famous Adventurer, then talk to him about everything. Leave his house, and immediately return. Talk to Famous Adventurer again. He has drunk some of the HIPPOCRANE WATER, and he seems much more alive now. He gives you a scroll containing the THERMONUCLEAR spell to show his appreciation. Talk to him again about everything. Again, leave his house then return. Talk to him about everything. Now leave his house again. Outside his house, open your Inventory, click on the THERMONUCLEAR SCROLL, and read the SCROLL. You now know the THERMONUCLEAR Spell. I just hope you never have to use it.
Make your way to the Main Square.
Enter the Apothecary and talk to Julanar about everything. Talk to Salim about everything. Sell some PEGASUS FEATHERS to Salim (but keep most of them for yourself). Click on Salim again and Buy Something From Salim. Buy some STAMINA PILLS from him - 15 should be enough for now. Also buy some HEALING PILLS and POISON CURE PILLS - 15 of each should be enough for now. When you’re ready, leave the Apothecary.
Enter the Magic Shop, and talk to Shakra about everything. Talk to Shakra again, and Purchase Something. Buy some MANA PILLS from him - another 20 should do it. When you’re ready, leave the Magic Shop.
Spend the rest of the day Casting Spells - you need the practice. If necessary, buy more MANA PILLS from the Magic Shop.
When evening arrives, make your way to the Dead Parrot Inn.
DEAD PARROT INN
Walk up stairs on the left, to the Private Seating area. Talk to Ugarte about everything. Now walk down to the bar. Notice that Arestes isn’t sitting at his usual table.
SAVE YOUR GAME HERE. Talk to Nawar, and play Wheel Of Fortune for a while, to get some more money. When you’ve had enough of playing, leave the Inn.
SILMARIA
Return to Gnome Ann’s Inn.
GNOME ANN’S INN
Sit down at the table, and Gnome Ann will bring a meal for you. After the meal, go up to your room.
Lie down on the bed and Sleep Until Morning.
Next morning, leave your room, sit down at the table, and enjoy your breakfast. When you’re ready, leave the Inn.
SILMARIA
Head along to the Adventurer’s Guild. Toro is here, along with Magmum Opus. Toro clearly doesn’t like Magmum very much. Talk to Toro about everything. Talk to Magnum Opus about everything. Now leave the Adventurer’s Guild.
You should have a decent amount of money at this point. Make your way to Silmaria Bank in the Main Square. SAVE YOUR GAME HERE. Talk to the Banker about everything. Now click on the Banker again, and Make A Transaction, then Deposit 1000 DRACHMAS into your back account. Finally, Enter The King’s Rite.
The Rites Of Rulership finally has enough contestants. Again, talk to the Banker about everything. When you’re ready, leave the bank.
Make your way up to the Hall Of Kings, and enter it. Logos announces The Rites Of Rulership has now begun, and each of the 5 contenders - You, Magmum Opus, Elsa Von Spielburg, Gort (Dr Mobius’s creation), and Kokeeno Pookameeso introduce themselves. The first Rite is the Rite Of Freedom.
******************************************************************
1. RITE OF FREEDOM
******************************************************************
SILMARIA
Five villages have been over-run by mercenaries, and each of those villages must be freed. By process of elimination, you are assigned to free the village of Naxos. You must also bring back the SIGIL of the village, to prove that the mercenaries are gone. Although you have been assigned the village of Naxos, you get extra points if you free the other villages as well. After the opening ceremony, you are escorted out of the Hall Of Kings.
As eager as you are to get started on your mission, don’t rush into it yet. It’s best to start this mission early-morning, so you have a full day to complete it.
For now, go right, all the way along, until you see Rakeesh. Talk to Rakeesh about everything.
Walk left to the Notice Board, and look at the Notice Board for new notices. Now head down the stairs, into the Main Square.
Talk to Sarra the Katta about everything. Talk to Wolfie about everything. Go into the Magic Shop and talk to Shakra about everything. Talk to Marrak at his Fruit Stall about everything.
Go into the Apothecary. Click on Salim and Buy Something From Salim. Now buy 15 each of STAMINA PILLS, POISON CURE PILLS, and HEALING PILLS. Now leave the Apothecary.
Explore Silmaria until evening. When it’s 5pm, go along to the Dead Parrot Inn. Go up stairs on the left, to the private seating area. Talk to Ugarte about everything. Talk to Ferrari about everything. Now leave the Dead Parrot Inn.
Practise Casting spells for a while. When you’ve had enough, use your MYSTIC MAGNETS to teleport yourself to Gnome Ann’s Inn.
GNOME ANN’S INN
Lie down on the bed and Sleep Until Morning.
Next morning, leave your room, climb downstairs, and sit at the table for your breakfast. When you’re ready, leave the Inn.
Head along to the pier, and talk to Andre about everything.
Make your way to the portcullis next to Gnome Ann’s Inn, and head up through it. Make sure you have the CALM spell and the HIDE spell in your belt, for easy access. Now SAVE YOUR GAME HERE.
EXPLORING THE WILDERNESS
Time to get started on the first Rite. The following villages can be tackled in any order, but make sure you tackle Naxos (your assigned village) last.
KEROS
SAVE YOUR GAME HERE. Cast CALM and then Cast HIDE. Now run right over the bridge until you see a house with a red roof. Touch the door of this house and Force The Door Open. Inside the house, Cast CALM. Now there is a chest in the lower-right corner. Open the chest, and take all the goodies, including SIGIL OF KEROS and MAGIC AXE. Now leave the house. Since you have the SIGIL, all the mercenaries have fled, and the village is free.
IOS
SAVE YOUR GAME HERE. Cast CALM and then Cast HIDE. Run left to the house at the very left edge. Touch the door and Force The Door open. Inside the house, Cast CALM. Now there is a chest in the left corner. Open the chest and take all the goodies, including SIGIL OF IOS and AMULET OF ATTACK. Now leave the house. Since you have the SIGIL, all the mercenaries have fled, and the village is free.
PAROS
SAVE YOUR GAME HERE. Cast CALM and then Cast HIDE. Run left over the bridge, climb up the ladder, and enter the house. Inside the house, Cast CALM. Notice that door on the left, inside the house - click on that door and Force The Door Open. In the next room, Cast CALM. Now there is a chest on the left. Open the chest and take all the goodies, including SIGIL OF PAROS and AMULET OF DEFENCE. Now leave the house. Since you have the SIGIL, all the mercenaries have fled, and the village is free.
TINOS
SAVE YOUR GAME HERE. Cast CALM and then Cast HIDE. Run left, up the stairs, and go to the house with the red roof. Click on the door and Force The Door Open. Inside the house, Cast CALM. Now there is a chest in the left corner. Open the chest and take all the goodies, including SIGIL OF TINOS and MAGIC LEATHER ARMOUR. Since you have the SIGIL, all the mercenaries have fled, and the village is free. I recommend you equip yourself with this MAGIC LEATHER ARMOUR, instead of the CHAINMAIL ARMOUR, as it is lighter, and gives you more agility.
NAXOS
SAVE YOUR GAME HERE. Cast CALM and then Cast HIDE. Run left, up the stairs to the house with the red roof. Click on the door and Force The Door Open. Inside the house, Cast CALM. Now there is a chest in left corner. Open the chest and take all the goodies, including SIGIL OF NAXOS and ATLAS ARMBAND. Since you have the SIGIL, all the mercenaries have fled, and the village is free.
Well you’ve successfully freed all 5 villages. Congratulations! But DON’T rush back to Silmaria just yet. SAVE YOUR GAME HERE. Leave Naxos and head back out into the Wilderness.
EXPLORING THE WILDERNESS
Go to the Dragon Pillar to the left of Silmaria. Cast CALM and then Cast HIDE. There is someone lying face down in the ground - oh no! It’s Kokeeno! Someone’s killed him in cold blood! R.I.P. Kokeeno. Also look at the broken Dragon Pillar. This can’t be good!
Return to Silmaria now.
SILMARIA
The guard door is right next to the portcullis, so Knock At The Door to tell the guard about Kokeeno.
Now I know you’re excited about completing your first mission, but it’s very late now, you’re tired, you’re hungry, and you’re extremely overloaded. Head left, and go back to Gnome Ann’s Inn.
GNOME ANN’S INN
Sit down at the table, and Ann will bring a meal out for you. After the meal, go up to your room.
Lie down in the bed and Sleep Until Morning.
Next morning, leave your room and go back downstairs. Sit at the table so Gnome Ann can bring your breakfast. After breakfast, leave the Inn.
SILMARIA
You’re still very overloaded from all the goodies you acquired in yesterday’s mission. Okay, let’s deal with that.
Head right, and make your way to Pholus’s Weapons Stall. Talk to Pholus about everything. Click on Pholus again and Sell Something to him. Now Sell him any excess SHIELDS, CHAINMAIL ARMOUR, and ARROWS.
Make your way to the Apothecary, and enter it. Talk to Julanar and Tell About Andre. Talk to Salim and Buy Something From Salim. You’ve got plenty of money, so buy 20 each of STAMINA PILLS, POISON CURE PILLS and HEALING PILLS. Now leave the Apothecary.
Head down to the pier, and talk to Andre the fisherman. He’s extremely grateful that you spoke to Julanar on his behalf, so that now he can become a healer. Talk to him about everything.
Climb up stairs next to the bank. Check the Notice Board and read the new notices. SAVE YOUR GAME HERE.
Go to the Hall Of Kings. Give one of the SIGILS (it doesn’t matter which one) to the guards at the gate.
Logos declares the Rite Of Freedom ended, with you, Hero, as the winner. It is with great sorrow that Logos also announced the news of Kokeeno’s murder.
You are given a chance to rest, before the next Rite starts.
******************************************************************
2. RITE OF CONQUEST
******************************************************************
SILMARIA
After some rest, you return to the Hall Of Kings. Logos announces the next Rite - The Rite Of Conquest. This mission requires you to seek out the ruthless Warlord, General Claudius, who has a fortress hidden on one of the islands surrounding Marete, and make sure he is no longer a threat to Silmaria. You’ll need to bring back his SHIELD as proof.
After you are escorted from the Hall Of Kings, head all the way right, until you see Rakeesh. Talk to Rakeesh about everything.
Just as before, don’t rush into it. Prepare yourself first.
Go left to the Notice Board, look at the Notice Board, and read all the new notices. Now head down the stairs into the Main Square.
Continue down to Pholus’s Weapons Stall and talk to Pholus about everything.
Walk along to the Adventurer’s Guild and enter it. Look on the Notice Board and read the new notice. Talk to Toro about everything. Talk to Elsa about everything. Now leave the Adventurer’s Guild.
After 5pm, go to the Dead Parrot Inn.
DEAD PARROT INN
Go up stairs on the left, to the private seating area. Talk to Ugarte about everything. Ugarte mentions wanting payment for information, but DON’T pay him anything yet. Now leave the Dead Parrot Inn.
SILMARIA
SAVE YOUR GAME HERE. Make your way left, back towards Gnome Ann’s Inn. As you cross the bridge next to the Adventurer’s Guild, Ugarte sneaks out from the shadows and talks to you (he was in the Dead Parrot Inn a moment ago - how did he get here before you?). Talk to him about everything. He tells you that the Assassin is following him, and he doesn’t feel safe. Just as you Say Goodbye to Ugarte, the Assassin teleports in, throws a poisoned dagger at Ugarte, then teleports out again. Poor Ugarte is in terrible pain! QUICKLY give a POISON CURE PILL to Ugarte. A guardsman comes to help, and says that his men are searching for the Assassin. You are summoned to the Hall Of Kings, where Logos tells you that Ugarte is unconscious, but he will live, thanks to your quick actions. However, they can’t identify the poison that the Assassin used. Talk to Logos about everything. When conversation is over, you will be escorted from the Hall Of Kings.
Head right and talk to Rakeesh about everything. When conversation is over, return to Gnome Ann’s Inn.
GNOME ANN’S INN
Sit down at the table and Ann will bring a meal for you. Now climb the stairs up to your room.
Lie down in the bed and Sleep Until Morning. When morning comes, leave your room again.
Sit down at the table so that Ann can bring your breakfast. Now leave the Inn.
SILMARIA
Make your way to the Apothecary in the Main Square. Talk to Salim about everything. Talk to Julanar about everything. Now leave the Apothecary.
Head down to the pier, and talk to Andre the fisherman about everything. SAVE YOUR GAME HERE. Now talk to Andre again and Rent Boat. Andre tells you that the fortress is rumoured to be near the island of Sifnos. Guide the boat to the south-west area of the map. Andre will tell you when you are near - he’ll wait until it’s dark, then drop you off, and then he’ll leave.
ISLAND OF SIFNOS
SAVE YOUR GAME HERE. There are 6 mercenaries guarding the area. Defeat each of the mercenaries by Casting FORCE BOLT at them. Search the bodies for any goodies.
Climb up the stairs into the fortress. There’s more mercenaries in here. Cast FORCE BOLT on them until most of them are defeated. Look at the pile of SPEARS on the cart, and take several SPEARS. When you’ve taken out some of the mercenaries, run forward to the next section, and a centaur Wizard will teleport in one of the upper areas. Don’t bother chasing him - he’ll just teleport himself to safety.
Quickly Cast REVERSAL and Cast PROTECTION to protect yourself from the Wizard’s spells. Now repeatedly throw SPEARS at the centaur Wizard, until he’s dead. Alternatively, you could Cast FROSTBITE at the centaur Wizard, but that is much harder and VERY frustrating. When you defeat the centaur Wizard, search his body and take AUGMANTATION SCROLL.
General Claudius will show up now. Cast FORCE BOLT on the General - remember to search his body afterwards, and take GENERAL’S SHIELD. Now without their leader, all the remaining mercenaries flee in terror.
In your Inventory, select the AUGMENTATION SCROLL, and Read It. You know now that spell.
Use your MYSTIC MAGNETS to teleport back to Gnome Ann’s Inn.
GNOME ANN’S INN
Well, that was an exhausting day. But now it’s very late, and you’re tired. Lie down on the bed and sleep until morning.
When morning comes, leave your room, go downstairs, and sit at the table so that Gnome Ann can bring your breakfast. Now leave the Inn.
SILMARIA
You’re really overloaded again. Make your way along to Pholus’s Weapons Stall, and sell him any excess SHIELDS and SWORDS you picked up from General Claudius’s island.
Head up to the Apothecary in the Main Square, and stock up on HEALING PILLS, STAMINA PILLS, and POISON CURE PILLS - 15 of each should be enough. Leave the Apothecary.
Go to the Magic Shop. Talk to Shakra and Purchase Something. Buy MANA POTION from him - 30 should be enough for now. Leave the Magic Shop.
Make your way up to the Hall Of Kings and give GENERAL’S SHIELD to the guards at the gate.
Logos declares the Rite Of Conquest ended, with you, Hero, as the winner. Logos also announces that Magnum Opus was found dead next to another broken Dragon Pillar. Another tragic death. Magnum may have been arrogant and conceited, but he didn’t deserve to be murdered.
You are given a chance to rest, before the next Rite starts.
******************************************************************
3. RITE OF VALOUR
******************************************************************
SILMARIA
After some rest, you return to the Hall Of Kings. Logos announces the next Rite - The Rite Of Valour. In this mission, you must defeat the Hydra beast on Hydra Island, and return to Silmaria with the HYDRA TEETH.
After you are escorted from the Hall Of Kings, you find yourself discussing the situation with Rakeesh. Talk to him about everything. Unfortunately, the Assassin strikes again - this time at Rakeesh. Give POISON CURE PILL to Rakeesh. The guards come to help. You return to the Hall Of Kings, and an angry Logos urges you to find the Assassin. First, however, you still have to deal with the Hydra beast.
After you are escorted from the Hall Of Kings, walk left a little bit to the Notice Board. Look at the Notice Board and read all the new notices. Now head down stairs to the Main Square.
Go to Wolfie’s stall, talk to Wolfie, and Purchase Something. Buy some AMPHORAS from him - 10 should be enough.
Go to the Magic Shop and talk to Shakra about everything. Talk to Shakra again and Purchase Something. Buy 10 MANA POTIONS and 30 MANA PILLS from him. When conversation is over, leave the Magic Shop.
Go to the Apothecary. Talk to Julanar about everything. Talk to Salim about everything. Thanks to your quick thinking, Rakeesh will survive. However, he is in a deep coma, and Salim & Julanar can‘t find a cure for him. Now leave the Apothecary.
Make your way left to the Adventurer’s Guild, and enter it. Look at the Notice Board and read the new notices. Read the Log Book again, until you see the entry about Icarus and Deadalus. Talk to Toro about everything. When you’re ready, leave the Adventurer’s Guild.
Go down to the pier area. Go to Pholus’s Weapons Stall and talk to Pholus about everything.
Continue right to the Famous Adventurer, and enter his library. Talk to Famous Adventurer about everything. He tells you a poem about the Ocean Queen - remember this poem for later. When you’re ready, leave the Famous Adventurer.
GNOME ANN’S INN
Return to Gnome Ann’s Inn, and talk to Ann about everything. Hmmm, it seems she owes money to Ferrari, and she can‘t afford to pay him back. Oh dear! Leave the Inn for now.
DEAD PARROT INN
Check the time, and when it’s 5pm, walk along to the Dead Parrot Inn. Enter the Inn, and go up stairs to the left, to the private seating area. Talk to Ferrari about everything - he agrees to trade you the DEED for Gnome Ann’s Inn, for something of equal value. You don’t have anything like that at the moment, so leave the Inn for now.
GNOME ANN’S INN
Return to Gnome Ann’s Inn. Talk to Ann and tell her what Ferrari said. Leave the Inn again.
SILMARIA
Practise Casting spells for the rest of the evening. When you’ve had enough of spell-casting, return to Gnome Ann’s Inn.
GNOME ANN’S INN
Head up to your room.
Lie down on the bed and Sleep Until Morning. When morning comes, leave your room.
Sit down at the table, so that Ann can bring your breakfast. When you’re ready, leave the Inn.
SILMARIA
Now you need to travel to Hydra Island. The boats don’t go that far out, so you need to find another way.
I’ll save you some time, and tell you now that you’re going to need some PEGASUS FEATHERS. If you don’t have any left, return to Pegasus Peaks at top of the map to get some.
When you’re ready, head right, and make your way over to Science Island, using the Gondola to get across to the Island.
SCIENCE ISLAND
Enter the Lab, and SAVE YOUR GAME HERE. Talk to whichever scientist is there about everything. Now look behind the scientist - notice the wing-frame on the wall? You can soon transform the frame into functioning wings. Use BEESWAX on the wing-frame to make it sticky, then attach PEGUSES FEATHERS. Now pick up the newly restored WINGS. You automatically take the WINGS outside, and fly like Icarus. This is your way to Hydra Island.
Well… you fly like Icarus, but you also crash like Icarus.
HYDRA ISLAND
Luckily, you landed in Hydra Island. Click on the Hydra icon to go to the Hydra beast, and SAVE YOUR GAME HERE.
As soon as you arrive in the Hydra beast area, look at that eerie green GOO on the tree. Use an empty AMPHORA to collect some of the GOO. Make sure you do this before dealing with the Hydra beast.
Make sure you have FLAME DART in your belt, for quick access.
Now run along the upper-path and start attacking the Hydra head nearest you. In a few seconds, Elsa will show up, offering to help. Say YES to Elsa’s help. Talk to her about everything. When she asks which you prefer to do, choose Torch The Hydra. She’ll start attacking the Hydra with her sword. Now you go down to the lower-path, and when Elsa successfully chops a Hydra head off, burn the dragon’s neck with FLAME DART to prevent the head from growing back. Make sure you are near the neck, for this to be successful. Repeat this for all 3 Hydra heads. Together, you and Elsa slay the Hydra beast.
Talk with Elsa about everything. Click on the dead Hydra beast and take HYDRA SCALE and HYDRA TEETH. Elsa asks what her reward is for her part in defeating the Hydra beast. Do the right thing - give her the HYDRA TEETH so that she can claim victory to this Rite.
Enter the cave behind the Hydra beast. Elsa finds a magical bow, and then leaves to return to Silmaria. You should search the cave further. Take DRACHMAS on the ground near the entrance. Take MAGIC HELM from the ground. Now SAVE YOUR GAME HERE. Look at the chest on the left - it‘s booby-trapped. From a distance, Cast TRIGGER on the chest to set off the trap. Next, Cast OPEN on the chest. Take all the goodies from the chest, including DRACHMAS and SHRINK SPELL SCROLL. In your Inventory, select the SHRINK SPELL SCROLL, and read it to learn the SHRINK SPELL. There’s nothing more you can do here, so use your MYSTIC MAGNETS to teleport back to Gnome Ann’s Inn.
GNOME ANN’S INN
Leave your room and leave the Inn.
SILMARIA
Go up to the Main Square, then continue up stairs next to the bank.
Look at Notice Board at top of the stairs, and read the new notice. Oh No! Erasmus is sick!
Walk all the way right to the Spinning Hat Teleporter. Walk into the Teleporter and Cast TRIGGER on one of the beams supporting the Teleporter.
ERASMUS’S MYSTICAL HOUSE
Walk left through the cloud face. Now walk along the red carpet, to the castle. Knock On Door and enter the castle.
Fenris is alone here, and he’s understandably worried about Erasmus. Talk to Fenris about everything. It seemed Erasmus was drugged by some mysterious chocolates he thought were from you. Fenris shows you the CHOCOLATE BOX Erasmus ate from - take the CHOCOLATE BOX, but DON‘T eat the chocolates.
You can’t do anything else here, so use MYSTIC MAGNETS to return to Gnome Ann’s Inn.
GNOME ANN’S INN
Leave your room and leave the Inn.
SILMARIA
Practise Casting spells for a while. Mid-evening, return to Gnome Ann’s Inn.
GNOME ANN’S INN
Sit down at the table and Gnome Ann will bring a meal for you. Now head up to your room.
Lie on the bed and Sleep Until Morning. You are woken the next morning by someone banging at your door - you are summoned to the Hall Of Kings.
SILMARIA
Elsa has presented the HYDRA TEETH, and Logos declares her the winner of this Rite. Elsa tells about your part in defeating the Hydra beast. She has shown honour in doing this, so the victory is still rightfully hers.
You are given a chance to rest, before the next Rite starts.
******************************************************************
4. RITE OF DESTINY
******************************************************************
SILMARIA
After some rest, you return to the Hall Of Kings. Logos announces the next Rite - The Rite Of Destiny. You must travel to the Island Of Delos, seek out the Sybil to learn your destiny. You must return with proof that you have spoken to the Oracle.
After you are escorted from the Hall Of Kings, look at the Notice Board and read all the new notices. Now head downstairs to the Main Square.
Go to Wolfie’s stall and talk to Wolfie about everything. If you have not already done so, buy BALLOON PAINTING from Wolfie.
Go to the bank, enter the bank, and talk to the Banker. Make A Transaction, and deposit roughly 2000 into your account, making sure you still have enough money to buy supplies. Now leave the bank.
Go to the Magic Shop and enter it. Talk to Shakra about everything. He tells you that Delos is too far to get there by boat or wings, so you’ll need to find another way. Leave the Magic Shop.
Talk to Marrak at the Fruit Stall. Show him the BALLOON PAINTING. You explain to him that you’re trying to make a HOT AIR BALLOON, and that you need a BRAZIER to use as a heat source for the BALLOON. He agrees to sell you his spare BRAZIER.
Go to the Apothecary. Salim and Julanar tell you that something has happened to Erasmus - he’s been drugged, and no-one can wake him. Give the drugged CHOCOLATE BOX to Salim. He’s glad to have this, so he can start making an antidote to the drug. Talk to Julanar about everything. When you say Goodbye to her, she gives you some MAGIC SEEDS. Talk to Salim about everything. Give the HYDRA SCALES you got from the last Rite, to Salim. Now leave the Apothecary.
Make your way to the Famous Adventure’s place. Talk to Famous Adventurer about everything, and take a mental note of the poem he tells you. When you’re ready, leave Famous Adventurer.
Head along to the Adventurer’s Guild. Look at Notice Board and read the new notices. Talk to Toro about everything. Talk to Elsa about everything. Leave the Adventurer’s Guild.
Return to Gnome Ann’s Inn.
GNOME ANN’S INN
Show BALLOON PAINTING to Gnome Ann, then give her the spare SHEET you got from your bedroom. She agrees to sew it into a balloon-shape, and tells you it will be ready tomorrow. Now talk to Ann, and Tell About Wolfie. If Wolfie could paint her Inn, it would be more appealing to potential customers. Give MAGIC SEEDS to Gnome Ann, and tell her they are fast-growing SEEDS. Now leave the Inn.
SILMARIA
Do what you like for the rest of the day. When it’s evening, return to Gnome Ann’s Inn.
GNOME ANN’S INN
Sit down at the table, and Gnome Ann will bring a meal out for you. Now go on up to your room.
Lie down in the bed and Sleep Until Morning. The next morning, leave your room and go back downstairs.
Gnome Ann gives you back the SEWN SHEET you gave her yesterday. Sit down at the table and Gnome Ann will bring your breakfast. Now leave the Inn.
SILMARIA
Make sure you have at least 7 AMPHORAS of HIPPOCRENE WATER. If you don’t, buy some more AMPHORAS from Wolfie, then head up to Pegasus Peaks at top of the map to fill them with HIPPOCRENE WATER.
Make your way to Science Island, using the Gondola to get across to the island.
SCIENCE ISLAND
Enter the lab and talk to whichever scientist is there about everything. Now go up the lift to the First Floor, where Gort is, then head out through the Exit which is slightly to the left.
You’re outside, on a crane platform. SAVE YOUR GAME HERE. There is a gondola below you that you have to get out of the water - this is the base for your hot air balloon. Look at the nearby monitor, and change the settings as so:
Crane Extension - 100
Crane Rotation - 55
Claw Position - Closed
RUN
The crane picks up the gondola and places it on the platform beside you. Use SEWN SHEET, ROPE, GOO, BRAZIER, and TINDERBOX on the gondola. SUCCESS! Your hot air balloon is flying!
Guide your HOT AIR BALLOON North-West, until you reach Delos.
DELOS
Once you reach Delos, simply click on the HOT AIR BALLOON to land. There are 2 icons on this island. Click on the lower icon to visit the Dryads. Give some HIPPOCRENE WATER to each of the 7 Dryads. Wait a few moments, and they’ll sing to you. You get so caught up in the moment, you start dancing! When the song is over, watch as some MAGIC WOOD is created by the Dryads. Wait a minute… didn’t Shakra say you needed MAGIC WOOD to create a MAGIC STAFF? Walk left, and take the MAGIC WOOD. Now leave the Dryads.
Now go to the top icon to see the Sybil. SAVE YOUR GAME HERE. A stone statue of the Sibyl stands in her temple. Walk right to the pool, and see the BLACK LOTUS floating in the pool. There is a toppled pillar in front of the pool. Click on the pillar to read the inscription - this is very important, otherwise you won’t be able to complete the next Rite. Now take BLACK LOTUS from the pool, then throw a DRACHMA into the pool. This wakes up the Sibyl, and she tells you your destiny. Sounds kinda scary! Anyway, she leaves a PROOF OF DESTINY disc on the floor - take it. Now leave the Sibyl.
Now you have to return to Silmaria, but DON’T use the MYSTIC MAGNETS this time. Click on the HOT AIR BALLOON, and fly South-East back to Silmaria.
SILMARIA
It’s probably pretty late by now, so return to Gnome Ann’s Inn.
GNOME ANN’S INN
Head up to your room, lie on the bed, and Sleep Until Morning. The next morning, leave your room and head back downstairs.
As soon as you leave your room… WOW! What a difference! The place has been painted, and it’s nice and bright and colourful! Wolfie is sitting here - talk to him about everything. Talk to Gnome Ann about everything. Now sit down at the table, and she’ll bring your breakfast for you. When you’re ready, leave the Inn.
SILMARIA
Head up to the Main Square. Wolfie’s back in his stall, so talk to him about everything.
Go along to the Magic Shop. Talk to Shakra about everything. Now give MAGIC WOOD to Shakra, and watch as you and he create the MAGIC STAFF. Notice how your Mana Bar has now changed to a Staff Bar. Nice work! Now leave the Magic Shop.
Go along to the Apothecary. Talk to Julanar about everything and talk to Salim about everything. Give the BLACK LOTUS to Salim - he’ll be able to use this to make an antidote to the Assassin’s poison. Leave the Apothecary.
Make your way up to the Hall Of Kings and give PROOF OF DESTINY to the guards at the gate.
Logos declares the Rite Of Destiny ended, with you, Hero, as the winner.
You are given a chance to rest, before the next Rite starts.
******************************************************************
5. RITE OF COURAGE
******************************************************************
SILMARIA
After some rest, you return to the Hall Of Kings. Logos announces the next Rite - The Rite Of Courage. You must enter Hades, face the Guardian Cerberus, and return with WATER FROM THE RIVER STYX. This will prove your courage.
After you are escorted from the Hall Of Kings, look at the Notice Board and read all the new notices. Now head downstairs to the Main Square.
Talk to Wolfie about everything.
Make your way back to Gnome Ann’s Inn.
GNOME ANN’S INN
Talk to Gnome Ann. She starts complaining about your girlfriend. Wait… GIRLFRIEND? What girlfriend? Head on up to your room.
There’s a big CHOCOLATE BOX on the chair for you. Why would anyone leave chocolate for you? Pick up the CHOCOLATE BOX, but whatever you do, DON’T eat it. Now leave your room and leave the Inn.
SILMARIA
Head down to Pholus’s Weapons Stall and talk to Pholus about everything.
Continue along to the Famous Adventurer’s place. Talk to him about everything - he gives you a hint as to how to get into Hades. Now leave the Famous Adventurer.
Make your way up to Wolfie’s stall, and talk to him about everything. Now talk to him again and Purchase Something. Buy 2 empty AMPHORAS from him - you’re going to need them when you’re in Hades.
Go to the Magic Shop. This will be your last chance to enter this shop, so as a Magic User, you should stock up now. Buy 50 MANA POTIONS and 50 MANA PILLS. Now leave the Magic Shop.
Go right to Marrak’s Fruit Stall. Talk to Marrak, and Buy Things from him. Buy GYRO, PEPPERONI PIZZA, ARTICHOKE PIZZA, and SOKOLATAK.
Do what you like for the rest of the day, but keep an eye on the time. When it’s evening, return to Gnome Ann’s Inn.
GNOME ANN’S INN
Sit down at the table and Ann will bring a meal for you. Now climb up the stairs to your room.
Lie down in the bed and Sleep Until Morning. Next morning, leave your room and go back downstairs.
Sit down at the table so that Ann can bring your breakfast. Now leave the Inn.
SILMARIA
Make your way up to the Apothecary. Salim tells you that thanks to the BLACK LOTUS you gave him, he was able to find an antidote for the Assassin’s Poison. He replaces your old POISON CURE PILLS with his new POISON CURE PILLS. Talk to Julanar about everything. Talk to Salim about everything. Give the CHOCOLATE BOX from your room to Salim, and he‘ll agree to see what he can find out about them. Now buy 30 each of POISON CURE PILLS (yes, as well as the ones you already have), STAMINA PILLS, and HEALING PILLS. When you’re ready, leave the Apothecary.
Head back towards Gnome Ann’s Inn, but don’t enter it. Instead, go through the portcullis gate. SAVE YOUR GAME HERE, then head out into the Wilderness.
WILDERNESS
Head North-West, and go to the Dragon Pillar Icon that has a skull (a little bit past Tinos). This is the Gateway to Hades.
GATEWAY TO HADES
Look at the dead guard next to the broken Dragon Pillar. Because he was killed so violently, his blood is tainting the water here. Use an AMPHORA to get some of the tainted water. Now follow the stream left, until it enters the mountain. Use your AMPHORA WITH TAINTED WATER in the stream here, and you’ll recite a verse. If you haven’t read the verse in the Oracle’s Temple at Delos, this won’t work. When you recite the verse, you’ll hear a crash of thunder, and the Gates to Hades will be revealed. SAVE YOUR GAME HERE, then try to enter Hades. As you approach the Gates, the Guardian Cerberus will appear. Wow, he is big! And he’s mean!! And he won’t let you into Hades!!! Talk to Cerberus about everything. Each of the 3 heads asks for a bribe - give them GYRO, PEPPERONI PIZZA, and BOX OF CHOCOLATE. He’ll let you in now. Place your AURA spell in your belt for quick access, then enter through the gates into Hades.
HADES
As soon as you enter Hades, Cast AURA (so your life energy isn‘t drained away), then SAVE YOUR GAME HERE. When the AURA spell runs out, Cast it again, as many times as necessary while you are in Hades. Now you‘re not a fighter, so avoid all the skeletons and other monsters as much as possible. Run right, and continue right, until you reach a dead-end, with a path far below you. Cast LEVITATE to float down, then run through the arch on the right.
Run left through the giant dragon’s skeleton, and exit through it’s mouth into the next area.
SAVE YOUR GAME HERE. This is where you’ll find the River Hades. Run right down the bottom of the screen, and use an AMPHORA on the edge of the whirlpool to collect LETHE WATER. Continue right until the path ends (the path is hard to see, but it‘s there), and use an AMPHORA on the river to collect STYX WATER.
Now you have both WATERS, retrace your steps, so you’re on the far side of the River Hades. Now run right again until you see the Hall Of Hades.
Make sure your Health and Stamina are at maximum, and SAVE YOUR GAME HERE. Enter into the Hall Of Hades. The Guardian Of The Dead stops you from entering, and tells you about two souls in pain that are connected to you - the good fairy Erana, and the dark Vampire Katrina. He gives you the chance to end the suffering of one of them by restoring her to life (or you can choose to save neither, but I don’t recommend that). Unfortunately, you can only save one - the other soul will be condemned to oblivion! After you choose, you are told there is a price - give your life for hers. Choose to Pay The Price. You will be killed. But you will be brought back to life, but with only half of your Health and Stamina. Now, time to get out of here. Run left, and continue left, until you reach the mouth of the giant dragon skeleton again.
Run right through the dragon skeleton, until you see the archway. Run through the archway.
Run right until you see another archway - this is the Main Entrance, so run through it.
GATEWAY TO HADES
You’ve escaped from Hades. The gate closes behind you, leaving no trace of it ever being there.
Leave the area and go back out to the Wilderness.
WILDERNESS
Start heading back towards Silmaria, but don’t enter Silmaria. Your Hot Air Balloon should be parked nearby. Click on it to enter, and start flying. Now, where you go next depends on who you saved in Hades.
- SAVED ERANA
If you saved Erana, fly North-East towards Lymnos. When you reach
Lymnos, simply click on the Hot Air Balloon to land it. Click on the
Erana’s Retreat Icon to enter that area. Walk left a little bit, and
Erana will appear. Talk to her about everything. Make sure to Ask
About Magic, and she teaches you the FIRST AID spell. Walk left a
little bit more, so you see the Fountain. Click on the Fountain, and
Drink From The Fountain to replenish your energy. Now leave
Erana’s Retreat, and head back into the Wilderness.
- SAVED KATRINA
If you saved Katrina, fly East towards Zante. When you reach Zante,
simply click on the Hot Air Balloon to land it. Click on the Katrina’s
Retreat Icon to enter that area. Walk left a little bit, click on the
door, and Knock On The Door. Katrina will appear, and she‘s been
restored to human - not Vampire. Talk to her about everything.
Make sure to Ask About Magic, and she teaches you the DRAGON
FIRE spell. Now leave Katrina’s Retreat, and head back into the
Wilderness.
WILDERNESS
Click on the Hot Air Balloon to start flying, and fly back to Silmaria. Land the Balloon near Silmaria, then click on Silmaria to enter the town again.
SILMARIA
Check the time - it’s probably really late now, so use MYSTIC MAGNETS to return to your room at Gnome Ann’s Inn.
GNOME ANN’S INN
Lie down on the bed and Sleep Until Morning. When morning arrives, leave your room.
Head downstairs and sit at the table so that Gnome Ann can bring your breakfast. After breakfast, leave the Inn.
SILMARIA
Make your way up to the Apothecary in the Main Square. Talk to Julanar about everything. Talk to Salim about everything. You learn that the BOX OF CHOCOLATES you gave to Salim contained a very strange drug he’d never seen before, and it left victims in a state of ‘Restless Sleep’. Give the LETHE WATER to Salim, so he can start working on a cure for Erasmus and Shakra. Now leave the Apothecary.
Head up to the Hall Of Kings and give STYX WATER to the guards at the gate.
Logos declares the Rite Of Courage ended, with you, Hero, as the winner.
You are given a chance to rest, before the next Rite starts.
******************************************************************
6. RITE OF PEACE
******************************************************************
SILMARIA
After some rest, you return to the Hall Of Kings. Logos announces the next Rite - The Rite Of Courage. This next mission concerns the nation of Atlantis - the underwater city. Tritons from Atlantis have been attacking Silmaria’s ships. You must visit the queen in Atlantis and forge a Peace Treaty with them, then bring back proof of this new alliance.
After you are escorted from the Hall Of Kings, look at the Notice Board and read all the new notices.
Make your way down to the pier area, and talk to Pholus in his Weapons Stall about everything.
Continue right to the Famous Adventurer’s house and talk to him about everything. He has some good information for you. When conversation is over, leave the Famous Adventurer.
Head back towards Gnome Ann’s Inn, but don’t enter the Inn. Instead, go through the portcullis gate next to the Inn.
SAVE YOUR GAME HERE. Now head out into the Wilderness.
WILDERNESS
Your Hot Air Balloon should be nearby. Click on it to start flying. Your destination depends on who you saved in Hades.
- SAVED ERANA
If you saved Erana, fly North-East towards Lymnos. When you reach
Lymnos, simply click on the Hot Air Balloon to land it. Click on the
Erana’s Retreat Icon to enter that area. Erana greets you to her new
home, and thanks you for freeing her from Hades. Talk to Erana
about everything. She gives you an AMULET OF WATER-
BREATHING to aid in your quest in Atlantis. Now leave Erana’s
Retreat, and head back into the Wilderness.
- SAVED KATRINA
If you saved Katrina, fly East towards Zante. When you reach Zante,
simply click on the Hot Air Balloon to land it. Click on the Katrina’s
Retreat Icon to enter that area. Katrina is here, waiting for you. Talk
to Katrina about everything. She gives you an AMULET OF WATER-
BREATHING to aid in your quest in Atlantis. Now leave Katrina’s
Retreat, and head back into the Wilderness.
WILDERNESS
Click on the Hot Air Balloon to start flying, and fly back to Silmaria. Land the Balloon near Silmaria, then click on Silmaria to enter the town again.
SILMARIA
Check the time. If it’s evening, return to Gnome Ann’s Inn.
GNOME ANN’S INN
Sit down at the table and Ann will bring a meal for you. Now head up to your room.
Lie down on the bed and Sleep Until Morning. You get a visit from Elsa through the night (how on earth did she get into your room?). She tells you that she thinks her sponsor, Minos, is behind all the problems in Silmaria, and urges you to be careful, since you could be Minos’s next target. Talk to her about everything - she wanted you to know her suspicions, in case anything ‘happened‘ to her. After she leaves, you go back to sleep. Next morning, leave your room again.
Go downstairs and sit at the table so Gnome Ann can bring your breakfast. When you’re ready, leave the Inn.
SILMARIA
Go along to the Adventurer’s Guild. Look at the Notice Board and read all the new notices. Talk to Toro about everything. Now leave the Adventurer’s Guild.
Walk along to the pier area and talk to Andre the fisherman about everything.
Head up to the Apothecary in the Main Square. Talk to Julanar about everything. Talk to Salim about everything. The LETHE WATER you game them have really helped Erasmas and Shakra, and both victims are now on the mend. Now leave the Apothecary.
Make your way to Science Island, using the gondola to get across to the Island.
SCIENCE ISLAND
Enter the lab. Look around - there’s no scientist here. And Gort is missing as well. How strange! Use the lift to get up to the First Floor where Gort usually stands. There is an Access Panel on the wall here - look at it to see it‘s the Access To Secret Laboratory. Use the Access Panel and enter the secret code you were given earlier. If you‘ve forgotten what the secret code is, you can find it on the green monitor next to the pizza poster on the wall. The wall will rise up to reveal… a Secret Lab!
One of the scientists is here, and he’s not all happy that you found the Secret Lab. Talk to him about everything. You discover that it’s the scientists that have been drugging Erasmus and Shakra, because that believe that Silmaria should be ruled by science, not magic.
Use your MYSTIC MAGNETS to return to Gnome Ann’s Inn.
GNOME ANN’S INN
Leave your room and leave the Inn.
SILMARIA
Head up through the portcullis next to Gnome Ann’s Inn. SAVE YOUR GAME HERE, then head into the Wilderness.
WILDERNESS
If you remember what Famous Adventurer told you, Atlantis can be found in the island of Skyros. Click on the Hot Air Balloon to start flying.
Fly South West until you see an island with a lake in the centre. Land your Balloon there.
SKYROS \ ATLANTIS
Click in the Pillar Icon to jump into the water. Now equip yourself with the AMULET OF WATERBREATHING then SAVE YOUR GAME HERE.
Swim left to the ornate door. This is the entrance to Atlantis. Cast OPEN on the door to open it. You are ‘welcomed’ by two Tritons - quickly Cast CALM on them so they won‘t attack you. Now swim into the tunnel.
You’ve now reached Atlantis. There are lots of Tritons here, but don‘t fight them. Instead, Cast CALM, so they won‘t attack you. Swim forward to another ornate gate, and Cast OPEN on the gate. Swim through the doors into the next area.
The Queen is here, and she’s not very happy to see you! Cast CALM, and then give FLOWERS to the Queen. Tell About The Famous Adventurer, then Talk About Romance, then Tell About Silvertongue, then Tell About Silvertongue’s Message. She has bitter-sweet memories of him, and she’s now willing to listen to what you have to say. You ask for peace between Silmaria and Atlantis. She agrees to this request, and gives you a PEACE STATUE as proof. Her Tritons escort you out of Atlantis. Swim back up to the surface.
Click on your Hot Air Balloon to start flying again, and fly North East, back to Silmaria.
SILMARIA
Go through the portcullis. It’s probably quite late by now, so enter Gnome Ann’s Inn.
GNOME ANN’S INN
As soon as you enter, Gnome Ann asks for your help - Say Yes to agree to help her. Only now, you find out you’ve agreed to be tonight’s entertainment… as a belly dancer! Don’t you look adorable in the belly dancer’s costume! After the dance, talk to Wolfie about everything. Now head on up to your room.
Lie down on the bed and Sleep Until Morning. When morning arrives, leave your room.
Go back downstairs and sit at the table so that Gnome Ann can bring your breakfast. After breakfast, leave the Inn.
SILMARIA
Make your way up to the Hall Of Kings and give PEACE STATUE to the guards at the gate (don‘t worry, you get to keep it).
A trial is heard, involving the scientists from Science Island and Gort, since it was them that drugged poor Erasmus and Shakra. We finally find out that Dr Pretorius and Dr Mobius are one and the same person - creepy! Gort is disqualified from the Rites Of Rulership.
You are given a chance to rest, before the next Rite starts.
******************************************************************
7. RITE OF JUSTICE
******************************************************************
SILMARIA
After some rest, you return to the Hall Of Kings. Logos announces the final Rite - The Rite Of Justice. You must find the person responsible for all the problems in Silmaria - the assassinations, the poisonings, starting a war between Silmaria and Atlantis, everything - and bring that person to justice.
After you are escorted from the Hall Of Kings, look at the Notice Board and read all the new notices.
Make your way down to the Adventurer’s Guild. Look at the Notice Board and read all the new notices.
Head along to the Famous Adventurer’s place and talk to him about everything. Take note of what he says about the dragon pillar. Now leave the Famous Adventurer.
Go to the Apothecary. Stock up on POISON CURE PILLS, STAMINA PILLS and HEALING PILLS if you like. Also, buy some FIRE PROOFING POTION - buy 10 if you can afford it.
Do what you like for the rest of the day. When evening comes, return to Gnome Ann’s Inn.
GNOME ANN’S INN
Sit down at the table, and Gnome Ann will bring a meal for you. Afterwards, head on up to your room.
Lie down on the bed, and Sleep Until Morning. Through the night, Elsa will visit your room again. She tells you that she’s going to try to find evidence against Minos. She wants you to know this, in case anything happens to her. After she leaves, go back to sleep. Next morning, leave your room.
Go downstairs and sit at the table so that Ann can bring your breakfast. After breakfast, leave the Inn.
SILMARIA
Do whatever you like for the day.
At 5pm, then go to the Dead Parrot Inn. Climb up stairs on the left, to the Private Seating area. Talk to Ferrari about everything. Give him the PEACE STATUE as a trade for the DEED to Gnome Ann’s Inn. Now leave the Dead Parrot Inn.
SAVE YOUR GAME HERE. Wait until 6pm, then head left towards Gnome Ann’s Inn (don‘t use the MAGNETS). As you pass the Adventurer’s Guild, you’ll come face to face with the Assassin. It’s Bruno, from QFG1. It seems he’s been carrying a grudge against you and Elsa, and now he wants you to pay. You have no choice - blast him with FORCE BOLT until you defeat him. He will attack you with his poisoned dagger though, so take POISON CURE PILLS to cure yourself. Toro will come to help you. Logos shares your suspicions that Minos is the one behind all the troubles, and asks what he should do - choose Confront Minos With Suspicions.
Now you know who the culprit is, Logos declares this Rite ended. You are escorted from the Hall Of Kings.
Return to Gnome Ann’s Inn.
GNOME ANN’S INN
Give DEED to Gnome Ann. Sit down at the table, and Ann will bring a meal out for you. Afterwards, go on up to your room.
Lie down on the bed and Sleep Until Morning. You are woken the next morning by the guard banging on your door, telling you that you're summoned to the Hall Of Kings.
HALL OF KINGS
Logos wants to wrap up the Rites, and asks you who is behind all of the crimes in Silmaria. Say The Assassin Confessed (it's a lie, but Minos doesn't know that). Minos admits his true intent of becoming king of Silmaria, as well as revealing he has a PROPHECY STONE. Then he teleports himself away. Logos sends you to Minos's island on the fastest boat. You must prevent Minos from destroying the PROPHECY STONE.
MINOS'S ISLAND
SAVE YOUR GAME HERE. Place the OPEN spell and the FORCE BOLT spell in your belt for quick access. Don't bother with the goons here - just run past them, and run to the gate. At the gate, Cast OPEN on the gate, then run through to the courtyard.
In the courtyard, use FORCE BOLT to kill all the goons. Now run right to the doors, and again, Cast OPEN.
You've made it into the Fortress. Cast CALM so the Goons and Centaur Wizards don‘t attack you. SAVE YOUR GAME HERE. Run right past the Goons and Wizards, and go to door at top-left of the stairs, and Cast OPEN on the door to open it. You find yourself in the Treasure Room.
Elsa is here, but she's locked in one of the alcoves. Minos starts taunting you, then he calls his guards in. Now you have to be quick here. Cast CALM, and SAVE YOUR GAME HERE. Run to desk at front of the screen, and take the INTERESTING TOOLKIT. Now run to Elsa at the back-right alcove, and give her the INTERESTING TOOLKIT, so she can escape. Cast FORCE BOLT to defeat both Goons and the Minotaur (Elsa will help you, after she gets out of the alcove).
Minos jumps off the balcony to his death, breaking the Prophecy Stone in the process. By doing this, he has succeeded in waking the dragon, putting all of Silmaria in grave danger. Search Minos's body and take everything. Search the Minotaur and take MINOTAUR AXE.
Elsa points out one of the alcoves as being of special interest. Cast TRIGGER on this alcove, then Cast OPEN on the alcove. Take All to gets lots of FIREPROOFING POTIONS. Now either Erana or Katrina will show up (depending on who you saved from Hades), and summons you to the final battle.
******************************************************************
THE DRAGON FIRE PROPHECY
******************************************************************
Toro and Gort show up to help you in this final battle. Use FIREPROOFING POTION on yourself, then SAVE YOUR GAME HERE. Now if you remember what the Famous Adventurer said, you'll know that the dragon cannot be harmed while the pillar is broken. So talk to Elsa, Toro, and Gort, and ask them to Help Fix The Pillar. You'll also have to help fix the pillar. Once the pillar is restored, the dragon is bound to this cave and cannot leave. SAVE YOUR GAME HERE. Give MINOTAUR AXE to Toro. Cast RESISTANCE and Cast PROTECTION to protect yourself from the dragon’s fiery breath.
Now for the actual battle itself - this is one TOUGH battle! Make sure you give HEALING POTIONS to anyone that needs it, including yourself. Despite what the Sybil told you in one of the Rites, there's no need to sacrifice anyone, so don't do it. Cast FROST BITE on the dragon, but avoid it's fiery breath. Eventually, the dragon will break free from it's bindings in the Temple, and fly to other side of the cave. Follow him and attack again. Keep doing this until the dragon falls into a pool of lava.
After you defeat the dragon, you, along with the survivors of the battle, return to Silmaria. Logos performs a Hero’s Ceremony, declaring that, thanks to your actions, Silmaria is now safe. Notice that Rakeesh, Erasmus, and Shakra are at the ceremony. They've all been cured, thanks to you.
Logos asks if you'd like to be next King of Silmaria. I'll leave the decision... up to you.

_capsule_fog__medium.png)


