Walkthrough for Lost in Play
Full Walkthrough for Lost in Play
Gameplay Features
You can choose from joystick control, keyboard or computer mouse. On the initial screen, you can select the language of the menu, because the rest of the game is multilingual, i.e. all desires and decisions are expressed by pictograms that do not require translation.
Cursor types
Hand - take / interact with an object or character;
Eye - inspection of an object / character;
Dialogue cloud - communication with the character;
Arrow up/down - move up/down;
Arrow right/left - move to another location.
The inventory is located at the top of the screen and is available for interacting with items by clicking the left mouse button (LMB) on the backpack icon in the upper right corner. To use an item from the inventory, you need to hold down its LMB and drag it to the location. If you collect all the necessary items, they are automatically combined for further use.
The hint icon in the form of a light bulb is located in the upper left corner. To get it, you need to click on the light bulb icon and wait for the hint field to fill out.
The game is divided into short episodes. After completing the passage of each episode, it can be downloaded and replayed. After the end of the game, it will be possible to replay any of the 15 episodes.
Saving is done automatically when you exit the game.
Chapter one - Introduction
Playing Gal
We click on the frog. We move to the right screen.
We get to the telephone booth, pick up the receiver, and listen to the interlocutor on the other end of the wire. We continue to move to the right screen. We pass by a lonely standing mirror. We notice in it the reflection of a bear instead of our own.
We immediately return and peer into the mirror, where we see only our reflection. We continue moving to the right.
We suddenly notice a cup floating in the air. We clicked on the left stone, which turned out to be the goblin's stone head. Alternately click on the stone heads, and take the teacup. We go to the right screen.
We reach three dandelions in the field. Click first on the left and then on the right so that all three flowers turn turquoise. A cute monster appears from the ground, which we stroke in the face. We go further to the left. We pass by a locked door that requires a key.
We jump and reach for the letters of the game’s name, which crumble right before our eyes. We reach a clearing with a royal tea party.
We click on the duckling and the frog with the crown. They take out their cups and place them on their saucers. Open your inventory, and drag your cup down with the left mouse button pressed.
After that, the dwarf in the cap takes out a key for us from his cup. We take it into inventory and go back to the locked door.
You can use the key from the inventory on the locked door.
To open the door, you need to solve a puzzle. With the LMB pressed, we rotate the circles with bright sun rays to cover the cold blue rays with them.
We take away the watering can with the image of the moon from the outstretched hand, which appeared in the opening of the open door. With a watering can in inventory, we follow to the place of the royal tea party.
We pour moon water into the cups of those present, then click on one of them. The dream ends, and we find ourselves in our bedroom next to the sleeping brother.
Chapter two - Waking up
Bright sunbeams break through the loosely drawn curtains. We click on the blanket to finally wake up. We get out of bed and part the curtains to let the sun into the bedroom.
We are trying to wake up our brother, but he only brushes us off and continues to sleep sweetly.
We take an alarm clock from the shelf. We need a screwdriver, a battery, and a winding key to start it.
Take a table lamp. We direct its blinding light to the burning eyes under the bed. From there, a crazed cat jumps out, and a battery-powered toy robot falls to the floor.
We first take a toy from the floor and select the battery that fell out of the broken robot.
Click on the open door of the lower cabinet. From there, a clockwork cat on wheels appears. We manage to slam the closet door before the clockwork cat returns to its place in the closet.
Automatically pick up the dropped key.
We click on the plywood box under the brother's bed. We drag it to the left. We stand in the direction of the arrow on the box.
We reach for the screwdriver on the top shelf. Now we need to insert the battery into the alarm clock.
Collected items are automatically combined. Open the inventory, holding the LMB, take the combined items in the inventory and apply them to the alarm clock.
Using a screwdriver, unscrew the three bolts from the back cover of the alarm clock.
Turn arrows appear at the bottom left. Click on them to turn the battery in the right direction.
We drag the battery into the slot intended for it.
Now we have to assemble the gears into a single moving chain to start the alarm clock. To do this, move the tiles to the side with the left mouse button so you can put a gear in its place. For engagement, the gears must be in contact with each other.

We use the alarm clock on the sleeping brother. Watch a short video. We pass into the next room.
Chapter three - Quite the scare
We go down the stairs, and step over the sleeping dog.
We pick up colored felt-tip pens from the floor.
We select a comic book from the floor, and look through it to the end by clicking on the arrow on the right. We build a deer-bear mask out of a cardboard box and scare the brother.
Note . If you collect achievements, you need to turn the radio on until the desired achievement appears.
We click on the walkers on the wall and understand that they do not have a pendulum. We go into the room on the right. We see that the brother is fascinated by the electronic toy and does not pay any attention to us.
We take out things from the basket with linen and find a yellow ball at the bottom of the basket. We are trying to lure a cat out of a cardboard box with the help of a ball, but nothing works out for us. We take the bell from the bedside table. We use the bell on the cat, but also to no avail.
We push the shoulder of the brother. We hide behind the back of the sofa, scream heart-rendingly and show our tongue. The brother moves from his seat, and we find the key, which we take into inventory.
We return to the living room and set the pendulum in place.
We look at a family photo in the approximation. We find out that the time on the clock face is set at five o'clock in the afternoon. So, we need to move the clock hands to the same position.
Hold LMB and move the hour hand to 5 o'clock, the minute hand to 12 o'clock, and the second hand to 9 o'clock.
We pick up the key from the cuckoo that appears. We connect the dog to the expulsion of the cat from the cardboard box.
You can use the bell on the sleeping dog. To wake the dog, you need to solve a simple puzzle in which the dog drives the sheep to their places in a dream. Move the dog figurine using the arrows at the bottom left.
We move to the bottom sheep and move it one cell to the right. Move the top sheep one cell to the right.
We send the middle sheep one cell down. We return the upper sheep to its place.
We lower the middle sheep one more cell down. We send the lower sheep to its place on the right.
We go down one cell and move the middle sheep one cell to the left. All the sheep are now in their places, and the dog is waking up.
We show the dog a yellow ball, then we throw it at the center of the target. To do this, move your hand to the side and release it. Let's watch a short video. We go into the next room.
We click on the cardboard box from which the dog jumps out. We take the box into inventory. We return to the living room.
We unlock the nightstand drawer with the key we got from the walkers. Take the scissors from the open box.
We move to the room with my brother. We open the inventory, take the box with the collected items, and put it on the floor behind the sofa. We automatically make the desired mask and put it on.
We hide behind the side of the sofa and click on the brother. The brother runs away in fright, and we, wearing a mask, run after him.
We play a small mini-game in which we need to click on selected areas while running, similar to the shadow from our mask. At the top, a counter is turned on, which shows that we must step on such areas six times.
If we miss such a section, the counter is reset to zero, and the race starts again. We run to another location.
Chapter four - Escaping the Bear
Playing as Toto
In this episode, we will play the girl's brother, who, in fright, moves into an unusual forest. We automatically hide in the hollow of a tree so that a bear with horns runs past us.
Double-click on the arrow to get out of the hollow.
We click on the reading forest goblin, who asks us to get him glasses.
Click on the red button on the tree trunk. An opener for opening cans comes down on a thread from above. But the can opener hangs high, we can't get it.
We pass to the left screen and exit a clearing with three frogs. We click on the cup. Automatically pick it up in inventory. We ask the frogs how we can help them. The frog on the right needs to get the red cap. The frog on the left needs to open a can of frog treats. The central frog cannot pull the sword out of the stone in any way. We pass to the right screen. We go out to the meadow with the bear.
Please be sure to note the knife, grab it. Unable to hold back a joyful cry, we attract the attention of a horned bear and run away from the clearing. We immediately go back and carefully raise the knife from the ground. We move to the location of arrival.
With the help of a knife, we deepen the crack on the tree trunk, from which resin drips. We substitute the cup and collect wood resin in it. We follow the clearing with the bear.
We put a cup with resin on a stump, on which a blue moth sits from time to time. A forest goblin tries unsuccessfully to catch him. The moth sits on a cup of resin and sticks to it. The goblin grabs the moth by its paws and flies away from the clearing, releasing a hollow log for us.
We climb to the glasses through the log, we grab them. With glasses in inventory, we go to a clearing with a reading goblin. We give him glasses, and the goblin disappears in an unknown direction.
We break off a branch from the tree and head to the left screen.
Using a stick, remove the cap for the right frog, which will now become our assistant.
We go to the meadow with the bear. We are interested in the blue lever we spotted in the grass near the tree. We climb into a hollow log. We click on the frog so that he begins to distract the horned bear.
We click on the lever to take it, but we are ahead of the goblin from the hollow, into which we look, while the frog distracts the forest monster.
We ask the goblin to give us the lever, but he agrees to return it to us only if we win on the checkerboard. The goblin moves with a black checker that can move across the board in any direction. We have four white checkers at our disposal, which can only move forward to the cells indicated by the arrows. Pieces cannot jump over each other and cannot attack each other. Our task is to drive the black checker into a position from which there will be no way out of it. If we lose, the game starts over. The game is random, so it is impossible to offer a step-by-step guide.
We get a blue lever from the goblin.
We push the bear from behind and quickly disappear into a hollow log. The frog ceases to distract the bear, who again returns to his occupation. And we are in a hurry to a clearing with frogs.
We insert the lever into the base of the mechanism, and click on it. We observe how the button springs in the ground near the tree.
We approach the button, and point to it the helper frog. He understandably stands on the button. We return to the clearing, and pull the lever. The frog jumps up and takes the can opener off the string.
We approach the frog, click on it, and the frog gives us its prey. We return to the clearing on the left.
We ask the left frog for a closed jar, and open it with a can opener. We click on the swarm of flying insects. Let's watch a short video. It remains only to pull the sword out of the stone.
We click on the sword. The frogs line up behind us to help. Click on the sword again.
A bar appears that shows the efforts of the team. Quickly, click on the sword until the scale is filled. With a sword, we proudly walk into a clearing with a bear.
We click on the bear, we watch the video. When we are on the ground, first, we click on the frogs so that they distract the bear. At this time, we quickly crawl along the arrow between the bear's paws and promptly run to the next location. We find ourselves in caves where we must escape from the bear in five different caves. The bear, like us, can only move one position. If we find ourselves in the bear's line of sight, it starts to move after us. The red stripes are the zone of his aggression. The yellow stripe is a blind zone for the bear, in which he does not see us. We can only move to the highlighted position.
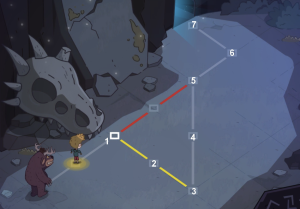
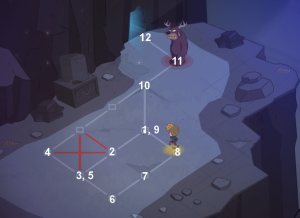
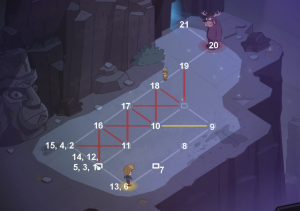
We move alternately to the designated places, according to the numbering.

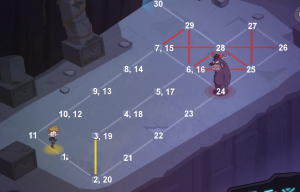
Running away from the horned bear in the correct positions, we automatically pick up the figurine, outwardly very similar to us. We run out of the last cave to the magical clearing. We see a king frog tied to a tree.
Chapter five. Catching the bear
We pull the end of the rope to untie the royal person. We take the rope into inventory.
We pay attention to the magic circle and the symbols around it, fix them for ourselves.
We put the figurine with our own image in the center of the magic circle. Use the rope on the bear tracks next to the circle. Our attention is drawn to the niche with the image of a snake. We head towards the entrance to the cave. Around the entrance are inscribed strange symbols that remind us of their image around the magic circle.
We click alternately on the stones. We pick up the fallen stone with the image of a snake.
We insert this stone into a niche on a block.
To solve the puzzle, look at the image of a snake. The points in the figure show the number of turns of the disk in the direction of the arrow. The small arrow indicates that you should start counting from the tail and move toward the head. Rotate the circles using the arrows on the right and left. We twist: three times to the right, four times to the left, and two times to the right. The image of the snake on the stone and the magic circle glowed in turquoise.
We touch the wooden figurine in the circle, which turns into our holographic image. We touch our image and automatically hide behind a large stone.
We pull the rope that entangles the legs of the horned bear, then push it with all our might. Let's watch the video.
Chapter six - Back Home
Playing as Toto
Sister invites us to return home, we agree with her. We move to the left screen, we speak with the goblin aeronaut, who sits on the back of a heron.
We ask him to help us return home. The aeronaut puts forward a condition for us: he needs four ducklings.
We click on the loaf of bread in the water. It’s impossible to reach out on our own, so we ask our sister for help. The sister holds our hand, we click on the loaf of bread again. We take it out along with the fish, which clung to the bread loaf. The heron now eats fish, and the loaf remains in our inventory.
We go back. We ask the old woman on the bench about the duckling.
The old woman tells us about her adventures with the kidnapping of her bag. Click on each of the five drawings to build a coherent story out of them. We pay attention to the geometric figure in which each character of this adventure is depicted. Click on the geometric shapes on the bag in the correct sequence.
We get from the old woman a duckling (1/4).
We notice another duckling on a stick waved to us from behind the bushes. We are invited to exchange the duckling for pizza. We click on the box. We find in it a phone number by which you can place an order. We fix for ourselves with what ingredients you want to order a pizza: mushrooms, tomatoes, herbs.
Our attention is drawn to a coin glittering in the bark of a tree. When you try to reach it, the pigeons flock to us. We take out the bread from the inventory and crumble it into a plate under the tree. While the birds are busy eating, we pick up the discovered coin. We head to the pay phone booth.
Playing Gal
We pick up the handset, throw a coin into the slot of the coin acceptor and dial the phone number 124435, which we saw in the pizza box. We name the ingredients of pizza: mushrooms, tomatoes, herbs.
Note . If we chose the wrong ingredients for pizza and the customer rejected it, then we again approach the telephone booth and dial the desired phone number without putting a coin into the machine.
Playing as Toto
We put the finished pizza in an empty box near the bushes. We pick up the duckling (2/4).
We approach the garden gnomes, whose colored hats correspond to the multi-colored roofs of houses. We click on the gnomes and align them in height in the same way the houses are aligned in height. We pick up the duckling (3/4).
Playing Gal
We approach the trash can, we are trying to find something useful in it, but it is impossible to do this because of the unpleasant smell that comes from the trash can. We go to the left screen.
We click on the urn with legs. A bespectacled fairy wizard jumps out of it, offering us the most ordinary clothespin. We return to the trash can near the telephone booth.
We use a clothespin on the trash can. We rummage in it and look for the last duckling (4/4).
Playing as Toto
We show the collected ducklings to the goblin-aeronaut. In response, the aeronaut offers us to solve the puzzle with ducklings.
Getting a flag and returning all ducklings to the start line is necessary. Initially, each duckling has 100 units of energy. Swimming one position takes 25 units of energy from the duckling. Ducklings can share energy with each other using the up arrow. When you click on the duckling, directional arrows appear. It is proposed to pass one of the possible options.
First, we push all the ducklings to the first position. Duck number 2 is put forward to the second position. Duck #4 shares energy with duck #3 (up arrow).
Duck #3 shares energy with duck #2. Duck #2 swims to the flag and takes it.
With a flag in its beak, duck #2 swims to duck #3, which shares energy with it.
Duck #2 swims to duck #1, who shares energy with him. Both ducklings return to the start line.
Duck #3 swims to duck #4, who shares energy with him. Both ducklings return safely to the start line. Puzzle solved. We show the victorious flag to the disgruntled goblin. Let's watch the video.
In flight, we pull out a white feather from the left wing of the heron. With this pen, we begin to tickle the heels of the aeronaut.
A scale appears on the right, the requirements of which we have to adhere to. The ball must be in the green zone until the circle below is completely filled with green.
Playing Gal
After filling the tickle scale, pull the parachute ring. A green goblin aeronaut flies on a parachute into the far distances.
A new scale with a slider appears on the right. In order to leave the heron, it is necessary to swing as much as possible, holding the legs of the bird. Hold LMB and move the slider up/down until the scale at the bottom is completely filled with green. We automatically release the legs of the heron and go down to the sailboat in the open sea.
Chapter seven - A whale sighting
After watching a short video insert, we receive a map of the journey home from the fairy wizard. Swim to the right screen.
Playing as Toto
We swim to the island with two palm trees, under which there is a treasure chest. We double-click on the chest and a huge whale fish emerges on the sea’s surface, which, without hesitation, swallows us whole.
Playing Gal
We express our indignation to the sea monster, demanding that he immediately return his brother to us. We swim now to the left screen.
We swim up to two captains, share our problem. A pirate seagull demands a fish for a service. We continue to sail to the left screen.
We ask the fish for a breathing tube from scuba gear, we get it.
We return to the fish that swallowed our brother. We use the breathing tube from the inventory on ourselves and jump into the water. We pay attention to corals and fish stuck under the whale's belly.
Let's switch to brother.
Playing as Toto
We click on the wooden box, which clogged the outlet from the whale's esophagus. We click on the pirate toy with a saber, we push it out for the sister.
Playing Gal
We click on the pirate toy to pick it up in inventory.
Now we have two inventories, items from them can be transferred to each other.
- To pass the item to the brother, you need to throw the item into the whale's mouth.
- To transfer the object to the sister, you need to push the thing out through a special hole in the whale's stomach.
We click on the ladder to climb aboard the sailboat.
We swim to the left until it stops. Use the pirate doll on the toys above the surface of the water. We select a bottle. We automatically take out the cork from it and get a firefly with an ultraviolet glow. Now we are heading to the two captains.
We click on the book pile floating on the sea’s surface. We carry out a firefly through the drawings in the book, scrolling through the pages with the arrow on the right. We find out in what order corals and fish-sticks should be under the whale's belly. We are heading for a huge fish.
Click on the buoy with the arrow "down" and dive under the belly of the whale.
We remember the order of the pictures we saw. We fix for ourselves the form of each creature.
We click on the creatures under the whale's belly, turning them into a sequence in the drawings. After that, the creatures automatically combine into an electric eel.
The eel swallows the worm, then spits out the already electrified worm.
We select this bait and emerge. We take out the worm from the inventory and throw it to the whale for the brother, who automatically catches the bait. We go down under the water and click on the brother to transfer control to him.
Playing as Toto
We give the fisherman an electrified bait. For joy, the fisherman takes off his hat in the form of a plunger and gives it to us.
The fisherman also hands over the caught fish to us. We use the plunger on the toilet, we get the key from there.
Through the hole in the belly of the whale, we push out the key and the caught fish. Let's switch to my sister.
Playing Gal
We pick up the items transferred to us in the inventory. We return to the sailboat and swim to the left.
We offer the seagull-pirate the fish ordered by him. Watch a short video. After the pirate seagull drove away his colleague in the game, we will have to take his place and play a mini-game.
We have to line up our crabs horizontally or vertically four pieces in a row faster than our opponent. We play orange crabs instead of chips. The figures move in a straight line to the first obstacle.
The game is random, so you have to win on your own.
We win the game.
The angry pirate seagull still brings us the coveted chest from the whale fish. We swim up to it and open the chest with the key received from the brother. We take out a navigation device from the chest, with the help of which we play another mini-game.
We will control the bathyscaphe by clicking on the tips of the red cross on the left. We press the pressed LMB on the "up" key and we lead the bathyscaphe up through the stone blockage.
Twice we carry out the bathyscaphe to the left through the stone blockages.
We unfold the bathyscaphe and lead it through the blockage to the right.
We raise the bathyscaphe up and move the stone barrier to the left.
We lead the bathyscaphe down and to the right through the free passage. Again we lead the bathyscaphe up through the stone rubble.
We direct the free bathyscaphe up to the sailboat according to the antenna signals.
Chapter 8 - Saving your brother
We sit down in the floating bathyscaphe and plunge into the water. We swim to the sleeping monster, we try to wake him up, but to no avail. We go down to the bottom.
We click three times on the crab, which carries a wine cork on its back. We drive it into the hole, remove the cork from the crab and climb up to the coral reef.
We use a cork on the inlet of one of the processes, in which a movable red light is hidden. We take it into inventory by clicking on the mink in which the light hid. We go down to the bottom.
We place a glowing red light on the lamp plant on the left. A crab with a shell on its back rushes under a column of light. We click on the sink, we take it into inventory. We swim to the sleeping monster.
We use the shell on the sleeping monster as a mouthpiece, bring it to life. We ask the monster for his fluffy process on his head. The three-eyed whale agrees to share this offshoot with us on the condition that we solve a few logic puzzles and prove our wit to him.
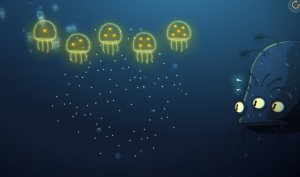
In the first puzzle, you need to put the jellyfish in the correct order. We arrange them in ascending order of their points on the body. See the screenshot for the correct solution.
In the second puzzle, you need to put the jellyfish in the correct order. We arrange them as phases of the moon from new moon to full moon. We look at the finished solution in the screenshot.

In the third puzzle, you must also arrange the jellyfish in the correct order. In the left row we put jellyfish vertically from bottom to top in ascending order from one strip to three. In the right row, we arrange the jellyfish horizontally from top to bottom in descending order from three stripes to one below. In the central row, we combine the strips on the left and right and arrange them in ascending order from bottom to top. We look at the finished solution in the screenshot.

In the fourth puzzle, you must also arrange the jellyfish in the correct order. They need to be arranged in pairs in a mirror image. We look at the finished solution in the screenshot.

Kitenok recognizes that we are smart and quick-witted. He hands us his head process, and we head to the whale fish.
We use a fluffy process on a whale that swallows an offering. Brother automatically takes our gift to his inventory.
Playing as Toto
We take out a fluffy process from the inventory and begin to tickle the protruding part of the oesophagus in the form of a tongue with it. An angry whale spits out our fishing neighbor and us. The whale fish sinks to the bottom of the sea, allowing us to travel further towards home. Let's watch the video.
Chapter nine - Prepare to fly
We get to the island with a sign showing how many more kilometers are left to our house.
We go to the right to the end of the index with myriad numbers.
We get to the cacti. We click on the cactus with flowers. From it appears our familiar fairy wizard. He informs us that we need to get home before the new moon, otherwise the portal gate to our house will cease to exist. Fay the Magician builds us a tandem bicycle. We automatically get on it to the city of masters. We speak with the craftswoman, ask her how we can get to the house. We carefully observe how the craftswoman opens the car’s trunk: a blow to the headlight, a blow to the license plate and two blows to the hood.
The craftswoman takes out a drawing of a flying dragon robot. For its construction, we need parts from a bicycle, a large amount of fabric, roller skates and a mask in the form of a dragon's head. The sister remains to disassemble the bike, and we go to the right screen. We reach the place where juvenile lizards appear. They pulled out a light lance and fire it in different directions in turn. We approach them to talk. Instead of talking, one of the teenagers starts shooting in our direction. We automatically escape from a dangerous place.
One shot knocked down a miniature lawn mower from a tree branch, we select it in inventory. We climb into a metal barrel with many holes and slowly move to the right.
We move only when the left lizard turns to a friend and does not look in our direction. We approach the lizard from the back and suddenly pull its tail, which immediately falls off. This causes an outburst of healthy laughter from the second lizard and indignation from the first. Clutching into a ball with each other, they roll away from the clearing.
We leave the barrel and pick up a light spear from the ground. We put it in place.
We pick up three crystals from the ground.
We install blue and pink crystals on the pedestals on the right.
We put the last crystal on the left pedestal. Suddenly the fuse blows, which we have to find a replacement. We follow to the right until it stops to look at a huge cat. We turn around and go to the left screen.
We notice a car with a lonely burning headlight in a junkyard, we head towards it.
To open the hood of the car, we act in the same way as the craftswoman: we hit the headlight, then the license plate and hit the hood twice. We take out the video cassette from the car. We follow the Baba Yaga exercise bike.
We use a video cassette on a TV.
According to the hint, we need to drive through four zones to find Baba Yaga's hut. You can navigate using the arrows below.
Press the "left" and "straight" keys. We pass the first section.
We get into the forest zone and move straight along it. We also pass the flower zone straight ahead.
In the forest zone, first move straight ahead, then turn left.
Again we go in a straight line towards the hut.
Baba Yaga climbs into her hut and goes about her business. We select the steering wheel from the ground.
We go to the left screen, then we head to the cactus with a mirror in our hands. We ask the cactus what his problem is. We learn that a razor does little to help a cactus, because the spines quickly grow back.
We offer a miniature lawn mower to a cactus. We select the discarded razor from the ground.
We follow to the transmission mechanism with a robotic teapot. We put the steering wheel in place. We click on the wheel with levers.
We lower the two extreme levers.
The upper sleeve does not withstand the pressure and flies out of the structure. We click on the wheel with levers. Raise up the left lever and lower the central one. The movement of water changes its direction.
We select the dropped sleeve from the ground. We go to the left.
We show the master the bushing and ask him to make a handle out of the bushing.
Insert the handle into place and twist it.
Objects on the rope begin to move. An empty bucket fills with water and drops all items down. We select a working fuse from the ground.
We remove roller skates from the cable. We follow to the right to the tree on which the goblin-aeronaut hung.
We are talking to the parachutist. We offer him a razor to cut the parachute lines.
The released aeronaut runs away, and we pick up the parachute left by him. We automatically pull it up to the masters.
We hand over the craftswoman and roller skates. For a complete set, we need to get the head of the dragon. We pass to the right.
We insert the fuse into the left pedestal. Let's watch a short video.
We pass inside the stone head. The door slams shut behind us.
We look at the first picture on the wall. We fix for ourselves that there is no image of a dragon's head on it. In the second picture, the dragon's head is lowered down.
In the third picture, the dragon's head is turned to the right, and in the fourth - to the left. We are approaching the pedestal, on which the same dragon's head lies under a glass cap. We click on the security cap .
We press the buttons on the pedestal. We do not touch the first button. On the second, the arrow should point down, on the third - to the right, and on the fourth - to the left.
The protection is turned off, and we take the dragon's head from the pedestal. The wall behind us collapses, cutting off the path to the exit. We go to the right screen. We come to the first failure.
Click on the dragon's head on the other side of the gap. Automatically put on a dragon mask to solve the puzzle in 3D format. We have to move the turtles with crystals on their backs so that the laser beam hits the hole in the pedestal. We look at the hint how the turtles should be located.
We number the turtles. Turtle one with down arrows on its back, turtle two with right arrows on its back. Move (one of the options):
- First to the left;
- Second up, left and down;
- First right, up, left and down.
A plate appears, which allows us to go further to the right.
We reach the next platform and click on the dragon's head on the other side of the failure. Let's look at the hint.
We number the turtles. Turtle one with up arrows on its back, turtle two with right arrows on its back. Move (one of the options):
- First to the right and up;
- Second left, down, right and up;
- First right, down, left, down, right and up;
- Second up.
A plate appears, which allows us to go further to the right.
We reach the next platform and click on the dragon's head on the other side of the failure. Let's look at the hint.
We number the turtles. Turtle one with up arrows on its back, turtle two with down arrows on its back, turtle three with right arrows on its back, turtle four with left arrows on its back. Move (one of the options):
- Third up, left and up;
- First down ;
- Third to the right, up and to the right;
- First to the right;
- Second right, up, right and up;
- Fourth to the right;
- First left, down and right.
A plate appears, which allows us to go further to the right.
We reach the next platform and click on the dragon's head on the other side of the failure.
We number the turtles. Turtle one with up arrows on its back, turtle two with right arrows on its back, turtle three with a yellow crystal on its back. Move (one of the options):
- Second up, left and up;
- First left and down;
- With a yellow crystal to the left and up;
- First right, down, left, up and left;
- Second down;
- With a yellow crystal to the left;
- Second up;
- First up;
- With a yellow crystal to the right;
- Second up.
A plate appears, which allows us to go further to the right.
We follow to the right along the stone path, climb the stairs to the very top. We press the red button on the belly of the frog-king. We find ourselves in an imaginary world that looks like a sister's dream.
We click on our own figure and begin to move to the right screen. We meet with our own display and follow further to the right. We reach the figures sitting on the grass. We are trying to talk to the big guy in the center. We observe the transformation and come to ourselves near the locked exit.
Click on the dragon mask. We begin to remove it from the head. The energy from the mask splashes onto the door, and it opens. We select the crown from the floor and go outside.
We watch how the stone head plunges into the ground. We go to the left to the masters. We give the craftswoman the dragon head.
We speak with the sister, and she passes the wheel from the bicycle to the craftswoman. All the details are collected and we are handed the designer "Collect the dragon". Assembly instructions are in the lower left corner. To the right of it we see the parts for assembly and a screwdriver.
First of all, we study the instructions. Scroll through the pages using the side arrows. The third page shows the first stage of assembly. We take short pins and apply them from above to the holes intended for them.
On short pins we put scales from the left box. Two long pins from the second box are installed above and below the visible colored wires on the right.
Let's scroll through the instructions. We look at the next stage of the assembly.
Unscrew the four screws with a screwdriver. Then click on the central light to open a niche with colored wires.
We connect the wires according to the drawing in the instructions.
See the next page for instructions.
We take the screws from the box one by one and first insert them into the holes from which we unscrewed them. Screw the screws with a screwdriver. The central light should be on if the wires were connected correctly. We take the box on the left, which will become the neck of the dragon, and put it on the long pins on the right.
Look at the last page of the manual.
We take the remaining two long pins and insert them into the holes on the right, according to the instructions. After that, it remains only to attach the dragon's head to the inserted pins. We love the results of our work. Masters also confirm that we did everything right. We watch a video of flight on a mechanical dragon.
Chapter ten - Flight on the dragon
We press on the keyboard on the cursor key "right" and start a leisurely flight. If you want to fly fast, hold down the Right arrow key and enjoy the flight.
Along the way, we meet our fairy wizard, who tells us to take care of the crown, which will help us get home through the guarded gates. At some point in the flight, a quarrel begins , which leads to a catastrophe and a fall from a height. Let's watch the video.
Chapter eleven - Saving your sister
We come to ourselves in an unfamiliar place. We get up and look around, ask a question about my sister. We are offered to look into the eyepiece of the periscope, which we do.
We peer into the window at the top of the tower and see our sister behind bars.
We lower the eyepiece below and see a goblin aeronaut with our crown on his head.
We lower our gaze even lower and notice the guard who is watering the flowers on the window.
Above the entrance, we notice a rather vicious bird on the window, ready to raise the alarm at the slightest danger.
An armed guard stands in front of the passage. We tell all this to our saviors. After a little consultation among themselves, we are offered a whole plan to save our sister.
In the first paragraph of the plan, we have to get a cart with vegetables with the neutralization of the first guard in order to go through the transition to the tower.
To implement the whole grand plan, we need to find a cart, a chicken and a flower. Before leaving, we are handed a paper with a password. We press the doorknob and go outside. It turns out that we got on the flying islands.
We are trying to catch a walking chicken, but she runs away from us.
We knock on the attic window and are offered to name the password. We say it wrong three times to anger the questioner.
After each angry rebuff addressed to us, the head of a deer, nailed over the attic window, bows lower and lower to the ground. Finally, it falls off, and we take the head of a deer into inventory.
We fumble with our hand in the fountain, we find a coin in it. We ask the street musician to play something. We note that a lamb appears from the foliage to mournful sounds and shows its negative attitude towards such music. We go to the right, go to the next island. Again we are trying to catch the chicken, but again she deftly dodges and runs across to the neighboring island.
We speak with the goblin who waters his garden, we ask him for a cart. We get rejected because the farmer complains about the birds that spoil his crop.
We open the toilet door. We get from there instructions for making scarecrows for various types of birds. We turn the page in the direction of the arrow and find the scarecrow we need. We need a deer head and a black T-shirt with a red cross on the chest to make it.
We move to another island, we communicate with the shepherdess, who complains about the loss of two lambs. We note that in order to get soda with syrup from a barrel, we need to have a valve on the tap . Watching the card players. We see how the loser leaves his place and leaves.
We ask the outlet’s owner for a bottle of soda with syrup, but we are refused.
We communicate with the players and find that you need ten coins to play. The chicken again slips out of our hands and now flies to the roof of the outlet.
We note the second lamb on the neighboring island, but the bridge is broken. So, we need to make sure that the lamb jumps over to our island. We go to the left screen until it stops.
We are talking with a former player who is now enthusiastically fishing. The player asks to find him a magnet.
We note a bird's head in the crown of the tree, click on it. It turns out that our familiar fairy wizard is hiding there. We tell him about our sister behind bars. We get a bird's head mask for use. We head to the island with lambs.
Before climbing a tree, apply a bird mask to it. The sentinel raven allows us to climb the tree.
We rise along the trunk, tear off the valve for the crane on the right side. We move up the tree trunk. We note the magnet, but we cannot reach it. Along the way, we fix for ourselves which signs are depicted on suspended or similar geometric figures.
We get to the top. We ask for a flower from the raven-teacher. Raven agrees to give us a flower if we prove our wit.
The crows line up vertically and hold geometric figures with drawings in their beaks. We are invited to put the correct images that we saw on the way to the top of the tree. Click on the figures, select the desired images.
We get a flower from the raven. We go down the trunk and approach the barrel.
We use the valve on the tap, click on it. We observe how a lamb runs up to the leaked puddle of carbonated syrup and feasts on it. After that, it emits a multi-colored gas and flies over our head. While the outlet’s owner scolds the lamb, we pick up a bottle of soda from the counter.
We throw a bottle of soda to a lamb on a neighboring island. Having licked a delicacy, the lamb flies to our island and goes to the shepherdess.
We pay attention to the posters pasted on the wall of the outlet. Let's look at them up close.
We tear off two posters pasted on top. We find under them the musical work of a famous rock band. We take this poster into our inventory.
We return to the street musician and show him a poster with the music of a famous rock band. We observe the transformation of a street musician who begins to play completely different music. The lamb descends from the tree and begins to sing along. We click on the lamb and inform him that the shepherd is waiting for him. Following the lamb, we go to the shepherd's island.
We select the shepherd's staff from the ground. We approach the shepherdess, tell her about the clever chicken and ask us to help in catching her. We automatically climb the pyramid of lambs and try to grab the chicken. After a while, we still succeed.
We put on a raven mask, climb the tree trunk, remove the magnet from the branch and go down.
We go to the fisherman and offer him a magnet. We watch how the fisherman pulls out a mountain of coins from below and returns with them to the gaming table.
We pick up the dropped coin. We take a magnetic fishing rod in our hands.
Our task: With a fishing rod’s help, load the trolley with scrap metal so the arrow stops in the green zone. After recycling scrap metal, a coin appears to the right of the recycling mechanism. We direct the fishing rod to the right / left and up / down using the cursor keys. In order for the magnet to pick up a metal structure, press the "Z" key. We release the key and the item taken falls down.
We pick up a coin with a magnet and move it to the right to other coins.
We raise the coins with a magnet and lower them into the barrel on the right. After all the coins are in the barrel, lift up all the collected coins.
We go to the right. On the way we pick up two more coins.
We find the last coin at the location with the players.
We show our coins to place bets in the game.
We get acquainted with the rules of the game. Each player initially has 10 coins. Bets are made in turn. Your bid must be higher than the highest bid of your opponents. The rates should not be the same. The one who bets the most coins wins. To win, you need to score at least 30 points. Try not to spend coins on small cards. The number of points is indicated on each card.
You need to click on the cross on your coin to skip a move. Use the arrows on the coin to select the bet amount. After choosing a bet, click on the coin’s center with the assigned amount. We carefully examine how many coins each of the opponents has, whether any of them can beat our bet.
If our bet has played, then it is marked with a green checkmark. Scoring is done automatically for all players. If you lose, then you do not need to look for coins again. you need to click on the game table again.
After winning, we pick up the Chupa-Chups candy from the ground and go to the location with the fountain.
We click on the subject of the laundrywoman's underwear and automatically step aside. The washerwoman turns her back to us, and we see a baby tied to her back. We try to take off the black T-shirt, but the kid throws a tantrum. We take off the washerwoman's underwear again. We click on the baby and give him a candy so that the baby does not raise the alarm at the moment when we remove the T-shirt from the rope. We return to the location with the garden.
We first put a T-shirt on the scarecrow’s base and fit the deer's head there. Seeing such a monster, not only birds fly away, but the farmer himself runs away. We pick up a cart with greens.
We click on the stairs down and automatically inform the conspirators that everything is ready for us to implement the plan. Let's watch the video.
Chapter twelve - Save the prisoners
We click alternately from left to right on the eyes glowing in the dark. The lamp topples over and illuminates the prison cell along with all the conspirators. To free the chicken, we first click on the right conspirator, then on the left. The fire burns through the rope on which the fighting chicken was hung.
Playing as a fighting chicken
We make our way through the bars of the lattice into the common prison cell. We poke our nose into the “ duck ”, into which the prisoners relieve their need. We make our way through the bars into the next room, where the guard enthusiastically reads a book.
We quickly climb under the table and pull the fan rope. The fan cover opens and a spider escapes from it, which has been spinning the fan blades all this time.
Following the spider, we return to the common cell. We click on the spider, and it brings us a sleepy flower, which we hide in our inventory.
We fall asleep here. Click the mouse to bring the chicken to life.
We follow into the security room. We use a sleepy flower on the guard.
After the guard has fallen asleep, we take the tongs from the table and pick up the book of fairy tales from the floor. We head to our solitary cell.
We use tongs to pull a nail out of the wall. We offer this nail to Toto so that he opens his shackles. Let's watch a short video. Again we go to the security room to open the grate.
We jump on the table. We peck on the plaque to release the belts.
We carefully look at the hint on the guard's chest. We turn left, we study the puzzle. Above the magnet is a crown. To the right of the crown is a crescent moon, and to the left is an image of a house. Click on the cells in the order indicated on the guard's chest. The lattice of the common cell rises, clearing the way for the prisoners.
Everyone goes out into the sleeping guard's room. There are no keys, so we cannot go through the door. We bravely stick our head into the air duct grille, remove it. The escape route is clear.
Chapter thirteen - Reading a story
Let's watch the video.
Note . In this episode, Gal will read the tale of how the Princess frees her Prince imprisoned in the tower. The pages of the book are temporary portals from the Past (-50), to the Present (0) and the Future (+50). We will move from one time to another along the arrows to the right / left along the book’s edges. Items will be transferred through a well bucket.
Past
We take the well gate and insert it into place.
The present
We ask the Prince to throw us a plant in a flower pot. We place the plant in a well bucket.
Past
We twist the handle of the gate, we take out the plant from the bucket. We plant it in the ground.
Future
The grown tree drained all the water. We go down into the moat, take the egg and put it in a bucket.
The present
We take out the egg from the bucket, we pass it to the bird for incubation.
Future
We take the turtle that hatched from the egg. The turtle asks to fill the moat with water.
Past
We dig the plant out of the ground.
Future
We take the turtle out of the water and put it in a well bucket.
Past
We take the turtle out of the bucket and put it in the water.
Future
We move to the other side of the moat on the back of a grown turtle. We rise to the Prince on his regrown beard. Let's watch the video.
Chapter fourteen - Catch a frog
Playing as Toto and Gal
Our long journey ends at a portal guarded by two frogs. Time is almost running out, but we made it on time.
We take out the crown from the inventory and try to place it on the top of the portal, but because of our small stature, we cannot reach it. We hear the sounds that the frog makes behind the portal, we hurry to it.
We click on the frog, and an idea comes to our mind how to use it to put the crown in place.
We try on the crown on a frog, but the amphibian clearly does not like this idea. The frog escapes to the platform in front of the portal. We follow her. We click on the frog.
We have to play another game in which we need to drive the amphibian to a cage with which we can reach the frog in order to put a crown on it. We will drive the frog together, we will be able to move only one cell. The frog jumps two squares in any direction. The puzzle is random, so the presented walkthrough is just one of the possible winning options.
We move: B2 and G7.
We move: G6 and D6.
We move: G6 and B3.
We move: G5 and D5.
We move: D4. We click on Gal, who can already grab the frog. Let's watch the video.
Chapter fifteen - Come back home
Playing as Toto+Gal
We fall into the interworld, merging together with each other.
We take a bottle and take out a fairy magician with an ultraviolet glow. We take out a coin from the hollow of the tree.
We approach the fairy wizard, ask him for a watering can. Fey is willing to exchange the watering can for three cups. We go in search of them.
We look at the family photo. We fix for ourselves in what position the multi-colored objects are. We fly up to the clock-clocks. We set the multi-colored arrows to the same position as in the family picture. We get the first cup.
We find a book, highlight its drawings with the ultraviolet light of a fairy wizard. Near the steering wheel, note the number three. The card lights up the number one, and the handbag shows the number two.
By clicking, we change the characters under the belly of a huge whale. We saw the hint in the book. We compare objects from the book with their belonging to various characters: a gambler, an old woman with pigeons and Baba Yaga. We get a second cup.
We throw a coin into the pay phone. The pizza delivery man brings us the third cup.
We give the fairy-wizard three cups. Instead, we get a watering can with the image of a crescent.
We use a watering can on the door. We give the watering can and go outside.
We go to the right and select the crown. We go back and hand over the crown to the royal person. Watch the final video. To see the real games of brother and sister, we watch the subtitles to the end.


")
