Walkthrough for Broken Sword 5: The Serpent’s Curse
Broken Sword 5: The Serpent's Curse
Walkthrough
~~~~~~~~~~~~~~~~~~~~~~~~~~~~~~~~~~~
PARIS - GALLERY (GEORGE)
~~~~~~~~~~~~~~~~~~~~~~~~~~~~~~~~~~~
LE LEZARD BLEU GALLERY
After the intro, your adventure begins here, investigating a robbery, and the shooting of the gallery owner. Chat with Father Simeon. When he goes to pray, turn your attention to Henri, the gallery owner. Look at Henri’s body to get a close-up of it.
Look at the crumpled note under Henri’s left hand. Hmmm, intriguing! Take EAU DE TOILETTE from the pocket of his black vest. Look at the gun shot wound in his chest. Move the specs on his face if you like. Move his toupee if you like. When you’re ready, back out of the close-up.
Look at the bust on the pedestal. Look at the painting on the wall above the bust. Look at the Office Door on the left - it has wires coming out of it, that are connected to CCTV. Unfortunately, the door is locked with a keypad, and you don’t know the code.
Look at all the paintings on the left. Most of the paintings are connected to alarms, that sound when you touch them. So why didn‘t the alarm for the stolen painting sound? Look at the gap on the wall, where the stolen painting used to hang. You see a close-up. Touch the pressure pad of the alarm. Open the door of the alarm. Ah-ha! Look at the cut wire. So that’s why the alarm didn’t sound. Push the Test Button. Look at the speaker. When you’re ready, exit the close-up.
Walk right a few steps. Open the pizza box on the table next to the window, and take the PIZZA SLICE from the pizza box - the pizza box falls to the floor. Talk to Father Simeon and work through all the conversation topics. When conversation is over, look at Hector Laine, who is slumped against the wall, to get a close-up.
Look at Laine - he’s out cold. Open his jacket, and take the NAIL CLIPPERS from his pocket. Spray some EAU DE TOILETTE on Laine to wake him up. Try to talk to him, but he wants some food. Give him the PIZZA SLICE to calm him down. When he’s finished the pizza, talk to him and work through all the conversation topics. If necessary, talk to him again and continue working through the conversation topics.
Open your Inventory, and look at your MOBILE PHONE. Use your phone, and call Mr Rickenbacker from your insurance company, and decide which conversation topics you want to discuss with him. When you’re ready, leave the gallery.
RUE ORSEL STREET
Look at the gallery window. You can’t see the stolen painting from out here, so that proves it was a planned job. Walk left a few steps. Look at the stained glass window in Le Tri Colours Café. Talk to the Waiter and work through all the conversation topics with him. He gives you LAINE’S DRINKS BILL, and asks you to pass it on to Hector Laine. Look at the Sacre-Coeur in the distance, on the left.
Walk right to the Office Window. Look in the window - you can see the glow from the CCTV monitor. Now open the blue gallery door, and enter the Gallery again.
LE LEZARD BLEU GALLERY
Show LAINE’S DRINKS BILL to Hector Laine, and blackmail him into telling you the code for the Office Door. Watch the cut scene, as Inspector Navet arrives.
~~~~~~~~~~~~~~~~~~~~~~~~~~~~~~~~~~~
PARIS - GALLERY (NICO)
~~~~~~~~~~~~~~~~~~~~~~~~~~~~~~~~~~~
RUE ORSEL STREET
While George is in the gallery with the Inspector, you get to play as Nico for a while.
Talk to Sergeant Moue, who’s guarding the door, and work through the conversation topics with him. You may recognise him as the Sergeant from Broken Sword 1. Sergeant Moue refuses to let you back into the Gallery. From your Inventory, use your MOBILE PHONE to call George. Work through the conversation topics with him. From your Inventory, use your MOBILE PHONE to call Ronnie, your boss. Work through all the conversation topics. Look at the Gallery Window. Look at the Office Window.
Walk left a few steps, and chat with the Waiter. He goes into great detail, explaining why his café is closed to you. Show him your PRESS CARD. He apologises for making assumptions about you. Talk to him again and work through all the conversation topics with him. If necessary, talk to him again and continue working through the conversation topics with him. Make sure he gives you a TAKEAWAY COFFEE.
Walk right, back to Sergeant Moue, and give him the TAKEAWAY COFFEE. Watch the cut scene, as you convince him to drink the coffee. He has to leave for a bathroom break, allowing you to enter the Gallery again.
LE LEZARD BLEU GALLERY
Chat to George - you agree to distract the Insperctor, so that George can enter into the Office. Look at the paintings on the wall. Look at the gap in the wall where the stolen painting used to be. Talk to Inspector Navet and work through all the conversation topics. Talk to Hector Laine and work through all the conversation topics. He doesn’t have anything useful to share with you. Talk to Father Simeon and work through all the conversation topics.
Pick up the pizza box from the floor, and replace it on the table. Look at the tomato sauce stain on the floor, under where the pizza box had been. You see a close-up of it. Interact with the tomato sauce stain, to spread it around, so it looks like blood. Use your PRESS CARD to scrape out the chewing gum. Your card becomes PRESS CARD WITH CHEWING GUM. Exit the close-up.
Talk to Inspector Navet again, and discuss the following topic.
- Blood stain
That’s just the distraction George needed. He punches in the security code, and enters the Office.
~~~~~~~~~~~~~~~~~~~~~~~~~~~~~~~~~~~
PARIS - GALLERY (GEORGE)
~~~~~~~~~~~~~~~~~~~~~~~~~~~~~~~~~~~
LE LEZARD BLEU GALLERY - HENRI’S OFFICE
Explore the Office. Look at the pressed flowers, hanging on the wall next to the door. Look a the guitar lying on the floor next to the door. Look at the CCTV System to get a close-up.
The CCTV system is pretty ancient. Unfortunately, you need a 4-digit code, which you don’t currently have. Exit the close-up.
Look a the pile of junk on the floor. Look a the pipe, in amongst the pile of junk. Search the bin next to the desk, to find a crumpled letter. Now you know where Henri lives. Look at the music poster on the wall. Look at the calendar hanging on the wall above the desk, and note that Henri has circled a date - 27 May - as a birthday. Hmm… 27 May could be deciphered as 2705 - that’s a 4-digit code. Look again at the CCTV system to get a close-up.
Enter 2705 into the keypad of the security system. Bingo! You can access the security footage now. Go through the footage, frame by frame, taking note of anything relevant in each frame. This is what to look for in each frame:
Frame Clue
1 Henri, La Malediccio
2 You, Nico
3 Nothing new
4 Thief
5 Thief (his helmet), Henri, alarm on wall
6 Thief (logo on helmet)
Exit the close-up of the security system.
Look at the Notice Board hanging above the desk. Look a the phone on the desk. Look at the lava lamp on the desk. Look at the desk itself, to get a close-up.
Look at the box of pins on the desktop. Look at ‘Le Lezard Bleu’ Business Card on the desktop. Look at the pen. Look at the lighter. Look at the ink pot. Look at the switch on the desk lamp. Look at the eraser. Look at the roll of tape. Look at the La Liberte newspaper. Open the drawer and take the folder. You automatically place it on the desk top. Read through the folder to find a VERA SECURITY COMPLETION NOTE, containing the address for Vera Security. You automatically exit the close-up.
Inspector Navet enters the office, and he’s not happy to find you here. Decide how you want to respond to him. Choose a conversation topic to ask him. He soon throws you out of the office.
LE LEZARD BLEU GALLERY
Watch the cut scene, as you and Nico go to the café next door.
RUE ORSEL STREET
Work through the conversation topics with Nico. After she leaves, it’s time for you to continue your investigation.
MAP SCREEN
Travel to Henri’s Apartment.
~~~~~~~~~~~~~~~~~~~~~~~~~~~~~~~~~~~
PARIS - HENRI’S APARTMENT (GEORGE)
~~~~~~~~~~~~~~~~~~~~~~~~~~~~~~~~~~~
STREET
Look at the shops, the café, and the park. Look at Henri’s Apartment door on the right, and use the intercom next to the door. The woman who answers the intercom is too distraught to talk to you. There’s nothing you can do here at the moment, so return to the Map Screen.
MAP SCREEN
Go to Vera Security.
~~~~~~~~~~~~~~~~~~~~~~~~~~~~~~~~~~~
PARIS - VERA SECURITY (GEORGE)
~~~~~~~~~~~~~~~~~~~~~~~~~~~~~~~~~~~
ALLEY
Talk to Bassam, the Stallholder, and work through the conversation topics with him. The neon flashing sign is giving him a headache. Maybe you could fix it for him. Look at the neon sign next to him to see a close-up.
Pull out the loose WIRE. The good news is that the letters are no longer flashing. The bad news is that now, only half the sign is illuminated. Rearrange the letters to spell out ‘Aladdin’, but make sure you only use the spaces that are still illuminated. You can only move letters into an empty space.

Bassam likes it, and decides that will be the new name for his stall. Talk to Bassam and work through all the conversation topics.
Look at Vera Security on the left. Open the door, and enter the building.
VERA SECURITY RECEPTION
Watch the cut scene with Annette, the Manager. She’s scared of the cockroach scuttling around on the floor. She’s not gonna talk to you, until that cockroach is gone! Look at the table on the right, to see a close-up.
On the table, look at the ashtray. Move the cigarette packet out of the way, then pick up the MATCHBOX. In your Inventory, open the MATCHBOX and tip out all the SAFETY MATCHES, so you have an EMPTY MATCHBOX. Exit the close-up.
Leave the building.
ALLEY
Talk to Bassam and ask about the following topic.
- Cockroach
Bassam will give you a RICH TEA BISCUIT. Enter Vera Security on the left again.
VERA SECURITY RECEPTION
Look at the cockroach on the floor to get a close-up. Place the EMPTY MATCHBOX down, behind the crumbs. Place RICH TEA BISCUIT inside the EMPTY MATCHBOX. Wait for the cockroach to crawl inside the EMPTY MATCHBOX, then pick up MATCHBOX CONTAINING COCKROACH. Talk to Annette and work through the conversation topics. When conversation is over, try to interact with Annette’s Black Book on the counter, but she prevents you from looking at it. You need to find a way to distract her, so that you can have a look at that book.
In your Inventory, use your MOBILE PHONE, and call Vera Security. While Annette is busy answering the phone, take this chance to change the station on the radio at the end of the counter. When Annette goes to change the radio station back, interact with Annette’s Black Book on the counter to find PHOTOGRAPH OF ANNETTE AND LAINE. Show PHOTOGRAPH OF ANNETTE AND LAINE to Annette, and she admits that she’s dating him. Talk to Annette and work through all the conversation topics. That’s all the help you’re going to get from Annette. When you’re ready, leave the building.
ALLEY
Walk up to the Map Screen.
MAP SCREEN
Go back to the Gallery.
~~~~~~~~~~~~~~~~~~~~~~~~~~~~~~~~~~~
PARIS - GALLERY (GEORGE)
~~~~~~~~~~~~~~~~~~~~~~~~~~~~~~~~~~~
RUE ORSEL STREET
The Gallery is sealed off, and it looks deserted. That’s odd! There’s no sign of Hector Laine. Look through the Gallery window - the Gallery is empty. Try to open the Gallery door, only to discover that it’s locked. Walk left to Le Tri Colours Café. Talk to the Waiter and work through all the conversation topics with him. He tells you that Hector Laine has gone to visit Henri’s widow. Talk to the Waiter again and continue working through the conversation topics. When conversation is over, walk right a few steps, and head down into the Metro Station. You automatically make your way to Henri’s Apartment.
~~~~~~~~~~~~~~~~~~~~~~~~~~~~~~~~~~~
PARIS - HENRI’S APARTMENT (GEORGE)
~~~~~~~~~~~~~~~~~~~~~~~~~~~~~~~~~~~
STREET
Interact with the door to Henri’s Apartment on the right, then interact with the intercom next to the door. Hector Laine answers the intercom. Work through the conversation topics with him. After some ‘persuasion’, he agrees to let you enter the apartment. Open the green door on the right, and enter Henri‘s Apartment.
HENRI’S APARTMENT
Talk to Hector Laine and work through all the conversation topics. When Hector leaves, talk to Bijou and work through all the conversation topics with her. Look at all the paintings of Bijou on the wall. Look at the coffin with Henri inside. Look at the stuffed dog on the table next to the coffin. Look at the dressing table on the left. Look at the music box in the shelves on the left. Look at the view out of the window. Look at the stereo. Talk to Bijou again and work through all the conversation topics with her. When you’re ready, leave the apartment.
STREET
You automatically make your way to Vera Security.
~~~~~~~~~~~~~~~~~~~~~~~~~~~~~~~~~~~
PARIS - VERA SECURITY (GEORGE)
~~~~~~~~~~~~~~~~~~~~~~~~~~~~~~~~~~~
ALLEY
Look at the sturdy shutter for Very Security, on the left. There’s no way you can open that shutter with your bare hands, so you have to find another way into the building. Look at the girder above the alley. If you could get up there, you could access the electrical box above the Vera Security building. Look at Bassam’s empty stall \ box on the right. Push the stall \ box along, climb up onto it, then jump up to the girder above. You automatically shimmy across to the electrical box.
Open the electrical box. Look at the various components inside the electrical box. Flip the switch under the Power Supply box, to turn the fan off. Use the NAIL CLIPPERS to cut all 3 blue wires. Now use the WIRE from your Inventory on the wire connecting the Shutter Motor box (bottom left) to the Power Supply box (top right). Finally, flip the switch under the Power Supply box again. It worked! The shutters roll open. Now simply go through the door, into Vera Security.
VERA SECURITY RECEPTION
Open the drawer on the left, and pick up the Q-TIP (COTTON BUD) from the drawer. Open the door behind the desk, and head through the door, into the Store Room.
STORE ROOM
It’s pitch black in here! In your Inventory, use SAFETY MATCHES with MATCHBOX CONTAINING COCKROACH. It gives you some light… but not for long. But it was enough to see that there’s a light switch next to the door. Flip the light switch to turn on the light.

That’s better! Explore the room. You see a pizza delivery scooter in the bottom right corner of the room. Look at the pizza delivery scooter. Look at the patch of oil on the floor, and use your Q-TIP (COTTON BUD) with the patch of oil to get OILY Q-TIP (OILY COTTON BUD). Look a the shredder on the the table next to the door, to see a close-up of it.
There’s some paper jammed in the shredder. Open the lid of the shredder, and look at the gears inside. They’ve seized up. Use your OILY Q-TIP (OILY COTTON BUD) with the gears to oil them. Push the green ‘START’ button to start the shredder and clear the jam. The letter goes through the shredder, and you have to put it back together. You see a close-up of the shredded letter. Before you do anything else, take the PAPERCLIP that’s lying on top of the shredded letter. Now reassemble the letter so it looks like this.

After you’ve read the letter, exit the close-up.
You decide to keep the SHREDDED LETTER. Look at the air vent on the left, and try to open the air vent. You can see something glinting through the grille. Use your PAPER CLIP with the air vent to open it. Look in the air vent to find the GUN that was used to shoot poor Henri. Watch the cut scene as Inspector Navet arrests you for trespassing.
~~~~~~~~~~~~~~~~~~~~~~~~~~~~~~~~~~~
PARIS - RUE JARRY (NICO)
~~~~~~~~~~~~~~~~~~~~~~~~~~~~~~~~~~~
NICO’S APARTMENT
You’re playing as Nico again. Watch the cut scene, as the elderly man - Tiago Marques - comes into your apartment. Talk to the elderly man and work through all the conversation topics. Marques claims to be the owner of the stolen painting, and he shows you an old family photo, with the painting hanging above the fireplace. He asks to see the photos you took of the robbery at the gallery, and you lay them out on the table. Look at all 4 photos, 2 times. You see a distinctive tattoo on the thief’s arm. One of the photos shows the stolen painting in great detail, so you give that photo to the elderly man. Now exit the close-up. Since Marques has nowhere to go, you agree to let him stay in your neighbour, Adam’s apartment, since Adam is out of town for a few days.
HALLWAY
Lift up the doormat in front of Adam’s door - he usually keeps a spare key under the mat, but the spare key isn’t there now. Look at the floor crack under the mat - the key must have fallen down there. Use your PRESS CARD WITH CHEWING GUM with the floor crack, to fish out the APARTMENT KEY. Now use APARTMENT KEY with Adam’s door. Watch the cut scene as you and Marques enter Adam’s apartment.
~~~~~~~~~~~~~~~~~~~~~~~~~~~~~~~~~~~
PARIS - GALLERY (NICO)
~~~~~~~~~~~~~~~~~~~~~~~~~~~~~~~~~~~
RUE ORSEL STREET
After leaving Marques in Adam’s apartment, you head back to the Gallery. Laine is sitting outside the café. Talk to Laine and work through all the conversation topics. When he gives you the choice, tell him ‘YES’, you want to go to the Gallery. Watch the cut scene as you and Laine head over to the office in the gallery.
LE LEZARD BLEU GALLERY - HENRI’S OFFICE
As Laine sits down on the settee, something sticks out from beneath the cushion. Sit down on the settee next to Laine. Notice the folder on Laine’s side of the settee, next to the arm. You need to distract him, so you can get a look at that folder. Talk to Laine and work through all the conversation topics. Make sure you ask him about champagne, so he pours you a glass. Pick up glass of CHAMPAGNE next to you. Now from your Inventory, give the glass of CHAMPAGNE to Laine - you ‘accidentally’ spill the CHAMPAGNE on him, so he has to go and dry off his trousers. While he is distracted, grab the folder. It conforms your suspicions. Watch the cut scene, as you make your excuses and leave.
~~~~~~~~~~~~~~~~~~~~~~~~~~~~~~~~~~~
PARIS - RUE JARRY (NICO)
~~~~~~~~~~~~~~~~~~~~~~~~~~~~~~~~~~~
NICO’S APARTMENT
Watch the long cut scene. You call your editor on the phone, George pops round to tell you about his arrest, then Marques makes an appearance. He shows his old family photo to George.
~~~~~~~~~~~~~~~~~~~~~~~~~~~~~~~~~~~
PARIS - RUE JARRY (GEORGE)
~~~~~~~~~~~~~~~~~~~~~~~~~~~~~~~~~~~
NICO’S APARTMENT
You’re playing as George again. Click on each part of the photo.
- Statue
- La Malediccio painting
- Man
- Child
- Woman
- Fireplace
Look at each part several times, until the responses repeat themselves. Make sure you notice the medallion that the father is wearing. Marques shows you his father’s medallion, as proof that he is indeed the boy in the photo. Look at Marques’s medallion - it’s definitely the same medallion from the photo. So if Marques is the rightful owner, that means that Medovsky has no claim to the painting, and you won’t have to pay out for the insurance claim.
Talk to Nico and work through all the conversation topics. She finds the phone number for Waterloo Motors (the logo on the thief’s helmet) for you. Talk to Nico again and continue working through all the conversation topics. Talk to Marques and work through all the conversation topics.
Explore the apartment. Look at Nico’s camera. Look at the computer. Look at the bin. Look at the bottle of wine on the table. Look at the wooden chest at the end of Nico’s bed. Use the PHONE in your Inventory and call the following people.
- Rickenbacker
- Waterloo Motors
Work through the conversation topics with Waterloo Motors - you get a lead for London, and you and Nico decide to travel there.
~~~~~~~~~~~~~~~~~~~~~~~~~~~~~~~~~~~
LONDON - MEDOVSKY’S RESIDENCE (NICO)
~~~~~~~~~~~~~~~~~~~~~~~~~~~~~~~~~~~
STREET
You’re playing as Nico. Look at the gate, and try to open it - it’s locked remotely. Look at the intercom system, and try to use it - no answer. Talk to the Gardener and choose any conversation topic. No matter what you say, he’s rude to you. Look at the large topiary busy that he’s cutting, and also look at the spiral topiary bushes on either side of the door. Talk to the Gardener again and discuss topiary. You have a deep, philosophical discussion with him. When he asks, decide if you think his topiary bush is good or bad. Continue working through the conversation topics. Watch the cut scene, as you are eventually allowed into the house.
LIBRARY
Watch the cut scene, as Mr Medovsky greets you. Choose if you want to take a soft approach, or a hard approach, then work through all the conversation topics with him. Watch the cut scene, as the Gardener interrupts you. After Medovsky leaves, you’re able to search the room freely.
~~~~~~~~~~~~~~~~~~~~~~~~~~~~~~~~~~~
LONDON - MEDOVSKY’S RESIDENCE (GEORGE)
~~~~~~~~~~~~~~~~~~~~~~~~~~~~~~~~~~~
LIBRARY
You’re playing as George now. Look at the cigarette box on the table, to see a close-up.
Look at the cigarette box in the close-up. Look at the broken catch, then exit the close-up. You have a discussion with Nico. Look at the cabinet on the left to see a close-up.
Look at the blue Russian egg on the cabinet on the left. Pick up the COIN. Look at the Presentation Note in the book stand. Look at the Title Page of the book, and notice the date - 1869. Look at the medals in the display case. Look at Hobb’s Business Card on the lower shelf. Look at the Note on the lower shelf. Exit the close-up.
Look at the framed Voucher on the wall. Look at the framed photo on the wall. Look at the 3 bookcases. Look at the old typewriter on the small table, to get a close-up.
The typewriter keyboard is in Cyrillic. You don’t know the symbols, but if you could remember the layout of a standard keyboard, you might be able to work it out. You need to learn the symbols for the numbers 1869, which is the date you saw in the book. Look at the symbols below.

Exit the close-up.
Look at the cigarette box on the table again.
In the close-up, use the COIN with the broken catch to open it, and open the cigarette case. Look at the cigarettes in the box - it’s the same brand as what you saw in Vera Security. Take the KEY from inside the lid of the cigarette box. Exit the close-up.
Try to open the Study door on the left - it’s locked. Use the KEY you found in the Study door to unlock it. Watch the cut scene with Medovsky and Hobbs. Now enter the Study on the left.
STUDY
Explore the Study. Look in the open drawer of the cabinet next to the door - there‘s only a candy bar wrapper in there. Look at the paintings on the wall - one of them reminds you of your Aunt Maude. Look at the desk to see a close-up.
The desk is magnificent. Look at the Cyrillic buttons - it’s the same symbols as you saw on the typewriter. Look at the ashtray. Look at the chair. Look at the cigar cutter. Now turn your attention to the desk, and push the symbols that represent the date 1869, which is the date you saw in the book. Push the symbols like so.

A secret drawer pops open. Take the DOCUMENTS from the drawer - they show plenty of evidence about the stolen painting, as well as the person who shot Henri. Watch the cut scene as you put things back in place, and return to the Library, before Medovsky returns.
LIBRARY
Work through the conversation topics with Medovsky. When conversation is over, you and Nico decide to investigate Hobbs’s place.
~~~~~~~~~~~~~~~~~~~~~~~~~~~~~~~~~~~
LONDON - HOBBS’S RESIDENCE (GEORGE)
~~~~~~~~~~~~~~~~~~~~~~~~~~~~~~~~~~~
YARD
Explore the yard. Look at the chain on the gate. Look through the back window of the van. Open the van cab door, so you can see inside the van.
Take the bottle of WHISKY from the glove compartment inside the van. Try to honk the horn, but the horn isn’t working. Press the bonnet catch button under the steering wheel, to release the hood. Leave the van.
Open the van bonnet at the front of the van, to see a close-up.
Look at the engine block. It’s a complete mess in here. Look at the wires at the top left. Look at the wire loom at the top left. Look at the horn at the bottom left, then look at the loose wire on the horn. Look at the battery terminal at the top right. Look at the battery on the right. Look at the horn on the bottom right, then look at the loose wire on the horn. Exit the close-up.
Search the pile of junk in the lower right corner, to find some WIRE. Watch the cut scene, as Inspector Navet calls you on your mobile phone. When you’ve finished talking to him, pick up both pieces of LONG WIRE from the pile of junk in the lower right. Look at the bonnet at the front of the van again.
From your Inventory, use a piece of LONG WIRE with one of the horns, and you connect both horns together. Use your NAIL CLIPPERS to cut the remaining piece of LONG WIRE, so you now have 2 pieces of SHORT WIRE. Use a piece of SHORT WIRE with the wiring loom at the top left, and connect it to the horn at the bottom left. Use the remaining piece of SHORT WIRE with the battery terminal at the top right, and connect it to the horn at the bottom right. Everything is wired up now, so you exit the close-up.
Look at the blue security door, and knock on the door - it seems that nobody’s home. Look at the mailbox next to the door, and search the mailbox to find an UNOPENED LETTER. Take the UNOPENED LETTER. In your Inventory, open the letter and read it, so it becomes a MODELLING AGENCY LETTER. Open the van cab door again, so you can see inside the van.
Push the horn, in the middle of the steering wheel. Since you’ve wired up the horn in the engine, it sounds loudly, getting Hobbs’s attention. Talk to Hobbs and use the following conversation topic with him.
- Modelling Agency Letter
He allows you access to enter his home. Open the blue door, and enter the building.
STUDIO
Hobbs mistakes you and Nico for the models he had hired. Nico uses this to your advantage, and distracts Hobbs, so that you can investigate the place. Look at the bottles on the table next to Hobbs. Keep an eye on the whisky glass on the table, and when Hobbs finishes his whisky, use your bottle of WHISKY with the whisky glass to give Hobbs a top-up. Try to look at the portfolio on the floor next to Hobbs, but he tells you off. You NEED to get a look inside that portfolio. Walk behind the screen on the right, and watch the cut scene with Lady Piermont. Chat to Lady Piermont, and listen to her complain that it’s too cold in the studio. Adjust the thermostat next to the door, so it’s warmer. But Hobbs wants you to turn it back down again, explaining that the old wiring in this building can’t handle much power. However, Lady Piermont persuades him to keep the thermostat on.
Look at the fuse box on the wall next to the door. Look at the stereo on the shelf under the stairs, to see a close-up.
Look at the turntable, and push the power button to turn it on. Adjust the volume knob to make it louder. Look at the pile of records next to the turntable. Exit the close-up.
Talk to Hobbs and work through all the conversation topics you‘re able to. If his glass is empty, refill it with your bottle of WHISKY. Talk to Lady Piermont and work through all the conversation topics. Look at the lift behind Lady Piermont. Climb up the stairs on the right, and use the lift buttons next to the blue door to lower the lift. Climb down the stairs again, talk to Lady Piermont, and use the following conversation topic.
- Lift
She steps onto the lift. Climb back up the stairs, and use the lift buttons next to the blue door again, to call the lift up. However, the lift gets stuck halfway, trapping Lady Piermont. Hobbs goes to over to the fusebox to try and get the power back. While he is busy, look at the portfolio on the floor.
Look at the sketch in the portfolio, then turn to the next page. Look through all the sketches, until you come across the UNUSUAL SKETCH. Look at the UNUSUAL SKETCH to see that it’s the ouroboros, but it’s different from the Ouroboros you saw in the Gallery. Take the UNUSUAL SKETCH.
Hobbs has restored the power, so he turns his attention back to you. Talk to him about Henri. Choose if you want to take a soft approach or a hard approach. Work through as many conversation topics with him as you can, before he throws you out of his studio.
YARD
Watch the cut scene with Nico, as you discuss the situation. Who really owns the stolen painting - Marques… or Medovsky? Which one of them is lying? You and Nico have to return to Paris.
~~~~~~~~~~~~~~~~~~~~~~~~~~~~~~~~~~~
PARIS - MAP (GEORGE)
~~~~~~~~~~~~~~~~~~~~~~~~~~~~~~~~~~~
MAP SCREEN
Go to the Gallery, ready for the reconstruction of the crime scene.
~~~~~~~~~~~~~~~~~~~~~~~~~~~~~~~~~~~
PARIS - GALLERY (GEORGE)
~~~~~~~~~~~~~~~~~~~~~~~~~~~~~~~~~~~
RUE ORSEL STREET
Open the Gallery door, and enter the Gallery.
LE LEZARD BLEU GALLERY
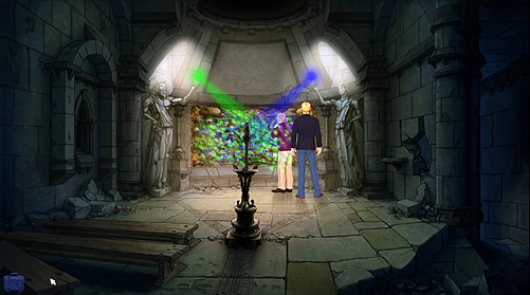
Watch the cut scene with Inspector Navet. He’s trying to get a machine working, that will help him analyse the ’blood stain’ on the floor, and deduce who Henri’s killer is. Talk to Laine and work through all the conversation topics. Watch the short cut scene. Try to leave the Gallery, but Inspector Navet won’t let you go, until his reconstruction is finished. Talk to Inspector Navet and work through all the conversation topics. You think you can get the machine to work, if only Inspector Navet would get out of the way! Walk left a few seps, and notice the plug in the socket in the left wall. Pull the plug out of the socket. Walk right a few steps, talk to Inspector Navet again, and ask him about the machine. He goes to plug the machine back in, giving you a chance to fix the machine.
You see a close-up of the machine’s controls. You need to turn all the lights to green. In order to do that, flip the switches in the following order.

When all the lights have turned green, flip the red power switch at the bottom. The machine is now working. Of course, Inspector Navet takes all the credit! Watch the cut scene. Open the door on the left, and enter Henri’s Office.
LE LEZARD BLEU GALLERY - HENRI’S OFFICE
Look at the statue of Henri, and look at Henri’s Head on the statue. The Head is wearing some glasses. Take HENRI’S GLASSES from the head of the statue, then leave the Office.
LE LEZARD BLEU GALLERY
Give the GLASSES to Inspector Navet, then watch the cut scene, as the reconstruction begins. You take the place of Henri, so you are lying on the floor pretending to be dead. Talk to Father Simeon and work through the conversation topics. He gets very upset when you show him HOBBS’S SKETCH, and storms out of the Gallery. Watch the cut scene, as Langham from Interpol introduces himself.
RUE ORSEL STREET
Watch the cut scene, as you, Nico, and Langham discuss the case over coffee at the café. When Langham leaves, you want to pay another visit to Bijou, since she wasn’t entirely honest with you on your last visit.
MAP SCREEN
Go to Bijou’s Apartment.
~~~~~~~~~~~~~~~~~~~~~~~~~~~~~~~~~~~
PARIS - BIJOU’S APARTMENT (GEORGE)
~~~~~~~~~~~~~~~~~~~~~~~~~~~~~~~~~~~
STREET
Look at the green door to Henri & Bijou’s apartment on the right. Use the intercom next to the door, and Bijou will grant you access. Enter through the green door, into the apartment.
BIJOU’S APARTMENT
Bijou seems a lot more emotional than the last time you saw her. Talk to her and work through the conversation topics with her. She’s not making much sense. But you realise that she’s upset because she lost the record of her and Henri’s ‘special’ song - ‘Jasmine‘ by The Hairy Lobsters. You should find another copy of it for her. Look at the broken record on the floor. When you’re ready, leave the apartment.
STREET
Walk up the street, and return to the Map Screen.
MAP SCREEN
Go to Vera Security.
~~~~~~~~~~~~~~~~~~~~~~~~~~~~~~~~~~~
PARIS - VERA SECURITY (GEORGE)
~~~~~~~~~~~~~~~~~~~~~~~~~~~~~~~~~~~
ALLEY
Talk to Bassam and work through all the conversation topics with him. Look at Bassam’s stall, and look at the Musical Greeting Cards. Talk to Bassam again and ask about the following topics.
- Song
He gives you a MUSICAL CARD that plays Jasmine. Head up to the Map Screen.
MAP SCREEN
Go back to Bijou’s Apartment.
~~~~~~~~~~~~~~~~~~~~~~~~~~~~~~~~~~~
PARIS - BIJOU’S APARTMENT (GEORGE)
~~~~~~~~~~~~~~~~~~~~~~~~~~~~~~~~~~~
STREET
As before, use the intercom next to the green door on the right, and Bijou will grant you access. Enter through the green door, into the apartment.
BIJOU’S APARTMENT
Give MUSICAL CARD to Bijou. She’s delighted, but in her confused state, she thinks you are Henri, and she wants you to dance with her. You need to get the SAFE KEY for the Gallery from her. Maybe if you look more like Henri, she would give you the key. Look at Bijou’s dressing table to get a close-up.
From the dressing table, take a WAX STRIP from the pile under the mirror. Now exit the close-up.
Look at the stuffed dog on the table, next to the coffin. Use WAX STRIP with the stuffed dog to get some WAXED DOG HAIRS. Look at Henri’s coffin, and take the WHITE FLOWER from the coffin. Walk left, and look at the dressing table again, to get another close-up.
Time to make yourself look like Henri. There’s a photo of Henri here, for reference. Look at the brown eye shadow - you use it to darken your hair. Henri has a goatee. From your Inventory, use WAXED DOG HAIRS, and use them with your mouth in the mirror. From your Inventory, use Henri’s GLASSES, and use them with your eyes in the mirror. From your Inventory, use EAU DE TOILETTE, and use it with your neck in the mirror. From your Inventory, use WHITE FLOWER, and use them with your button hole in the mirror.
Watch the cut scene as you dance with Bijou. She gives you BIJOU’S KEYS… then she faints. You leave her to rest, then you automatically return to the Gallery.
~~~~~~~~~~~~~~~~~~~~~~~~~~~~~~~~~~~
PARIS - VERA SECURITY (GEORGE)
~~~~~~~~~~~~~~~~~~~~~~~~~~~~~~~~~~~
RUE ORSEL STREET
Watch the cut scene with Father Simeon. Work through all the conversation topics with him. Walk right to the Gallery, and try to enter the Gallery. The door is locked. But don’t worry - use BIJOU’S KEYS with the Gallery Door to unlock it, and enter the Gallery.
LE LEZARD BLEU GALLERY
Walk left a few steps, and enter Henri’s Office.
LE LEZARD BLEU GALLERY - HENRI’S OFFICE
Look at the statue of Henri. Click on the fig leaf on the statue. Now you look closely, you can see that the fig leaf on the statue is hinged. Move the fig leaf on the statue - a hidden safe is revealed. Look at the safe to see a close-up. The safe is locked, so use BIJOU’S KEYS to unlock it. Pick up HOBBS’S NOTE from the safe. Were Hobbs and Bijou having an affair? Pick up DIAMOND RING from the safe. Pick up the PAPERWORK from the safe. This is the PROVENANCE you’ve been looking for.
You move over to the desk, to study the PROVENANCE in more detail. It clearly states that Medovsky is the owner of the stolen painting, and it looks authentic, but you’ve learned not to take things at face value. Turn the PROVENANCE round 2 times, so it’s upside down. Use HOBBS’S SKETCH with the Provenance. The coffee cup stains on both the documents match! Which means that the PROVENANCE is a fake, created by Hobbs, and that Medovsky is NOT the true owner of the painting.
You hear a gunshot coming from the Gallery. You have to get out there, to see what’s happened. Try to open the door, but something is blocking it from the other side. The window doesn’t open, and the glass is reinforced. Use DIAMOND RING with the window, to cut through the glass and escape.
RUE ORSEL STREET
Enter the Gallery through the front door again.
LE LEZARD BLEU GALLERY
Watch the cut scene with Father Simeon. R.I.P. Simeon! Take the PAPERS that are in Father Simeon’s hand. You see a close-up of the papers - look at the Cover Note, Manuscript, First Passage, Second Passage, Third Passage, and Illustration. Exit the close-up.
Watch the cut scene with Laine. While you are talking to Laine, Nico calls, and says that something terrible has happened. You rush over to her apartment.
~~~~~~~~~~~~~~~~~~~~~~~~~~~~~~~~~~~
PARIS - RUE JARRY (GEORGE)
~~~~~~~~~~~~~~~~~~~~~~~~~~~~~~~~~~~
ADAM’S APARTMENT
Watch the cut scene with Nico. Hmm, so Father Simeon, and Marques, both got attacked at the same time. Just what exactly are you up against? Look at the bloodstain on the floor. Look at the coins collection on the cabinet on the left. Look at the overturned chair - you find Marques’s MEDALLION. Look at the settee - you find MARQUES’S SCRIBBLED PHOTOGRAPH. In the photo, look at Sants, Magdalena, and Judes. Exit the close-up. Look at the mess in front of the settee - you find MARQUES’S FAMILY PHOTOGRAPH. Watch the cut scene with Nico. Inspector Navet is after you, so you quickly escape into Fleur’s Flower Shop.
FLEUR’S FLOWER SHOP
Watch the cut scene. Fleur gives you a BALL OF YARN. Detective Moue is outside the shop - you can’t let him see you. Talk to Fleur and work through all the conversation topics with her. Talk to Nico. Talk to Adam and work through all the conversation topics with him. You give Adam your COIN, and he leaves, to get it valued. He was so excited about the coin, he left his CD Player behind, on the counter. Look at the CD Player to get a close-up.
Press the STOP button on the CD Player. Press the EJECT button on the CD Player. Take the COMPACT DISC from the CD Player. Open the battery compartment, and take the BATTERY. Exit the close-up.
Look at the stereo on the counter, and insert the COMPACT DISC into the stereo. Take some FLOWERS from the basket on the ground, in front of the counter, and give the FLOWERS to Nico. However, Nico doesn’t want the FLOWERS, because she’s not a fan of yellow flowers. So Fleur was wrong! Look at the boxes on the right, and take the MANNEKIN PIS from the boxes. What an odd thing to find in a flower shop. In your Inventory, pour WHISKY into the MANNEKIN PIS, then add the BATTTERY to the MANNEKIN PIS. The MANNEKIN PIS is all ready for action now. Place the MANNEKIN PIS into the trolley on the left, then push the trolley outside. The sight of the MANNEKIN PIS aggravates Moue’s… problem… and he rushes off to the bathroom. You and Nico can now escape.
You decide it’s time for another little chat with Bijou.
~~~~~~~~~~~~~~~~~~~~~~~~~~~~~~~~~~~
PARIS - BIJOU’S APARTMENT (GEORGE)
~~~~~~~~~~~~~~~~~~~~~~~~~~~~~~~~~~~
STREET
You and Nico arrive in the street outside Henri & Bijou’s apartment. Look at the green door on the right. Use the intercom next to the door, and Bijou will grant you access. Enter through the green door, into the apartment.
BIJOU’S APARTMENT
Watch the cut scene with Bijou. Talk to Bijou and work through all the conversation topics with her. She’s nursing a bad hangover, after all the champagne she drank earlier. It turns out that she knew the Provenance for the painting was fake - which means that Medovsky is not the true owner of the stolen painting. Continue working through the conversation topics with her. When conversation is over, you and Nico decide to return to London, for some more investigating.
~~~~~~~~~~~~~~~~~~~~~~~~~~~~~~~~~~~
LONDON - HOBBS’S RESIDENCE (GEORGE)
~~~~~~~~~~~~~~~~~~~~~~~~~~~~~~~~~~~
YARD
Watch the cut scene. You automatically take the CHAIN from the ground. Pick up the CROWBAR that’s on the ground, behind the van. Open the van door to look inside. Give the horn inside the van a blast. That’s how you got Hobb’s attention last time. However, it doesn’t work this time. Try knocking on the front door - that doesn’t work either. You’ll have to find another way in. Climb up the drainpipe on the right. It’s climbable, but that seagull doesn’t like you being on ‘his’ drainpipe. While you’re still on the drainpipe, talk to Nico and work through the conversation topics. She honks the van horn, scaring the seagull away. Quickly, before the seagull returns, climb up to the crane at the top of the drainpipe. Use the CROWBAR with the crane, to swing across to the balcony.
STUDIO
You let Nico into the Studio. Something doesn’t feel right here. Look at the fuse box on the wall, next to the front door - it’s making a sinister buzzing sound. Look at the painting, which is under the sheet in the middle of the room. You automatically keep the DUST SHEET that covered the painting. It soon becomes apparent that Hobbs is a forger - he creates forged paintings. This particular painting, featuring you, Nico, and Lady Piermont, is very… unique.
Climb up the stairs on the right, and look at the balcony door. Try to open the balcony door, but it’s locked. However, you know that the stolen painting has to be behind this door, so you have to find a way to get it open. Use the lift buttons next to the door, to raise the lift. Now attach your CHAIN to the lift. Watch, as you attach the other end of the chain to the balcony door, then lower the lift again, thus forcing the door open. Now walk through the balcony door, into Hobbs’s Lair.
HOBBS’S LAIR
Explore the lair. Look at the portrait on the wall next to the door. You recognise the subject as Bijou. And from what Bijou told you earlier, you realise that this portrait is very important. Unfortunately, it’s screwed to the wall. Use your CROWBAR with the portrait, to pry it off the wall. SUCCESS! The stolen painting was indeed hidden behind Bijou’s portrait. You found it! Look at La Malediccio in your Inventory, to see a close up. Now look at all the various sections of the painting.
- Human Tower on the left
- Priest
- Building (Tower)
- Bearded Man
- Green Light in his hand
- Castle
- Buildings (Village)
- Scarred Face
- Buildings (Affluent Town)
- Young Man
- Blue Light in his hand
- Dog-Headed Man
- Human Tower on the right
When you’re ready, exit the close-up. Look at the Abstract painting on the wall, on the other side of the door. Look at the sink. Look at the cupboard under the sink. Look at the Landscape painting above the sink. Notice that the phone in the cupboard next to the sink is blinking. Use the phone, and listen to Hobbs’s messages - there’s one from Medovsky, and another one from Bijou. Open the cupboard door under the phone, then pick up the COLA BOTTLE. Look at the settee, and look at the sandals on the floor in front of the settee. Look at the portrait on the wall above the settee. Walk right a few steps… you discover Hobbs’s body. He’s been strangled! Look at Hobbs to get a close-up.
Look at Hobbs’s body. Take the MINTS from his pocket. Exit the close-up.
Look at the empty frame on the easel, near Hobbs’s body. It looks like Hobbs had been making a forgery of the stolen painting… and someone stole that forgery, thinking it was the real thing. Look at the various other paintings on the wall, and look at the Pinboard on the wall, in amongst the paintings. Look at the various sections of the Pinboard.
- Castell Catala Article
- 4 Sketches
- Castell Dels Sants at the top right of the map
Watch the cut scene, as you and Nico piece together parts of the conspicary. Then you realise that the building is on fire - you HAVE to get out of here! In your Inventory, combine the MINTS with the COLA BOTTLE to create TREMBLING BOTTLE. Now use TREMBLING BOTTLE with the drip bucket on the floor. The TREMBLING BOTTLE shoots up, opening the skylight in the ceiling. Now you just have to get up there. In your Inventory, tie the DUST SHEET to the CROWBAR, then use the resulting GRAPPLE AND LINE with the skylight in the ceiling. Watch the cut scene, as you and Nico climb up onto the roof.
ROOF
Watch the cut scene with Langham. Wait… is Langham one of the bad guys? Thankfully, the Fire Brigade rescue you. Following the leads you uncovered, you and Nico make your way to Spain.
~~~~~~~~~~~~~~~~~~~~~~~~~~~~~~~~~~~
SPAIN - CASTELL DELS SANTS (NICO)
~~~~~~~~~~~~~~~~~~~~~~~~~~~~~~~~~~~
GATE
Watch the cut scene, as someone starts shooting at you, before you finally arrive at the Castell Gate. Someone is still shooting at you from inside the Castell. You need a target to distract the Shooter. Pick up the HELMET from the grass on the left. Look at the crumbled wall next to you, and look at the rubble on the ground in front of the wall. In your Inventory, attach the HELMET to the MOP, so you have MOP WITH HELMET. Now use MOP WITH HELMET with the crumbled wall. The Shooter shoots at your makeshift target, giving George the chance to get through the gate.
~~~~~~~~~~~~~~~~~~~~~~~~~~~~~~~~~~~
SPAIN - CASTELL DELS SANTS (GEORGE)
~~~~~~~~~~~~~~~~~~~~~~~~~~~~~~~~~~~
GARDEN
There’s a goat here - déjà vu, anyone? Notice that he’s tethered to the old tyre. Let’s make friends with the goat… for old time’s sake. Interact with the goat - it will eat your PROVENANCE. Interact with the goat again - this time, it will eat MARQUES SCRIBBLED PHOTO. Alternatively, just give PROVENANCE and PARQUES SCRIBBLED PHOTO to the goat. Look at the apple tree, and look at the APPLES. Now stand in front of the apple tree, facing the goat. Move your mouse left slightly, so you can see the word ‘DODGE’, then click to Dodge Left. The goat butts the tree, knocking the APPLES to the ground. Pick up all the APPLES from the ground, and give APPLES to the goat. He has a taste for apples now. Look at the pile of apples on the right - they’re just outside the goat’s reach. Give PIECE OF RICH TEA BISCUIT to the goat (you weren’t able to do this, until now). Did the goat just say ‘Thanks’? Look at the pile of bottles behind the car, and throw an APPLE onto the pile of bottles. The goat goes to eat it. While he’s distracted, pick up the tyre on the ground, and move it close to the pile of apples on the right. Now the goat can enjoy as many apples as he wants.
While he’s busy with the apples, take the SIDE MIRROR from the car. Now look at the sun in the sky, between the apple tree and the Castell - it‘s blinding. Use SIDE MIRROR with the sun, to shine the blinding light back towards the Shooter. You take your chance, and run up to the Castell wall.
Look at the old man - Ramon - behind the window, and work through the conversation topics. Look at the gun he’s holding. Look at the wind chime hanging from the pillar on the left. Talk to Roman and work through all the conversation topics. Since all your attention is focused on the old man, you don’t notice the armed woman - Eva - sneaking up behind you. This doesn’t look good! Work through all the conversation topics with her. When you show her the LA MALEDICCIO stolen painting, her attitude changes, and she takes you inside the Castell.
GREAT HALL
Watch the cut scene, as you meet up with Marques again. You’re glad to see he’s alive and well. He hangs the LA MALEDICCIO painting above the fireplace, just as it was in his old MARQUES FAMILY PHOTOGRAPH. Placing the painting back here would reveal some answers. But the room has changed somehow, and Marques can’t put his finger on HOW it’s changed.
Talk to Marques and work through all the conversation topics with him. Look at the carved figurines on either side of the fireplace. Look at the carved tree to the left of the fireplace. Look at the bookcase at the back wall. Look at the crate of brandy on the floor, next to the bookcase. Look at all the shields on the wall, above the door. Look at the pile of stuff in the upper left corner of the room. Look at the GREEN STATUE in the lower left corner of the room, and pick up the GREEN STATUE.

Now open the door in the back wall, and head out to the Cloisters.
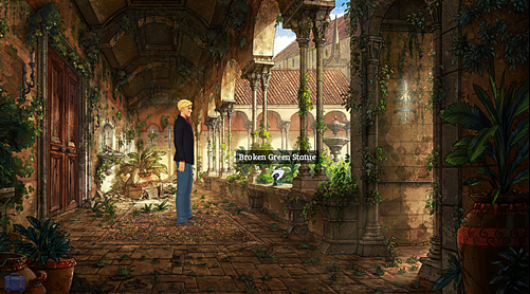
CLOISTERS
Look at the BROKEN GREEN STATUE on the wall on the right, and pick up the BROKEN GREEN STATUE.
Look at the Library door on the left. Try to open the door, but it’s locked. Look at the rubble near the door. Go right, back to the Great Hall.
GREAT HALL
Walk right, and go out the front door, to the fountain.
FOUNTAIN
Watch the cut scene with Eva and Nico. After Nico leaves, talk to Eva and work through the conversation topics. Look at the sundial on the left. Look at the fountain, look at the BROKEN BLUE STATUE inside the fountain, and pick up the BROKEN BLUE STATUE. Also take the BLUE STATUE from the bushes on the right. Open the front door, and return to the Great Hall.
GREAT HALL
Look at the mantelpiece above the fireplace to get a close-up. Look at the MARQUES FAMILY PHOTOGRAPH in your Inventory, to use as reference.
Look at the painting to see a close-up, and look at the following sections of the painting.
- Human Tower on the left
- Priest
- Buildings (Tower)
- Bearded Man
- Castle
- Buildings (Village)
- Scarred Face, and Symbol in the Scarred Face
- Buildings (Affluent Town)
- Young Man
- Dog-Headed Man
- Human Tower on the right
Exit the close-up of the painting.
Look at the plinths on either side of the painting, to learn that they can be rotated. Place the BROKEN GREEN STATUE on the left plinth, and rotate the plinth 6 times. Place the BLUE STATUE on the right plinth, and rotate the plinth 6 times. You hear a ‘CLICK’, and a hidden staircase is revealed inside the fireplace. Watch the cut scene, as you and Marques climb up to the top of the staircase.
~~~~~~~~~~~~~~~~~~~~~~~~~~~~~~~~~~~
SPAIN - CASTELL DELS SANTS (NICO)
~~~~~~~~~~~~~~~~~~~~~~~~~~~~~~~~~~~
GREAT HALL
While George is busy with Marques, you get to play as Nico for a while. Watch the cut scene. Work through the conversation topics with Ramon. He tells you all about Wolfram. When you’re ready, go through the front door on the right, and out to the fountain.
FOUNTAIN
Talk to Eva and work through the conversation topics. Walk down to the Garden.
GARDEN
Talk to the goat. Bet you never knew goats were so interesting! Now open the car door, and look inside the car.
CAR
Look at the shoes. Look at the blanket. Look at the dashboard. Look at the radio. Use your PRESS CARD WITH CHEWING GUM with the radio, to hear the radio interview with George. Look at the tin can keys in the middle of the car, near the gear stick. Look at the bottle. Look at the lining in the door. Move the pillow, and pick up the old book that was hidden underneath the pillow. As you are reading it, the goat steals it from you. Exit the car interior.
GARDEN
Walk up to the fountain.
FOUNTAIN
Look at the wind chime in the distance. It looks like it’s made from old tin cans.
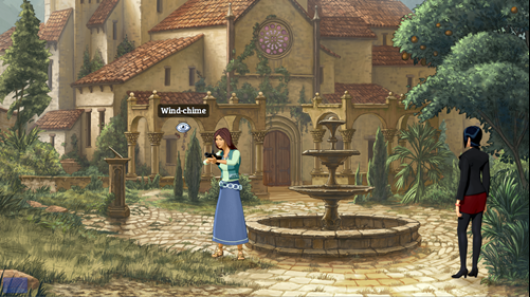
Look at the wind chime again, to see a close-up (this won‘t work, unless you‘ve looked at the tin can keys in the car). Look at the single red tin can in the wind chime.

It looks like it’s bulging. Take CASTELL LIBRARY KEY from the tin can. Go through the front door, into the Great Hall.
GREAT HALL
Walk left a few steps, and go through the door in the back wall, out to the Cloisters.
CLOISTERS
Look at the library door on the left, and use CASTELL LIBRARY KEY with the door to unlock it. You automatically enter the Library.
LIBRARY
Explore the Library. Look at the bookcase. Look at the trunk, to see a close-up.
Take the MAP from the trunk. You automatically take it over to the table, to study it.
~~~~~~~~~~~~~~~~~~~~~~~~~~~~~~~~~~~
SPAIN - CASTELL DELS SANTS (GEORGE)
~~~~~~~~~~~~~~~~~~~~~~~~~~~~~~~~~~~
CHAPEL
You’re playing as George again. The hidden staircase led you up to the Chapel. Watch the cut scene with Marques. Talk to Marques and work through all the conversation topics with him. Look at the Fresco in the wall, to see a close-up.
Look at the various parts of the Fresco.
- Various Figures
- Town
- Montsegur
- Crusaders
- Martyrs
Exit the close-up.
Look at the statues on either side of the Fresco - The look like the statues from the painting, and also from the fireplace. Marques tells you a lot about these statues - the gods they represent must rule together in harmony, otherwise the world would be in chaos. Look at the glass lens that the Jehovah statue is carrying. Look at Jehovah’s glass disc again, to see a close-up of it.
In the close-up, remove the leather cover, to reveal a lens. Rotate the disc 1 time, so that the green light is shining through the lends. Exit the close-up.
Look at the glass lens that the Lucifer statue is carrying. Look at Lucifer’s glass disc again, to see a close-up of it.
In the close-up, remove the leather cover, to reveal a lens. Rotate the disc 3 times, so that the blue light is shining through the lens. Exit the close-up.
The green and blue lights represent the green and blue statues you placed on the fireplace earlier. Look at the candelabrum in the middle of the room. Use your SAFETY MATCHES with the candelabrum to light it, then use the MEDALLION with the candelabrum. Watch the cut scene, as the light shines onto the Fresco. Afterwards, you automatically return to the Great Hall.
GREAT HALL
Watch the cut scene. Take the LA MALEDICCIO PAINTING from the wall above the fireplace. If you haven’t done so already, look at the shields on the wall above the door, and make sure you find the one marked ‘Berga’. Follow Nico out the door in the back wall, and make your way to the Library.
LIBRARY
As per her father’s request, Eva joins you. Watch the cut scene. Exit the close-up of the MAP - you don’t have all the information you need yet, to complete this puzzle.
Look at the trunk in the corner, to get a close-up.
Move the oil cloth out of the trunk. Move the blanket. Move the hat. Move the shirt. Pick up the FOLDED NOTE that was underneath the shirt - you realise that it’s a TELEGRAM. Look at the TELEGRAM in your Inventory - it’s encrypted. You need to decipher it. Click on a letter in the paragraph, then click on the correct letter from the alphabet below. When you’ve finished decrypting it, it will show the following message.
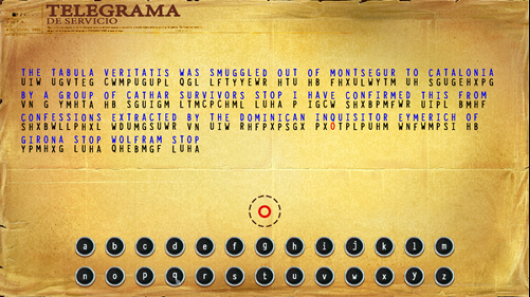
The Tabula Veritatis Was Smuggled Out Of Montsegur To Catalonia
By A Group Of Cathar Survivors Stop I Have Confirmed This From
Confessions Extracted By The Domincan Inquisition Eymerich Of
Girona Stop Wolfram Stop
Exit the close-up of the TELEGRAM. Exit the close-up of the trunk.
Look out the window. Look at the tapestry hanging on the wall, next to the window. Look at the suit of armour in the upper left corner. Look at the empty frame on the floor in the lower left corner. Look at the MAP on the table in front of Nico and Eva. Look at the MAP again. You have all the information you need now, to pinpoint the important locations. Take a pin from the box at the bottom, and place pins in the following locations.
- Sant Ramon
- Berga
- Montsegur
- Girona
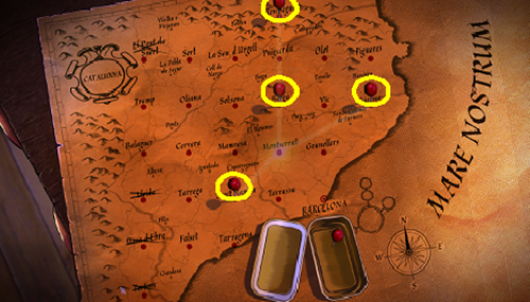
The 4 places all converge on 1 point - Montserrat. That must be where the Tabula is located. Watch the cut scene, as Langham appears, and reveals his true identity as the grandson of Gehnen. He abducts Marques, fires a warning shot, and locks you all in the library. After he leaves, look at the bullet hole in the wall on the left - you see daylight peeking through the hole. So this must be a false door, leading outside. Interact with the bullet hole again - the false door opens. Watch the cut scene, as you, Nico, and Eva make your escape. Next stop - Montserrat.
~~~~~~~~~~~~~~~~~~~~~~~~~~~~~~~~~~~~~~<
MONTSERRAT - TRAIN STATION (GEORGE)
~~~~~~~~~~~~~~~~~~~~~~~~~~~~~~~~~~~~~~
COURTYARD
Watch the cut scene, as you, Nico, and Eva arrive in Montserrat. Look at the Cathedral on the right - that’s where the Tabula is supposed to be. Notice the 3 guards, guarding the stairs of the Cathedral. Talk to them - they each give you a different excuse as to why you can’t enter the Cathedral! There’s no way you can get past these guys, so you’ll have to find another way into the Cathedral. Head down the stairs at the bottom right.
~~~~~~~~~~~~~~~~~~~~~~~~~~~~~~~~~~~~~~
MONTSERRAT - CABLE CAR STATION (GEORGE)
~~~~~~~~~~~~~~~~~~~~~~~~~~~~~~~~~~~~~~
CABLE CAR STATION EXTERIOR
It’s an impressive building. And it looks new. Look at the canopy on the left. Cross over the bridge, and try to enter the front door, then watch the cut scene with Langham and his goon. Eva decides to follow Langham, since he’s holding her father captive. It’s up to you and Nico to find a way into the Monastery. Walk left a few steps, and use the telescope that‘s looking out over the mountains.
Drag the telescope view left, until you see a face in the rocks.

Click on that face. You’ve seen that face before… in the LA MALEDICCIO PAINTING. Langham has the forged version of the painting, which doesn’t show the face, so the face in the rock won’t mean anything to him.
Use the telescope again, and drag the telescope view left, until you see Santa Cova Chapel.

Click on the Chapel. Drag the telescope view right and down slightly, until you see the other cable car station.

Click on the cable car station. Drag the telescope view right, a little bit more, until you see the yellow cable car.

There’s something glinting in the cable car - click on the glint. You recognise the people in the cable car as your old friends Pearl and Duane Henderson. They seem to be stranded out there. You need to signal them, that you will help. Use your SIDE MIRROR on the glint. Pearl must have seen your signal, because she writes a message on the cable car window, giving you the code to enter the cable car station. You automatically step away from the telescope.
Use the door of the building, to enter the Cable Car Station. Thanks to Pearl giving you the code, you can easily get inside.
CABLE CAR STATION INTERIOR
Look at the counter near the door on the right. There’s nobody here. Pick up the LUNCH BOX on the floor next to the counter. Hmm, the LUNCH BOX seems to be calling for help. You need to find a way to break into it, so you can find out what’s going on. Look at the cogs in the lower right corner, and place the LUNCH BOX in the cogs.
Look at the cupboard door behind the counter - there’s someone in there, but she won’t come out until she knows it’s safe. Look at the Timetable on the wall next to the cupboard door. Look at the giant wheels next to the Timetable. Look at the cable suspension above you.
Walk over to the Control Console on the left. Try to use the Control Console, but it’s not powered up. Use the lever in the Control Console. The cobs in the lower right corner turn, crushing the LUNCH BOX open. Walk over to the cogs, and pick up the LUNCH BOX. You find the 2-way RADIO that was locked in the LUNCH BOX. Watch the cut scene, as you can now communicate with Duane and Pearl in the cable car. They want to speak to Kat - that must be the woman who’s hiding in the cupboard behind the counter. Knock on the cupboard door and talk to Kat, but she still won’t come out. Use the RADIO with the cupboard door, and enjoy the cut scene, complete with musical number!
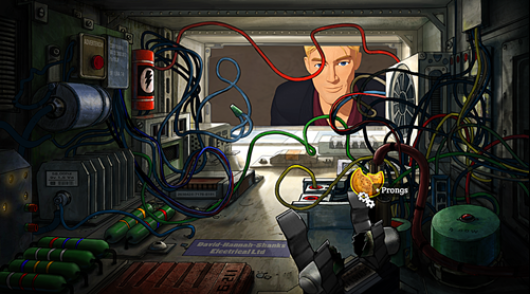
Now that Kat is no longer hiding, she tells you how to repair the Control Console. The problem is… reaching the damaged prongs, which are right at the back of the console. Walk over to the cogs at the lower right corner. Use PAPERCLIP with the jam on the cogs (courtesy of the crushed lunchbox) to get a STICKY PAPERCLIP.

Walk left a few steps, and look at the hatch on the front of the Control Console, to get a close-up.
Throw a PIECE OF RICH TEA BISCUIT onto the prongs.
Use your MATCHBOX CONTAINING COCKROACH with the biscuit at the bottom of the screen. You place the matchbox down, and the cockroach eats some of the biscuit, before returning to his matchbox. There’s something missing. Use STICKY PAPERCLIP with the cockroach. Again, throw a PIECE OF RICH TEA BISCUIT (it’s amazing how well this biscuit has lasted) onto the prongs. Watch the cut scene, as the cockroach scutters towards the biscuit, and unknowingly jams the PAPERCLIP in place, thus repairing the Control Console. Watch the cut scene, as you and Nico use the other cable car to reach Santa Cova Chapel.
~~~~~~~~~~~~~~~~~~~~~~~~~~~~~~~~~~~~~~
MONTSERRAT - SANTA COVA CHAPEL (NICO)
~~~~~~~~~~~~~~~~~~~~~~~~~~~~~~~~~~~~~~
CHAPEL EXTERIOR
You’re playing as Nico. Open the Chapel door, and enter the Chapel.
~~~~~~~~~~~~~~~~~~~~~~~~~~~~~~~~~~~~~~
MONTSERRAT - SANTA COVA CHAPEL (GEORGE)
~~~~~~~~~~~~~~~~~~~~~~~~~~~~~~~~~~~~~~
CHAPEL HALL
You’re George again. Watch the cut scene with Duane and Pearl. Explore the Chapel Hall. Look at the crank handle on the pillar near you. Look at the stone carving on the wall. Look at the Wall Of Rock on the left. Walk left a few steps, and look at the Black Madonna on the wall. Look at the recess in the wall next to the Black Madonna. Look at the Altar on the left. Look at the builder’s mug on top of the Altar. Look at the candelabra hanging from the ceiling.
Walk right a few steps, and look at the WOOD SHAVINGS on the floor next to Nico, and pick up some WOOD SHAVINGS. In your Inventory, mix the WOOD SHAVINGS with the FLOWERS to make POT POURRI, then mix POT POURRI with the EU DE TOILETTE to get SUPER POT POURRI. Look at the scaffolding on the right. Tap the oil drum to the left of the scaffolding. Tap the paint tins hanging on the scaffolding to hear a dull sound. Take the BOTTLE OF TURPENTINE from the bottom shelf of the scaffolding. Touch the fire extinguisher. Touch the industrial grater above the fire extinguisher. Touch the traffic cone. Open the toolbox on the floor, then take the MASON’S HAMMER from the toolbox.
Talk to Duane and work through all the conversation topics. Notice that he whistles a tune every so often. Talk to Duane again and work through all the conversation topics again. Pearl is also here, but she’s extremely upset because her holiday is turning out to be a disaster. She needs some cheering up.
Go back to the paint tins hanging on the scaffolding. Pour the BOTTLE OF TURPENTINE into one of the paint tins - for easiness, we’ll use the left \ top paint tin. Now use the MASON’S HAMMER to hit the following objects, in this order.
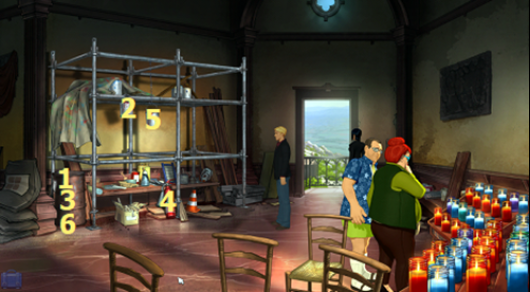
1. Oil drum
2. Left \ top paint tin
3. Oil drum
4. Fire extinguisher
5. Lower \ right paint tin
6. Oil drum
That’s the tune that Duane was whistling - Ava Maria. Watch the cut scene, as Nico takes her turn to bash out the tune. Walk left a few steps, to the Altar. Place the SUPER POTPOURRI into the builder’s mug on top of the Altar. Use your SAFETY MATCHES with the builder’s mug to light the SUPER POTPOURRI. Turn the crank handle on the pillar, near the door, to lower the candelabra. Use your SAFETY MATCHES with the candelabra to light the candles. Place the SIDE MIRROR with the candelabra. Use YARN on the candelabra & side mirror, to tie the mirror in place. Turn the crank handle again to raise the candelabra. The light reflects onto the Black Madonna. Watch the cut scene with Pearl - she’s really cheered up now.
Talk to Pearl and work through all the conversation topics with her. She’s a mine of information! It’s becoming more apparent that you need to find the Ouroboros. Duane gives his radio to Nico, before him and Pearl leave, so you each have a radio now. Talk to Nico and work through all the conversation topics.
Walk right a few steps, to where Pearl and Duane were standing. Take a CANDLE from the display. Walk left, to the Altar. Use MASON’S HAMMER with the Altar to smash a hole in it. Voila! You found the Ouroboros. Try to push the Ouroboros, but nothing happens. Place CANDLE in the recess in the wall next to the Black Madonna, then use SAFETY MATCHES with the recess to light the CANDLE. Look at the recess next to the Black Madonna again. Now push the Ouroborus in the Altar again. A secret passage is revealed. You and Nico head through the secret passage.
~~~~~~~~~~~~~~~~~~~~~~~~~~~~~~~~~~~~~~
MONTSERRAT - SANTA COVA CAVE (GEORGE)
~~~~~~~~~~~~~~~~~~~~~~~~~~~~~~~~~~~~~~
CAVE
Watch the cut scene, as you and Nico become trapped in a very dark cave. The stone door on the left, seals you in. Look at the following things in the darkness, on the right.
- Bottomless Pit
- Squidgy Hole
- Hard Thing
- Fuzzy Round Thing
- Unidentified Thing
- Big Thing
- Smooth Stone
- Stone Object
- Tall Thing
- Figment Of The Imagination
- Imaginary Malicious Denizen
- Wall


Now use MASON’S HAMMER with the following things.
- Figment Of The Imagination
- Imaginary Malicious Denizen
Look again at the Stone Object on the right. Use your last MATCH with the Stone Object. The Stone Object turns out to be a lamp full of oil, and now the whole cave is lit up. Watch the cut scene, as you realise that this is a Gnostic Shrine. Look at Gehnen’s corpse slumped over the table on the right, to see a close-up.
Look at the corpse. Gehnen knew he was trapped in this cave, so he had chosen suicide. Look at the hat. Pick up the PISTOL
Take GEHNEN’S MAP that Gehnen is leaning on - Gehnen wrote his last testament on this MAP. Hmm, it looks like there might be a secret message left, hidden in the testament. Exit the close-up of GEHNEN’S MAP.
Take GEHNEN’S PHOTOGRAPH, lying next to Gehnen’s hand. There are symbols on the back of GEHNEN’S PHOTOGRAPH, which Gehnen has translated. Look at each of the symbols. Exit the close-up of GEHNEN’S PHOTOGRAPH.
Take the ARTEFACT on the desk. This is it - this is TABULA VERITATIS. It looks so small and innocent. So what is it’s true purpose? Exit the close-up of the TABULA VERITATIS.
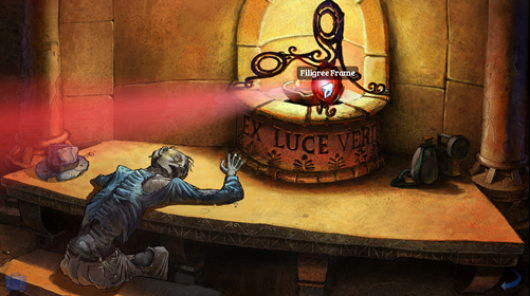
Look at the lamp, and use GEHNEN’S MAP with the lamp - the writing changes, leaving a clue behind. Look at each of the letters on the MAP - a, b, c, d, e. Exit the close-up of the MAP.
Look at the inscription below the lamp. Look at the filigree frame in the lamp, and insert the MEDALLION into the bottom right part of the filigree frame. It fits snugly into the frame, illuminating the green carved figure on the wall opposite.
Look at the green carved figure on the wall. Look at the TABULA VERITATIS in your Inventory, then exit the close-up. In your Inventory, combine the TABULA VERITATIS with GEHNEN’S PHOTOGRAPH. You have to decode the Glyphs on the Tabula, which is shown at the top. Just click on a Glyph, then click on the corresponding word on the right. You have all the information you need, now. Decode the Glyphs like this.

- Begin Sun City Travel Five Day East River
- Travel South Six Day Desert Source Four River
Watch the cut scene, as you transfer the decoded directions onto GEHNEN’S MAP, and show your findings to Nico. Nico, in turn, shows you a Secret Button in the wall that she found. Unfortunately, it doesn’t seem to do anything. There must be something that you’re overlooking, so you explore the cave some more.
Look at the blue carved figure in the wall. Look at the pillar on the wall. Look at the plinth \ statue on the platform - this must be Mary Magdalene. Interact with the statue 3 times, so you turn it round 3 times, so it’s facing left. Push the Secret Button in the wall again - this time, you hear a rumble.
Look at the table again. Look at the canteen on the right of the table. Look at the torch on the right of the table. Look at the lamp on the table again. Remove the MEDALLION from the bottom right part of the filigree frame, and place it into the top right part of the filigree frame.

Exit the close-up of the table. The blue carved figure on the wall opposite is now illuminated. Interact with Mary’s statue 2 times, so it is facing right. Push the Secret Button in the wall - you hear another rumble.
Again, look at the lamp on the table. Remove the MEDALLION from the top right part of the filigree frame, and place it into the left part of the filigree frame.

Exit the close-up of the table. The light is now shining on the carved relief at the bottom of the wall. Look at the carved relief. Interact with Mary’s statue 3 times, so it is facing forward. Push the Secret Button in the wall, one last time. Success! The door slides open!
Look at the lamp on the table again. Retrieve the MEDALLION from the filigree frame, then exit the close-up of the table. Head through the Exit on the left, so you‘re back in the Chapel.
~~~~~~~~~~~~~~~~~~~~~~~~~~~~~~~~~~~~~~
MONTSERRAT - SANTA COVA CHAPEL (GEORGE)
~~~~~~~~~~~~~~~~~~~~~~~~~~~~~~~~~~~~~~
CHAPEL HALL
Watch the cut scene. Langham and his goon is holding Marques and Eva at gunpoint. Luckily, they haven’t spotted you yet. Use REVOLVER with Langham. Watch the cut scene, as Langham calls your bluff, and takes the REVOLVER from you. When prompted, choose the following options.
- Lies
- Truth
Even if you choose different options, the outcome will be the same - Langham shoots Marques, then kidnaps Eva. Poor Marques dies, while telling you about Eden. You HAVE to get out of here, and find your way to Eden, so you can stop Langham and rescue Eva. You can’t go out the front door, because Langham’s goon is still there. Walk right a few steps, and head out onto the balcony.
BALCONY
Climb onto the drainpipe, then climb down. Look at the drain at the bottom of the drainpipe. Use your RADIO with the drain, to communicate with Nico and tell her your plan. When the goon is outside the door at the bottom of the stairs, throw MASON’S HAMMER at him to knock him out. Climb back onto the balcony, then go through the door, into the Chapel hall.
CHAPEL HALL
Click on Nico, then watch the cut scene as you both make your escape.
~~~~~~~~~~~~~~~~~~~~~~~~~~~~~~~~~~~~~~
MONTSERRAT - CABLE CAR (GEORGE)
~~~~~~~~~~~~~~~~~~~~~~~~~~~~~~~~~~~~~~
CABLE CAR EXTERIOR
You and Nico are hanging onto the side of a cable car, after having escaped from the Chapel. Look at the window of the cable car - the catch is on the inside, so you can’t open it. Edge over to the door - you can’t quite reach the handle. Use your YARN with the door, to pull it open. Now interact with the door to swing across and climb into the cable car.
CABLE CAR INTERIOR
Well, you’re safe inside the cable car now, but what about Nico? She’s still outside. And she’s banging on the window! Try to use the window catch, below Nico, to open the window… but it’s stuck. Suddenly, someone starts shooting at you. Watch the cut scene, as Medovsky catches up with you, wanting his painting.
~~~~~~~~~~~~~~~~~~~~~~~~~~~~~~~~~~~~~~
MONTSERRAT - CABLE CAR (NICO)
~~~~~~~~~~~~~~~~~~~~~~~~~~~~~~~~~~~~~~
CABLE CAR EXTERIOR
You’re playing as Nico again, and you’re hanging on for dear life, after Medovsky shot at the cable car. Talk to Shears in the cable car on the right, and work through all the conversation topics. He has an epiphany, and decides that he wants to be a good guy. So he shoots Medovsky, and helps you and George. Watch several cut scenes, including George’s bizarre dream. Eventually, you arrive at the Garden Of Eden.
~~~~~~~~~~~~~~~~~~~~~~~~~~~~~~~~~~~~~~
DESERT - GARDEN OF EDEN (GEORGE)
~~~~~~~~~~~~~~~~~~~~~~~~~~~~~~~~~~~~~~
EDEN APPROACH
You finally arrive in Eden. This is where Langham was heading, and this is where you must stop him from raising Lucifer. Walk left, towards the goat. Oh dear, your fear of goats strikes again. Nico, on the other hand, is quite taken with the goat. Try to pet the goat. Nope… you just can’t bring yourself to do it. Look at the fig tree near the goat, and note that one branch is full of nice, juicy FIGS… just out of the goat’s reach. Take HANDFUL OF FIGS from the branch above the goat. Give some FIGS to the goat, if you like.
Continue left, past the giant stone head, until you see Langham’s thugs… but no Langham! Watch the cut scene. You need some kind of a distraction, if you want to get past those thugs.
Look at the giant stone head. Walk back right a few steps, then continue up the path, towards the truck. Look at the back of truck, and take the KNAPSACK from the back of truck. Try to open the driver’s door of the truck, but it’s locked.
Walk down a few steps, then take the path on the left, back to where Shears is. Give KNAPSACK to Shears - you get a close-up of the KNAPSACK. Take DYNAMITE STICKS, TNT, DUCT TAPE, FUSE WIRE, DYNAMITE (which turns out to be a SAUSAGE), and PETROL LIGHTER from the KNAPSACK. Exit the close-up of the KNAPSACK.
Walk right a few steps, and return to the goat. In your Inventory, combine FUSE WIRE with the DYNAMITE to get PRIMED DYNAMITE. Also, in your Inventory, combine FUSE WIRE with SAUSAGE to get PRIMED SAUSAGE. Attach PRIMED SAUSAGE to the goat, then use LIGHTER with the goat. Now you just have to lure the goat closer to the goons - from a distance, they will think that the sausage is actually dynamite.
Walk left, along the path, past the stone head, back to where Shears is. Throw HANDFUL OF FIGS at Langham’s Henchmen on the left. Throw HANDFUL OF FIGS at bottom of path.

Throw HANDFUL OF FIGS at the top of the path.

Watch the cut scene. Your little ploy worked - the thugs think that dynamite is tied to the goat, so they flee for their lives. Try to go through the dark hole in the wall, in between the giant Shedu statues, but it‘s too dark to see anything in that cave. Use your LIGHTER with the dark hole in the wall. Watch the cut scene, as Nico takes the explosives from you. Again, use LIGHTER with the dark hole in the wall. You and Nico enter the cave, but Shears is too afraid, so he remains outside.
CAVE
Watch the cut scene. You MUST stop Langham, before it’s too late. Look at the dead bush next to Nico.

Use your LIGHTER with the dead bush to set it alight. Use EAU DE TOILETTE with the dead bush to enhance the flames. Look at the collapsed bridge leading into the river. Use the ladder above the collapsed bridge, to cross over the gap in the rocks, and reach Langham. Work through all the conversation topics with Langham. Watch the cut scene, as Langham pushes you into the river.
~~~~~~~~~~~~~~~~~~~~~~~~~~~~~~~~~~~~~~
DESERT - GARDEN OF EDEN (NICO)
~~~~~~~~~~~~~~~~~~~~~~~~~~~~~~~~~~~~~~
CAVE
It’s all up to you now, Nico. You MUST save George, and stop Langham from raising Lucifer! Look at the dead bush. Use the ladder to cross over the gap in the rocks. Use PRIMED DYNAMITE with the large crack in the back wall.
Now sit back, and enjoy the final intense cut scenes. You did it Nico! Langham is dead, and the world is safe once more!
Contributed by
Freaky Hobbit


")
